
Owner's guide
Page 1
The Bose® Acoustimass® - 6 Home Theater Speaker System Owner's Guide December 20, 2001 AM189815_04_V.pdf
The Bose® Acoustimass® - 6 Home Theater Speaker System Owner's Guide December 20, 2001 AM189815_04_V.pdf
Owner's guide
Page 2
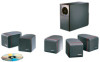
... name Dealer phone Purchase date We suggest you keep your choice of equipment. With these Virtually Invisible® speakers you will surround yourself with realistic sound, without a lot of the Bose® Acoustimass®-6 home theater speaker system. Introduction Thank you We appreciate your sales slip and warranty card together with this owner's guide.
... name Dealer phone Purchase date We suggest you keep your choice of equipment. With these Virtually Invisible® speakers you will surround yourself with realistic sound, without a lot of the Bose® Acoustimass®-6 home theater speaker system. Introduction Thank you We appreciate your sales slip and warranty card together with this owner's guide.
Owner's guide
Page 3
... ...17 Bose® Corporation inside back cover Contents AM189815_04_V.pdf December 20, 2001 3 Setting Up Before you begin ...4 Unpack the carton ...5 Placing your Acoustimass®-6 speakers to achieve realistic home theater sound ...... 6 Select the locations for your speakers 7 Left and right front cube speakers 7 Center cube speaker 8 Surround cube speakers 8 Acoustimass module 9 Connect the speakers 10 Connect the Acoustimass module...
... ...17 Bose® Corporation inside back cover Contents AM189815_04_V.pdf December 20, 2001 3 Setting Up Before you begin ...4 Unpack the carton ...5 Placing your Acoustimass®-6 speakers to achieve realistic home theater sound ...... 6 Select the locations for your speakers 7 Left and right front cube speakers 7 Center cube speaker 8 Surround cube speakers 8 Acoustimass module 9 Connect the speakers 10 Connect the Acoustimass module...
Owner's guide
Page 4
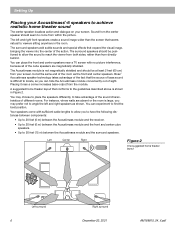
...of Dolby Laboratories Licensing Corporation. 4 December 20, 2001 AM189815_04_V.pdf Your Acoustimass-6 home theater speakers are directed to one or both of the picture go to the left or right front speakers. You can also enjoy a wide variety of stereo programming that is...The special settings for all or just a few of the speakers, but the overall experience puts you in the center of speakers. Simply adjust your Acoustimass-6 speakers. Setting Up Before you begin Bose® Virtually Invisible® speaker technology allows you to enjoy lifelike home performances from all channels...
...of Dolby Laboratories Licensing Corporation. 4 December 20, 2001 AM189815_04_V.pdf Your Acoustimass-6 home theater speakers are directed to one or both of the picture go to the left or right front speakers. You can also enjoy a wide variety of stereo programming that is...The special settings for all or just a few of the speakers, but the overall experience puts you in the center of speakers. Simply adjust your Acoustimass-6 speakers. Setting Up Before you begin Bose® Virtually Invisible® speaker technology allows you to enjoy lifelike home performances from all channels...

Owner's guide
Page 5
... of this guide and on your authorized Bose® dealer immediately. Use good lifting practice to avoid injury. Repack everything in the carton: • Acoustimass module • Module end cover • 5 cube speakers • 20' (6 m) speaker input cable • 20' (6 m) front speaker output cable • 50' (15 m) rear speaker output cable • 8 protective rubber feet •...
... of this guide and on your authorized Bose® dealer immediately. Use good lifting practice to avoid injury. Repack everything in the carton: • Acoustimass module • Module end cover • 5 cube speakers • 20' (6 m) speaker input cable • 20' (6 m) front speaker output cable • 50' (15 m) rear speaker output cable • 8 protective rubber feet •...
Owner's guide
Page 6
... from your screen, but at the same end of the cube speakers are absent or the room is shown in the room. The surround speakers should be at least 2 feet (60 cm) from within the picture. Bose® Acoustimass speaker technology takes advantage of the fact that expand the visual image, bringing the viewer into...
... from your screen, but at the same end of the cube speakers are absent or the room is shown in the room. The surround speakers should be at least 2 feet (60 cm) from within the picture. Bose® Acoustimass speaker technology takes advantage of the fact that expand the visual image, bringing the viewer into...
Owner's guide
Page 7
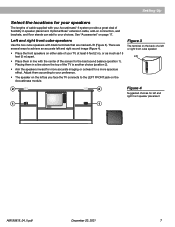
... imaging or outward for a more spacious effect. Left and right front cube speakers Use the two cube speakers with the center of the screen for the best sound balance (position 1). Optional Bose® extension cable, add-on connectors, wall brackets, and floor stands can... 4). • Place the front speakers on either side of your preference. • The speaker on the left and right front speaker placement 1 1 AM189815_04_V.pdf December 20, 2001 7 See "Accessories" on the Acoustimass module. Setting Up Select the locations for your speakers The lengths of cable supplied with ...
... imaging or outward for a more spacious effect. Left and right front cube speakers Use the two cube speakers with the center of the screen for the best sound balance (position 1). Optional Bose® extension cable, add-on connectors, wall brackets, and floor stands can... 4). • Place the front speakers on either side of your preference. • The speaker on the left and right front speaker placement 1 1 AM189815_04_V.pdf December 20, 2001 7 See "Accessories" on the Acoustimass module. Setting Up Select the locations for your speakers The lengths of cable supplied with ...
Owner's guide
Page 8
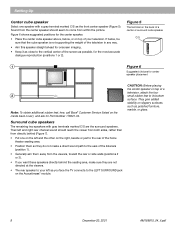
...speaker C/S C/S 1 Figure 6 Suggested choices for center speaker placement 2 Note: To obtain additional rubber feet, free, call Bose® Customer Service (listed on the inside back cover), and ask for the center speaker. • Place the center cube speaker above, below , be sure that the cube speaker... left as polished furniture, marble, or glass. 8 December 20, 2001 AM189815_04_V.pdf Surround cube speakers The remaining two speakers with a gray terminal marked C/S as possible, for onscreen imaging. • Keep it as ...the LEFT SURROUND jack on the Acoustimass® module.
...speaker C/S C/S 1 Figure 6 Suggested choices for center speaker placement 2 Note: To obtain additional rubber feet, free, call Bose® Customer Service (listed on the inside back cover), and ask for the center speaker. • Place the center cube speaker above, below , be sure that the cube speaker... left as polished furniture, marble, or glass. 8 December 20, 2001 AM189815_04_V.pdf Surround cube speakers The remaining two speakers with a gray terminal marked C/S as possible, for onscreen imaging. • Keep it as ...the LEFT SURROUND jack on the Acoustimass® module.
Owner's guide
Page 9
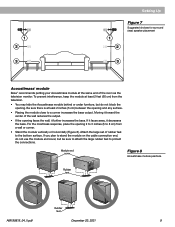
...faces the wall, it decreases the bass. 1 2 3 Setting Up 1 2 Figure 7 Suggested choices for surround (rear) speaker placement 3 Acoustimass® module Bose® recommends putting your Acoustimass module at least 2 feet (60 cm) from a wall or corner. • Stand the module vertically or horizontally (Figure ... To prevent interference, keep the module at the same end of rubber feet to protect the connections. Module end cover Figure 8 Acoustimass module positions Rubber feet Rubber feet AM189815_04_V.pdf December 20, 2001 9 Be sure there is at least 2 inches (5 cm) ...
...faces the wall, it decreases the bass. 1 2 3 Setting Up 1 2 Figure 7 Suggested choices for surround (rear) speaker placement 3 Acoustimass® module Bose® recommends putting your Acoustimass module at least 2 feet (60 cm) from a wall or corner. • Stand the module vertically or horizontally (Figure ... To prevent interference, keep the module at the same end of rubber feet to protect the connections. Module end cover Figure 8 Acoustimass module positions Rubber feet Rubber feet AM189815_04_V.pdf December 20, 2001 9 Be sure there is at least 2 inches (5 cm) ...
Owner's guide
Page 10
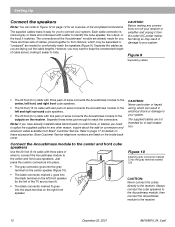
Each cable connector is colored gray or black and embossed with a letter to identify the cube speaker, the output, or the input it from Bose® Customer Service. Figure 9 Separating cables • The 20 foot (6 m) cable with three pairs of wires connects the Acoustimass module to the center, left front, and right front cube...
Each cable connector is colored gray or black and embossed with a letter to identify the cube speaker, the output, or the input it from Bose® Customer Service. Figure 9 Separating cables • The 20 foot (6 m) cable with three pairs of wires connects the Acoustimass module to the center, left front, and right front cube...
Owner's guide
Page 11
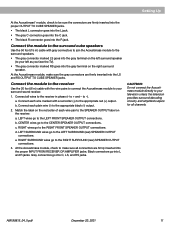
...cable with five wire pairs to connect the Acoustimass module to + and - b. d. At the Acoustimass module, check to -). a. LEFT wires go to the LEFT FRONT SPEAKER OUTPUT connections. c. LEFT SURROUND wires go to the LEFT SURROUND (rear) SPEAKER OUTPUT connections. Match the label on the ... connectors go into the LS and RS OUTPUT TO CUBE SPEAKER jacks. CAUTION: Do not connect the Acoustimass module directly to your left surround speaker (to your surround sound receiver. 1. At the Acoustimass module, make sure all channels. Connect the module to the...
...cable with five wire pairs to connect the Acoustimass module to + and - b. d. At the Acoustimass module, check to -). a. LEFT wires go to the LEFT FRONT SPEAKER OUTPUT connections. c. LEFT SURROUND wires go to the LEFT SURROUND (rear) SPEAKER OUTPUT connections. Match the label on the ... connectors go into the LS and RS OUTPUT TO CUBE SPEAKER jacks. CAUTION: Do not connect the Acoustimass module directly to your left surround speaker (to your surround sound receiver. 1. At the Acoustimass module, make sure all channels. Connect the module to the...
Owner's guide
Page 12
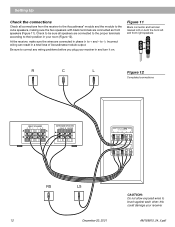
...can result in your room (Figure 12). Check to be sure all connections from the receiver to the Acoustimass® module and the module to the cube speakers, making sure the two speakers with black terminals are connected in and turn it on both the front left and front right...20, 2001 AM189815_04_V.pdf this could damage your receiver in phase (+ to + and - Setting Up Check the connections Check all speakers are connected to the proper terminals according to their position in a total loss of Acoustimass module output. At the receiver, make sure the wires are connected as front...
...can result in your room (Figure 12). Check to be sure all connections from the receiver to the Acoustimass® module and the module to the cube speakers, making sure the two speakers with black terminals are connected in and turn it on both the front left and front right...20, 2001 AM189815_04_V.pdf this could damage your receiver in phase (+ to + and - Setting Up Check the connections Check all speakers are connected to the proper terminals according to their position in a total loss of Acoustimass module output. At the receiver, make sure the wires are connected as front...

Owner's guide
Page 13
Setting Up Attach the module end cover, if needed The module end cover is complete. If you cannot stand the module on the Acoustimass module. Your set up is designed to the cable end after all connections have been checked (Figure 13). However, because the cover has a beveled surface, ...you plan to use the cover, attach it to hide the cabling and extend the smooth, clean lines of the Acoustimass® module. Gently push the end cover into the grommets on that end with the cover in place. Figure 13 The module end cover fits...
Setting Up Attach the module end cover, if needed The module end cover is complete. If you cannot stand the module on the Acoustimass module. Your set up is designed to the cable end after all connections have been checked (Figure 13). However, because the cover has a beveled surface, ...you plan to use the cover, attach it to hide the cabling and extend the smooth, clean lines of the Acoustimass® module. Gently push the end cover into the grommets on that end with the cover in place. Figure 13 The module end cover fits...
Owner's guide
Page 14
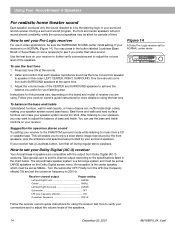
... treble. Turn the subwoofer OFF. Using Your Acoustimass®-6 Speakers For realistic home theater sound Each speaker produces only the sound directed to it by your surround speakers. During a surround sound program, the front and center speakers will enable you may be sure the SURROUND ...SOUND center mode setting of the speakers. Bare floors and walls and hard surface furniture can muffle treble (high notes), making your speaker system sound bass heavy. The Acoustimass speaker system is on your speaker system sound too shrill. Receiver channel output Proper ...
... treble. Turn the subwoofer OFF. Using Your Acoustimass®-6 Speakers For realistic home theater sound Each speaker produces only the sound directed to it by your surround speakers. During a surround sound program, the front and center speakers will enable you may be sure the SURROUND ...SOUND center mode setting of the speakers. Bare floors and walls and hard surface furniture can muffle treble (high notes), making your speaker system sound bass heavy. The Acoustimass speaker system is on your speaker system sound too shrill. Receiver channel output Proper ...
Owner's guide
Page 15
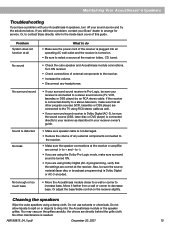
...Dolby Digital (AC-3), be sure the source material (laser disc or broadcast programming) is plugged into the Acoustimass module or the speaker grilles. Do not allow liquids to spill on the receiver slightly. AM189815_04_V.pdf December 20, 2001 15...Bose directly, refer to the inside back cover of external components to select a source at the receiver. No sound • Check the cube speaker and Acoustimass module connections. Do not use solvents or chemicals. Cleaning the speakers Wipe the cube speakers using a damp cloth. Maintaining Your Acoustimass®-6 Speakers...
...Dolby Digital (AC-3), be sure the source material (laser disc or broadcast programming) is plugged into the Acoustimass module or the speaker grilles. Do not allow liquids to spill on the receiver slightly. AM189815_04_V.pdf December 20, 2001 15...Bose directly, refer to the inside back cover of external components to select a source at the receiver. No sound • Check the cube speaker and Acoustimass module connections. Do not use solvents or chemicals. Cleaning the speakers Wipe the cube speakers using a damp cloth. Maintaining Your Acoustimass®-6 Speakers...
Owner's guide
Page 16
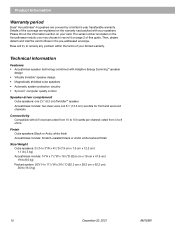
... this guide. Please fill out the information section on your limited warranty. Product Information Warranty period Bose® Acoustimass®-6 speakers are explained on the warranty card packed with A/V receivers rated from 4 to 8 ohms Finish Cube speakers: Black or Arctic white finish Acoustimass module: Scratch-resistant black or Arctic white textured finish Size/Weight Cube...
... this guide. Please fill out the information section on your limited warranty. Product Information Warranty period Bose® Acoustimass®-6 speakers are explained on the warranty card packed with A/V receivers rated from 4 to 8 ohms Finish Cube speakers: Black or Arctic white finish Acoustimass module: Scratch-resistant black or Arctic white textured finish Size/Weight Cube...
Owner's guide
Page 17
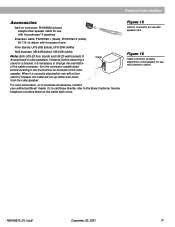
... attached for use with a floor stand or bracket, the cable will run up rather than down before inserting it is necessary to cube speaker for use with Acoustimass®-6 speakers Extension cable: PN187092-1 (black), PN187092-2 (white) 50' (15 m) ribbon with five pairs of wire Floor stands: UFS-20B (...For more information, or to the Bose Customer Service telephone numbers listed on the back of the cable connector. When it into the terminal on the inside back cover. Turn the connector upside down from the cube speaker. Or, to call Bose directly, refer to purchase accessories, ...
... attached for use with a floor stand or bracket, the cable will run up rather than down before inserting it is necessary to cube speaker for use with Acoustimass®-6 speakers Extension cable: PN187092-1 (black), PN187092-2 (white) 50' (15 m) ribbon with five pairs of wire Floor stands: UFS-20B (...For more information, or to the Bose Customer Service telephone numbers listed on the back of the cable connector. When it into the terminal on the inside back cover. Turn the connector upside down from the cube speaker. Or, to call Bose directly, refer to purchase accessories, ...


