Owner's guide
Page 7
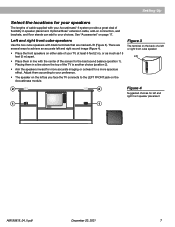
Optional Bose® extension cable, add-on connectors, wall brackets, and ...; The speaker on the left and right sound image (Figure 4). • Place the front speakers on the Acoustimass module. See "Accessories" on the back of flexibility in speaker placement. Placing them in a line above the top... There are marked L/R (Figure 3). Setting Up Select the locations for your speakers The lengths of cable supplied with your Acoustimass®-6 system provide a great deal of a left or right front cube speaker L/R L/R 2 2 Figure 4 Suggested choices for left and right front speaker...
Optional Bose® extension cable, add-on connectors, wall brackets, and ...; The speaker on the left and right sound image (Figure 4). • Place the front speakers on the Acoustimass module. See "Accessories" on the back of flexibility in speaker placement. Placing them in a line above the top... There are marked L/R (Figure 3). Setting Up Select the locations for your speakers The lengths of cable supplied with your Acoustimass®-6 system provide a great deal of a left or right front cube speaker L/R L/R 2 2 Figure 4 Suggested choices for left and right front speaker...