Owner's guide
Page 2
... properly, and enjoy all of its advanced features. No part of this owner's guide. ©2002 Bose Corporation. All rights reserved. 2 AM264924_00 _V.pdf • August 13, 2002 REFER SERVICING TO QUALIFIED ... DOIT ÊTRE RÉALISÉE PAR UN PERSONNEL QUALIFIÉ. It will help you set up and operate your records The system serial number is intended to alert the user to follow...and warranty card together with this work may be placed on the bottom of the Acoustimass module. Manufactured under license from Dolby Laboratories. Please read this owner's guide Please take...
... properly, and enjoy all of its advanced features. No part of this owner's guide. ©2002 Bose Corporation. All rights reserved. 2 AM264924_00 _V.pdf • August 13, 2002 REFER SERVICING TO QUALIFIED ... DOIT ÊTRE RÉALISÉE PAR UN PERSONNEL QUALIFIÉ. It will help you set up and operate your records The system serial number is intended to alert the user to follow...and warranty card together with this work may be placed on the bottom of the Acoustimass module. Manufactured under license from Dolby Laboratories. Please read this owner's guide Please take...

Owner's guide
Page 3
...12 Connecting the Acoustimass module to power 12 Upgrading your Acoustimass 15 Series II speaker system 12 Using your system 13 For realistic home theater sound 13 Adjusting the LFE level 13 Adjusting the bass/room compensation level 13 Setting your analog ...surround sound receiver 14 Reference 15 Troubleshooting 15 Customer service 15 Cleaning the speakers 16 Technical information 16...
...12 Connecting the Acoustimass module to power 12 Upgrading your Acoustimass 15 Series II speaker system 12 Using your system 13 For realistic home theater sound 13 Adjusting the LFE level 13 Adjusting the bass/room compensation level 13 Setting your analog ...surround sound receiver 14 Reference 15 Troubleshooting 15 Customer service 15 Cleaning the speakers 16 Technical information 16...
Owner's guide
Page 4
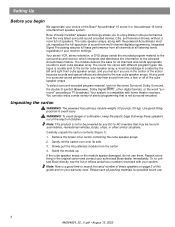
...contact your choice of this guide and on page 2 of the Bose® Acoustimass® 15 series II or Acoustimass 16 home entertainment speaker system. Carefully unpack the carton contents (Figure 1): 1. Or, to contact Bose directly, see the list of of the action because sounds and ... speakers on your warranty card. Use good lifting practice to the powered Acoustimass module. At any DC-to the center cube speaker array, a visual soundstage is compatible with your receiver settings. Bose Virtually Invisible® speaker technology allows you may be powered by the ...
...contact your choice of this guide and on page 2 of the Bose® Acoustimass® 15 series II or Acoustimass 16 home entertainment speaker system. Carefully unpack the carton contents (Figure 1): 1. Or, to contact Bose directly, see the list of of the action because sounds and ... speakers on your warranty card. Use good lifting practice to the powered Acoustimass module. At any DC-to the center cube speaker array, a visual soundstage is compatible with your receiver settings. Bose Virtually Invisible® speaker technology allows you may be powered by the ...
Owner's guide
Page 5
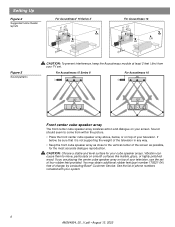
...Setting Up 20-ft (6.1m) system input cable Powered Acoustimass® module Three 20-ft (6.1m) front speaker cables Rubber feet for any channel. • All cube speaker arrays are some suggested home theater layout is shown in Figure 2. Proper mounting will ensure optimum performance and safety from your Acoustimass...may be used for front center cube speaker array With Acoustimass 15 Series II system With Acoustimass 16 system Five cube speaker arrays Six cube speaker arrays Two... (Figure 3). • Bose® wall brackets and floor stands can be upgraded by adding ...
...Setting Up 20-ft (6.1m) system input cable Powered Acoustimass® module Three 20-ft (6.1m) front speaker cables Rubber feet for any channel. • All cube speaker arrays are some suggested home theater layout is shown in Figure 2. Proper mounting will ensure optimum performance and safety from your Acoustimass...may be used for front center cube speaker array With Acoustimass 15 Series II system With Acoustimass 16 system Five cube speaker arrays Six cube speaker arrays Two... (Figure 3). • Bose® wall brackets and floor stands can be upgraded by adding ...
Owner's guide
Page 6
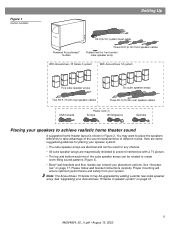
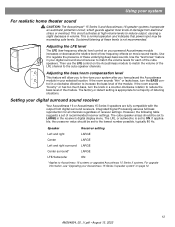
... screen as close to come from your TV set of charge, by contacting Bose® Customer Service. CAUTION: Choose a stable and level surface for the most accurate dialogue reproduction. For Acoustimass 15 Series II For Acoustimass 16 Front center cube speaker array The front center ...list of your television. Vibration can cause them to move, particularly on your screen. Setting Up Figure 2 Suggested home theater layouts For Acoustimass® 15 Series II (26'--51m5)' CR RR L LR (0.26'm+ +) For Acoustimass 16 (62'--51m5)' CR L LR RR CR (0.26'm+ +) Figure 3 Sound patterns ...
... screen as close to come from your TV set of charge, by contacting Bose® Customer Service. CAUTION: Choose a stable and level surface for the most accurate dialogue reproduction. For Acoustimass 15 Series II For Acoustimass 16 Front center cube speaker array The front center ...list of your television. Vibration can cause them to move, particularly on your screen. Setting Up Figure 2 Suggested home theater layouts For Acoustimass® 15 Series II (26'--51m5)' CR RR L LR (0.26'm+ +) For Acoustimass 16 (62'--51m5)' CR L LR RR CR (0.26'm+ +) Figure 3 Sound patterns ...
Owner's guide
Page 7
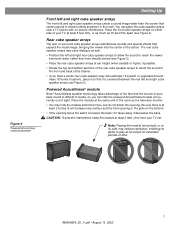
...the front and back of the listener. • If you have a center rear cube speaker array (Acoustimass 16 system or upgraded Acoustimass 15 Series II system), place it increases the bass; Place the module at least 6 feet (2m),...any surface and the front opening or the grille on either side of your TV set. Figure 4 Powered Acoustimass module placement Setting Up Front left and right cube speaker arrays The front left and right cube speaker... near a TV screen with no picture interference. Powered Acoustimass® module Bose® Acoustimass speaker technology takes advantage of sight.
...the front and back of the listener. • If you have a center rear cube speaker array (Acoustimass 16 system or upgraded Acoustimass 15 Series II system), place it increases the bass; Place the module at least 6 feet (2m),...any surface and the front opening or the grille on either side of your TV set. Figure 4 Powered Acoustimass module placement Setting Up Front left and right cube speaker arrays The front left and right cube speaker... near a TV screen with no picture interference. Powered Acoustimass® module Bose® Acoustimass speaker technology takes advantage of sight.
Owner's guide
Page 8
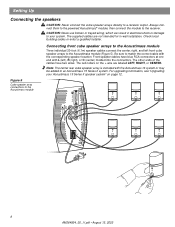
...Output Left Center Right Rear Rear Rear Audio Input Left Center Right Front Front Front Setting Up Connecting the speakers CAUTION: Never connect the cube speaker arrays directly to the receiver. Always connect them to the powered Acoustimass® module, then connect the module to a receiver output. CAUTION: Never use.... The red collars on page 12. The other ends of the cables have blue RCA connectors at one end with the Acoustimass 16 system or may be added to your Acoustimass 15 Series II speaker system" on the + wire are not intended for in electrical shock or damage to an...
...Output Left Center Right Rear Rear Rear Audio Input Left Center Right Front Front Front Setting Up Connecting the speakers CAUTION: Never connect the cube speaker arrays directly to the receiver. Always connect them to the powered Acoustimass® module, then connect the module to a receiver output. CAUTION: Never use.... The red collars on page 12. The other ends of the cables have blue RCA connectors at one end with the Acoustimass 16 system or may be added to your Acoustimass 15 Series II speaker system" on the + wire are not intended for in electrical shock or damage to an...
Owner's guide
Page 9
..., RIGHT FRONT, and LEFT FRONT blue RCA jacks, respectively, on the Acoustimass module. 9 AM264924_00 _V.pdf • August 13, 2002 Note: The Acoustimass 15 Series II system may be upgraded by adding a center rear cube speaker array. Setting Up 1. Connect the wire pair marked RIGHT to the right front cube ... Series II speaker system" on the back of the TV as you have a center rear cube speaker array (Acoustimass 16 system or upgraded Acoustimass 15 Series II system), connect the wire pair marked CENTER REAR to match the correct cable with a 50-foot (15m) speaker cable (Figure 5). ...
..., RIGHT FRONT, and LEFT FRONT blue RCA jacks, respectively, on the Acoustimass module. 9 AM264924_00 _V.pdf • August 13, 2002 Note: The Acoustimass 15 Series II system may be upgraded by adding a center rear cube speaker array. Setting Up 1. Connect the wire pair marked RIGHT to the right front cube ... Series II speaker system" on the back of the TV as you have a center rear cube speaker array (Acoustimass 16 system or upgraded Acoustimass 15 Series II system), connect the wire pair marked CENTER REAR to match the correct cable with a 50-foot (15m) speaker cable (Figure 5). ...
Owner's guide
Page 10
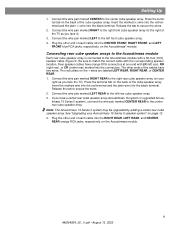
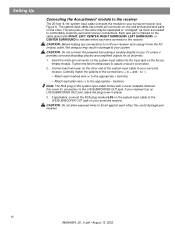
Setting Up Connecting the Acoustimass® module to the receiver The 20-foot (6.1m) system input cable connects the module to ...RIGHT, LEFT, CENTER, RIGHT SURROUND, LEFT SURROUND, or CENTER SURROUND to the LFE/SUBWOOFER OUT jack on the Acoustimass module. If applicable, connect the RCA plug marked LFE on the system input cable to indicate where each wire ...pair on the cable jacket with a cover installed. CAUTION: Do not connect the powered Acoustimass module directly to your TV unless it from the AC (mains) outlet. If your system. The wire pairs ...
Setting Up Connecting the Acoustimass® module to the receiver The 20-foot (6.1m) system input cable connects the module to ...RIGHT, LEFT, CENTER, RIGHT SURROUND, LEFT SURROUND, or CENTER SURROUND to the LFE/SUBWOOFER OUT jack on the Acoustimass module. If applicable, connect the RCA plug marked LFE on the system input cable to indicate where each wire ...pair on the cable jacket with a cover installed. CAUTION: Do not connect the powered Acoustimass module directly to your TV unless it from the AC (mains) outlet. If your system. The wire pairs ...
Owner's guide
Page 11
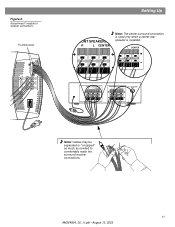
R L CENTER FRONT SPEAKERS A R L CENTER SURROUND SPEAKERS R L CENTER LFE/SUBWOOFER OUT Note: Cables may be separated or "unzipped" as much as needed to receiver connections Thumbscrews Setting Up FRONT SPEAKERS A R L CENTER Note: The center surround connection is used only when a center rear speaker is installed. Audio Output Left Center Right Rear Rear Rear Audio Input Left Center Right Front Front Front Figure 6 Acoustimass® module to comfortably reach the surround receiver connections. 11 AM264924_00 _V.pdf • August 13, 2002
R L CENTER FRONT SPEAKERS A R L CENTER SURROUND SPEAKERS R L CENTER LFE/SUBWOOFER OUT Note: Cables may be separated or "unzipped" as much as needed to receiver connections Thumbscrews Setting Up FRONT SPEAKERS A R L CENTER Note: The center surround connection is used only when a center rear speaker is installed. Audio Output Left Center Right Rear Rear Rear Audio Input Left Center Right Front Front Front Figure 6 Acoustimass® module to comfortably reach the surround receiver connections. 11 AM264924_00 _V.pdf • August 13, 2002
Owner's guide
Page 12
...module to the cube speaker arrays (Figure 5 and Figure 6). See the list of Bose of failures attributed to surges and may be upgraded to provide you plug your local authorized Bose retailer or call Bose directly. The 6.1 upgrade kit contains one black (PC 029661) or white (PC 029662...pdf • August 13, 2002 Upgrading your Acoustimass 15 Series II speaker system Your Acoustimass 15 Series II speaker system can eliminate the vast majority of fices and phone numbers enclosed with 6.1 or 6 channel surround sound. Setting Up Checking the connections Check all cube speaker arrays...
...module to the cube speaker arrays (Figure 5 and Figure 6). See the list of Bose of failures attributed to surges and may be upgraded to provide you plug your local authorized Bose retailer or call Bose directly. The 6.1 upgrade kit contains one black (PC 029661) or white (PC 029662...pdf • August 13, 2002 Upgrading your Acoustimass 15 Series II speaker system Your Acoustimass 15 Series II speaker system can eliminate the vast majority of fices and phone numbers enclosed with 6.1 or 6 channel surround sound. Setting Up Checking the connections Check all cube speaker arrays...
Owner's guide
Page 13
...-frequency effects) level control on your powered Acoustimass module increases or decreases the relative level of these levels is set to Acoustimass 16 systems or upgraded Acoustimass 15 Series II systems. For upgrade information, see "Upgrading your Acoustimass 15 Series II speaker system" on movie...be exceeding safe levels. Use the "test tones" feature in the receiver's digital display menu. Setting your digital surround sound receiver Your Acoustimass 16 or Acoustimass 15 Series II speakers are fully compatible with the output from electrical stress or overload. Integrated ...
...-frequency effects) level control on your powered Acoustimass module increases or decreases the relative level of these levels is set to Acoustimass 16 systems or upgraded Acoustimass 15 Series II systems. For upgrade information, see "Upgrading your Acoustimass 15 Series II speaker system" on movie...be exceeding safe levels. Use the "test tones" feature in the receiver's digital display menu. Setting your digital surround sound receiver Your Acoustimass 16 or Acoustimass 15 Series II speakers are fully compatible with the output from electrical stress or overload. Integrated ...
Owner's guide
Page 14
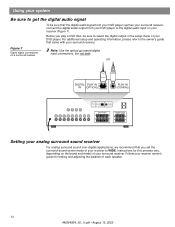
Before you set the surround-sound center mode of your receiver to WIDE. Figure 7 Digital signal connections on the brand and model of your surround receiver. Instructions for ... receiver (Figure 7). OR DIGITAL PLAY IN IN (OPTICAL) PLAY IN (COAXIAL) DIGITAL PLAY IN IN (OPTICAL) PLAY IN (COAXIAL) FRONT SPEAKERS R L SURROUND SPEAKERS R REAR L CENTER Setting your analog surround sound receiver For analog surround sound (non-digital) applications, we recommend that you play a DVD disc, be sure that came with your...
Before you set the surround-sound center mode of your receiver to WIDE. Figure 7 Digital signal connections on the brand and model of your surround receiver. Instructions for ... receiver (Figure 7). OR DIGITAL PLAY IN IN (OPTICAL) PLAY IN (COAXIAL) DIGITAL PLAY IN IN (OPTICAL) PLAY IN (COAXIAL) FRONT SPEAKERS R L SURROUND SPEAKERS R REAR L CENTER Setting your analog surround sound receiver For analog surround sound (non-digital) applications, we recommend that you play a DVD disc, be sure that came with your...
Owner's guide
Page 15
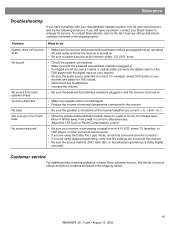
...Fi VCR, stereo TV, laserdisc, or DVD player, or other surround-sound source. • If you are using digital programming, verify that the settings are correct at the receiver. • Be sure the source material (DVD, laser disc, or broadcast programming) is Dolby Digital encoded. Reference ...have a problem with the digital input on your sound source and try the following solutions. To contact Bose directly, refer to the list of service of the DVD player with your Acoustimass® speaker system, turn off your receiver. • Be sure the audio source selected is correct....
...Fi VCR, stereo TV, laserdisc, or DVD player, or other surround-sound source. • If you are using digital programming, verify that the settings are correct at the receiver. • Be sure the source material (DVD, laser disc, or broadcast programming) is Dolby Digital encoded. Reference ...have a problem with the digital input on your sound source and try the following solutions. To contact Bose directly, refer to the list of service of the DVD player with your Acoustimass® speaker system, turn off your receiver. • Be sure the audio source selected is correct....


