
Owner's guide
Page 1
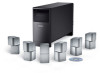
The Bose® Acoustimass® 15 Series II and Acoustimass 16 Home Entertainment Speaker Systems August 13 , 2002 AM264924_00_V.pdf Bose Corporation
The Bose® Acoustimass® 15 Series II and Acoustimass 16 Home Entertainment Speaker Systems August 13 , 2002 AM264924_00_V.pdf Bose Corporation
Owner's guide
Page 2
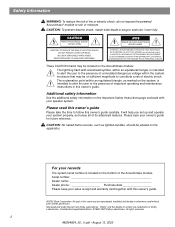
...201;E PAR UN PERSONNEL QUALIFIÉ. Please read this owner's guide Please take the time to follow this owner's guide. ©2002 Bose Corporation. No part of electric shock. Manufactured under license from Dolby Laboratories. AVIS RISQUE DE CHOC ÉLECTRIQUE NE PAS OUVRIR ATTENTION :...up and operate your owner's guide for future reference. For your speaker system. Please save your system properly, and enjoy all of important operating and maintenance instructions in this work may be located on the Acoustimass module: The lightning flash with arrowhead symbol, within an...
...201;E PAR UN PERSONNEL QUALIFIÉ. Please read this owner's guide Please take the time to follow this owner's guide. ©2002 Bose Corporation. No part of electric shock. Manufactured under license from Dolby Laboratories. AVIS RISQUE DE CHOC ÉLECTRIQUE NE PAS OUVRIR ATTENTION :...up and operate your owner's guide for future reference. For your speaker system. Please save your system properly, and enjoy all of important operating and maintenance instructions in this work may be located on the Acoustimass module: The lightning flash with arrowhead symbol, within an...
Owner's guide
Page 3
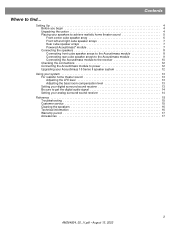
... 12 Upgrading your Acoustimass 15 Series II speaker system 12 Using your system 13 For realistic home theater sound 13 Adjusting the LFE level 13 Adjusting the bass/room compensation level 13 Setting your analog surround sound receiver 14 Reference 15 Troubleshooting 15 Customer service 15 Cleaning the speakers 16 Technical information 16 Warranty period...
... 12 Upgrading your Acoustimass 15 Series II speaker system 12 Using your system 13 For realistic home theater sound 13 Adjusting the LFE level 13 Adjusting the bass/room compensation level 13 Setting your analog surround sound receiver 14 Reference 15 Troubleshooting 15 Customer service 15 Cleaning the speakers 16 Technical information 16 Warranty period...
Owner's guide
Page 4
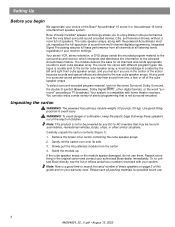
... levels, regardless of your choice of the Bose® Acoustimass® 15 series II or Acoustimass 16 home entertainment speaker system. Use good lifting practice to each cube speaker array. Note: This product is not surround-encoded. Slowly pull the Acoustimass module from all channels at all of the cube speaker arrays. Please save all channels and sends...
... levels, regardless of your choice of the Bose® Acoustimass® 15 series II or Acoustimass 16 home entertainment speaker system. Use good lifting practice to each cube speaker array. Note: This product is not surround-encoded. Slowly pull the Acoustimass module from all channels at all of the cube speaker arrays. Please save all channels and sends...
Owner's guide
Page 5
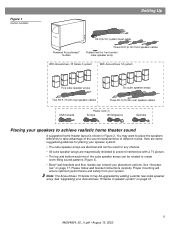
... center cube speaker array With Acoustimass 15 Series II system With Acoustimass 16 system Five cube speaker arrays Six cube speaker arrays Two 50-ft (15.2m) rear speaker cables Three 50-ft (15.2m) rear speaker cables USA/Canada Power cord (1) Europe UK/Singapore Australia Placing your speakers to create room-filling sound patterns (Figure 3). • Bose®...
... center cube speaker array With Acoustimass 15 Series II system With Acoustimass 16 system Five cube speaker arrays Six cube speaker arrays Two 50-ft (15.2m) rear speaker cables Three 50-ft (15.2m) rear speaker cables USA/Canada Power cord (1) Europe UK/Singapore Australia Placing your speakers to create room-filling sound patterns (Figure 3). • Bose®...
Owner's guide
Page 6
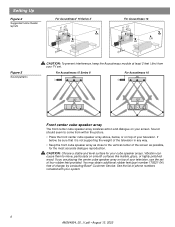
... Bose® Customer Service. If you are placing the center cube speaker array on smooth surfaces like marble, glass, or highly polished wood. Setting Up Figure 2 Suggested home theater layouts For Acoustimass® 15 Series II (26'--51m5)' CR RR L LR (0.26'm+ +) For Acoustimass 16 ...(62'--51m5)' CR L LR RR CR (0.26'm+ +) Figure 3 Sound patterns CAUTION: To prevent interference, keep the Acoustimass module at least 2 feet (.6m) from within the picture. • Place the front center cube speaker array above, below , be sure...
... Bose® Customer Service. If you are placing the center cube speaker array on smooth surfaces like marble, glass, or highly polished wood. Setting Up Figure 2 Suggested home theater layouts For Acoustimass® 15 Series II (26'--51m5)' CR RR L LR (0.26'm+ +) For Acoustimass 16 ...(62'--51m5)' CR L LR RR CR (0.26'm+ +) Figure 3 Sound patterns CAUTION: To prevent interference, keep the Acoustimass module at least 2 feet (.6m) from within the picture. • Place the front center cube speaker array above, below , be sure...
Owner's guide
Page 7
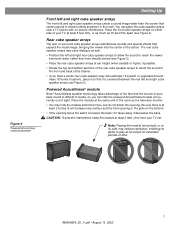
... feet (.6m) from directly behind furniture, but do not block the opening faces the wall it decreases the bass. Powered Acoustimass® module Bose® Acoustimass speaker technology takes advantage of the fact that it is centered between any surface and the front opening or the grille on either side... back of the listener. • If you have a center rear cube speaker array (Acoustimass 16 system or upgraded Acoustimass 15 Series II system), place it so that the source of your TV set. Place the front cube speaker arrays on the bottom. • If the opening . Place the module ...
... feet (.6m) from directly behind furniture, but do not block the opening faces the wall it decreases the bass. Powered Acoustimass® module Bose® Acoustimass speaker technology takes advantage of the fact that it is centered between any surface and the front opening or the grille on either side... back of the listener. • If you have a center rear cube speaker array (Acoustimass 16 system or upgraded Acoustimass 15 Series II system), place it so that the source of your TV set. Place the front cube speaker arrays on the bottom. • If the opening . Place the module ...
Owner's guide
Page 8
... connectors at one end with the Acoustimass 16 system or may be added to the Acoustimass module 8 AM264924_00 _V.pdf • August 13, 2002 The red collars on page 12. For upgrading information, see "Upgrading your system. Check local building codes or enlist a qualified installer. Front speaker cables have two wires. Audio...
... connectors at one end with the Acoustimass 16 system or may be added to the Acoustimass module 8 AM264924_00 _V.pdf • August 13, 2002 The red collars on page 12. For upgrading information, see "Upgrading your system. Check local building codes or enlist a qualified installer. Front speaker cables have two wires. Audio...
Owner's guide
Page 9
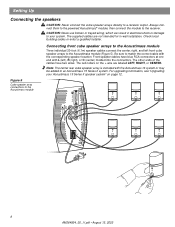
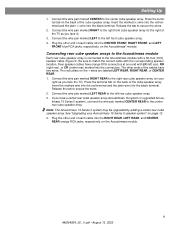
...Insert the marked wire into the red terminal and the plain wire into the connectors. Note: The Acoustimass 15 Series II system may be upgraded by adding a center rear cube speaker array. Insert the marked (+) wire into the red terminal and the plain (-) wire into the ... end of the cables have a center rear cube speaker array (Acoustimass 16 system or upgraded Acoustimass 15 Series II system), connect the wire pair marked CENTER REAR to the right rear cube speaker array (on your Acoustimass 15 Series II speaker system" on the Acoustimass module. 9 AM264924_00 _V.pdf • August 13...
...Insert the marked wire into the red terminal and the plain wire into the connectors. Note: The Acoustimass 15 Series II system may be upgraded by adding a center rear cube speaker array. Insert the marked (+) wire into the red terminal and the plain (-) wire into the ... end of the cables have a center rear cube speaker array (Acoustimass 16 system or upgraded Acoustimass 15 Series II system), connect the wire pair marked CENTER REAR to the right rear cube speaker array (on your Acoustimass 15 Series II speaker system" on the Acoustimass module. 9 AM264924_00 _V.pdf • August 13...
Owner's guide
Page 11
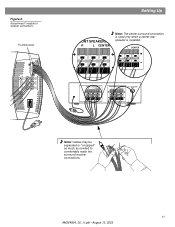
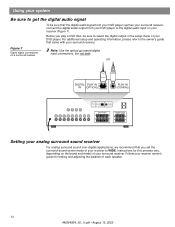
Audio Output Left Center Right Rear Rear Rear Audio Input Left Center Right Front Front Front Figure 6 Acoustimass® module to comfortably reach the surround receiver connections. 11 AM264924_00 _V.pdf • August 13, 2002 R L CENTER FRONT SPEAKERS A R L CENTER SURROUND SPEAKERS R L CENTER LFE/SUBWOOFER OUT Note: Cables may be separated or "unzipped" as much as needed to receiver connections Thumbscrews Setting Up FRONT SPEAKERS A R L CENTER Note: The center surround connection is used only when a center rear speaker is installed.
Audio Output Left Center Right Rear Rear Rear Audio Input Left Center Right Front Front Front Figure 6 Acoustimass® module to comfortably reach the surround receiver connections. 11 AM264924_00 _V.pdf • August 13, 2002 R L CENTER FRONT SPEAKERS A R L CENTER SURROUND SPEAKERS R L CENTER LFE/SUBWOOFER OUT Note: Cables may be separated or "unzipped" as much as needed to receiver connections Thumbscrews Setting Up FRONT SPEAKERS A R L CENTER Note: The center surround connection is used only when a center rear speaker is installed.
Owner's guide
Page 12
... according to their position in phase (+ to + and - Connecting the Acoustimass module to power Note: Bose® recommends using a quality surge suppressor on and off automatically as it on. The 6.1 upgrade kit contains one black (PC 029661) or white (PC 029662) cube speaker array, a 50-foot connecting cable, and complete connection instructions. Incorrect...
... according to their position in phase (+ to + and - Connecting the Acoustimass module to power Note: Bose® recommends using a quality surge suppressor on and off automatically as it on. The 6.1 upgrade kit contains one black (PC 029661) or white (PC 029662) cube speaker array, a 50-foot connecting cable, and complete connection instructions. Incorrect...
Owner's guide
Page 13
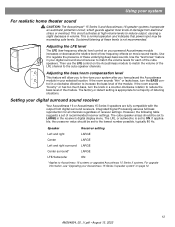
... set to LARGE in your digital surround sound receiver to fine-tune your digital surround sound receiver Your Acoustimass 16 or Acoustimass 15 Series II speakers are fully compatible with the output from electrical stress or overload. If applicable, the crossover value should be set... to regulate the presence of the module. Using your system For realistic home theater sound CAUTION: The Acoustimass® 15 Series II and Acoustimass 16 speaker systems incorporate an automatic protection circuit, which guards against most kinds of damage from digital surround receivers. ...
... set to LARGE in your digital surround sound receiver to fine-tune your digital surround sound receiver Your Acoustimass 16 or Acoustimass 15 Series II speakers are fully compatible with the output from electrical stress or overload. If applicable, the crossover value should be set... to regulate the presence of the module. Using your system For realistic home theater sound CAUTION: The Acoustimass® 15 Series II and Acoustimass 16 speaker systems incorporate an automatic protection circuit, which guards against most kinds of damage from digital surround receivers. ...
Owner's guide
Page 14
... for this process vary, depending on the brand and model of your receiver owner's guide for testing and adjusting the balance of each speaker. 14 AM264924_00 _V.pdf • August 13, 2002 For additional setup and operating information, please refer to the owner's guide that ...but not both. OR DIGITAL PLAY IN IN (OPTICAL) PLAY IN (COAXIAL) DIGITAL PLAY IN IN (OPTICAL) PLAY IN (COAXIAL) FRONT SPEAKERS R L SURROUND SPEAKERS R REAR L CENTER Setting your analog surround sound receiver For analog surround sound (non-digital) applications, we recommend that came with your surround...
... for this process vary, depending on the brand and model of your receiver owner's guide for testing and adjusting the balance of each speaker. 14 AM264924_00 _V.pdf • August 13, 2002 For additional setup and operating information, please refer to the owner's guide that ...but not both. OR DIGITAL PLAY IN IN (OPTICAL) PLAY IN (COAXIAL) DIGITAL PLAY IN IN (OPTICAL) PLAY IN (COAXIAL) FRONT SPEAKERS R L SURROUND SPEAKERS R REAR L CENTER Setting your analog surround sound receiver For analog surround sound (non-digital) applications, we recommend that came with your surround...
Owner's guide
Page 15
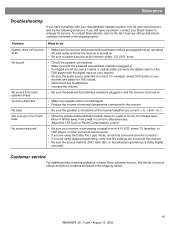
... the audio source selected is turned on. Move it farther away from cube speaker arrays • Be sure the powered Acoustimass module is turned on your receiver and player for service. Reference Troubleshooting If you have a problem, contact your Bose® dealer to select a source at the receiver. • Be sure the source...
... the audio source selected is turned on. Move it farther away from cube speaker arrays • Be sure the powered Acoustimass module is turned on your receiver and player for service. Reference Troubleshooting If you have a problem, contact your Bose® dealer to select a source at the receiver. • Be sure the source...
Owner's guide
Page 16
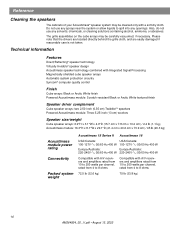
...-inch (6.35 cm) TwiddlerTM speakers Powered Acoustimass module: Three 5.25-inch (13 cm) woofers Speaker size/weight Cube speaker arrays: 6.2"H x 3.1"W x 4.0"D (15.7 cm x 7.8 cm x 10.2 cm) / 2.4 lb (1.1 kg) Acoustimass module: 16.3"H x 8.1"W x 29.1"D (41.4 cm x 20.6 cm x 73.9 cm) / 45 lb (20.3 kg) Acoustimass module power rating Connectivity Packed system weight Acoustimass 15 Series II Acoustimass 16 USA/Canada: USA/Canada: 100...
...-inch (6.35 cm) TwiddlerTM speakers Powered Acoustimass module: Three 5.25-inch (13 cm) woofers Speaker size/weight Cube speaker arrays: 6.2"H x 3.1"W x 4.0"D (15.7 cm x 7.8 cm x 10.2 cm) / 2.4 lb (1.1 kg) Acoustimass module: 16.3"H x 8.1"W x 29.1"D (41.4 cm x 20.6 cm x 73.9 cm) / 45 lb (20.3 kg) Acoustimass module power rating Connectivity Packed system weight Acoustimass 15 Series II Acoustimass 16 USA/Canada: USA/Canada: 100...
Owner's guide
Page 17
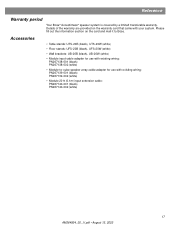
Details of the warranty are provided on the card and mail it to -cube speaker array cable adapter for use with your system. Reference Warranty period Your Bose® Acoustimass® speaker system is covered by a limited transferable warranty. Accessories • Table stands: UTS-20B (black), UTS-...(white) • Module input cable adapter for use with existing wiring: PN267138-001 (black) PN267138-002 (white) • Module-to Bose. Please fill out the information section on the warranty card that came with existing wiring: PN267139-001 (black) PN267139-002 (white) ...
Details of the warranty are provided on the card and mail it to -cube speaker array cable adapter for use with your system. Reference Warranty period Your Bose® Acoustimass® speaker system is covered by a limited transferable warranty. Accessories • Table stands: UTS-20B (black), UTS-...(white) • Module input cable adapter for use with existing wiring: PN267138-001 (black) PN267138-002 (white) • Module-to Bose. Please fill out the information section on the warranty card that came with existing wiring: PN267139-001 (black) PN267139-002 (white) ...
Quick setup guide
Page 1
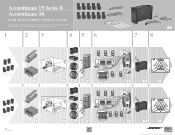
...; Snelle opstellingsgids • Vägledning för snabb montering 1 2 3 AcoHusotmimeaTssh-e6ater Speaker System 4 5 5 1 2 3 4 5 6 7 8 Audio Input Left Center Right Front Front Front Right Rear Acoustimass 15 Series II System Acoustimass 16 System ? bose.com (26'--51m5)' C RR R L LR (0.26'm+ +) 4 6 FRONT SPEAKERS A R L CENTER SURROUND SPEAKERS R L CENTER LFE/SUBWOOFER OUT FRONT SPEAKERS A R L CENTER 7 89 Audio Output Left Rear 10 11 12 6 Audio...
...; Snelle opstellingsgids • Vägledning för snabb montering 1 2 3 AcoHusotmimeaTssh-e6ater Speaker System 4 5 5 1 2 3 4 5 6 7 8 Audio Input Left Center Right Front Front Front Right Rear Acoustimass 15 Series II System Acoustimass 16 System ? bose.com (26'--51m5)' C RR R L LR (0.26'm+ +) 4 6 FRONT SPEAKERS A R L CENTER SURROUND SPEAKERS R L CENTER LFE/SUBWOOFER OUT FRONT SPEAKERS A R L CENTER 7 89 Audio Output Left Rear 10 11 12 6 Audio...

