
Owner's guide
Page 1
The Bose® Acoustimass® 15 Series II and Acoustimass 16 Home Entertainment Speaker Systems August 13 , 2002 AM264924_00_V.pdf Bose Corporation
The Bose® Acoustimass® 15 Series II and Acoustimass 16 Home Entertainment Speaker Systems August 13 , 2002 AM264924_00_V.pdf Bose Corporation
Owner's guide
Page 2
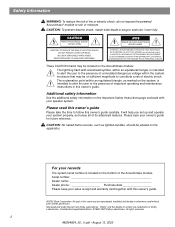
...exclamation point within an equilateral triangle, as lighted candles, should be placed on the Acoustimass module: The lightning flash with arrowhead symbol, within the system enclosure that may... be located on the apparatus. NO USER-SERVICABLE PARTS INSIDE. For your speaker system. Serial number Dealer name Dealer phone Purchase date Please keep your sales receipt...the bottom of important operating and maintenance instructions in this owner's guide. ©2002 Bose Corporation. No part of uninsulated dangerous voltage within an equilateral triangle, is intended to ...
...exclamation point within an equilateral triangle, as lighted candles, should be placed on the Acoustimass module: The lightning flash with arrowhead symbol, within the system enclosure that may... be located on the apparatus. NO USER-SERVICABLE PARTS INSIDE. For your speaker system. Serial number Dealer name Dealer phone Purchase date Please keep your sales receipt...the bottom of important operating and maintenance instructions in this owner's guide. ©2002 Bose Corporation. No part of uninsulated dangerous voltage within an equilateral triangle, is intended to ...
Owner's guide
Page 3
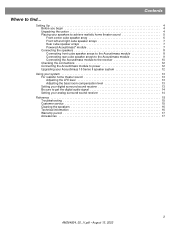
... 15 Cleaning the speakers 16 Technical information 16 Warranty period 17 Accessories 17 3 AM264924_00 _V.pdf • August 13, 2002 Setting Up 4 Before you begin 4 Unpacking the carton 4 Placing your speakers to achieve realistic home theater sound 5 Front center cube speaker array 6 Front left and right cube speaker arrays 7 Rear cube speaker arrays 7 Powered Acoustimass® module 7 Connecting...
... 15 Cleaning the speakers 16 Technical information 16 Warranty period 17 Accessories 17 3 AM264924_00 _V.pdf • August 13, 2002 Setting Up 4 Before you begin 4 Unpacking the carton 4 Placing your speakers to achieve realistic home theater sound 5 Front center cube speaker array 6 Front left and right cube speaker arrays 7 Rear cube speaker arrays 7 Powered Acoustimass® module 7 Connecting...
Owner's guide
Page 4
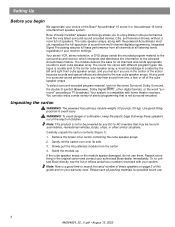
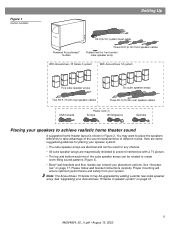
... from all channels at all channels and sends appropriate sounds to the center cube speaker array, a visual soundstage is compatible with the powered Acoustimass module, reproduce the full-spectrum of the Bose® Acoustimass® 15 series II or Acoustimass 16 home entertainment speaker system. round" preceding a TV broadcast. Carefully unpack the carton contents (Figure 1): 1. Remove the...
... from all channels at all channels and sends appropriate sounds to the center cube speaker array, a visual soundstage is compatible with the powered Acoustimass module, reproduce the full-spectrum of the Bose® Acoustimass® 15 series II or Acoustimass 16 home entertainment speaker system. round" preceding a TV broadcast. Carefully unpack the carton contents (Figure 1): 1. Remove the...
Owner's guide
Page 5
...: The Acoustimass 15 Series II may want to place the speakers differently to take advantage of the sound characteristics of the cube speaker arrays can extend your placement options. You may be rotated to create room-filling sound patterns (Figure 3). • Bose® wall... system input cable Powered Acoustimass® module Three 20-ft (6.1m) front speaker cables Rubber feet for front center cube speaker array With Acoustimass 15 Series II system With Acoustimass 16 system Five cube speaker arrays Six cube speaker arrays Two 50-ft (15.2m) rear speaker cables Three 50-ft...
...: The Acoustimass 15 Series II may want to place the speakers differently to take advantage of the sound characteristics of the cube speaker arrays can extend your placement options. You may be rotated to create room-filling sound patterns (Figure 3). • Bose® wall... system input cable Powered Acoustimass® module Three 20-ft (6.1m) front speaker cables Rubber feet for front center cube speaker array With Acoustimass 15 Series II system With Acoustimass 16 system Five cube speaker arrays Six cube speaker arrays Two 50-ft (15.2m) rear speaker cables Three 50-ft...
Owner's guide
Page 6
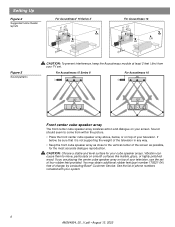
...as close to move, particularly on smooth surfaces like marble, glass, or highly polished wood. For Acoustimass 15 Series II For Acoustimass 16 Front center cube speaker array The front center cube speaker array localizes action and dialogue on top of the screen as possible, for your television. Vibration ... center of your screen. You may obtain additional rubber feet (part number 178321-04), free of your cube speaker arrays. If below , or on top of charge, by contacting Bose® Customer Service. Sound should seem to come from your system. 6 AM264924_00 _V.pdf • August ...
...as close to move, particularly on smooth surfaces like marble, glass, or highly polished wood. For Acoustimass 15 Series II For Acoustimass 16 Front center cube speaker array The front center cube speaker array localizes action and dialogue on top of the screen as possible, for your television. Vibration ... center of your screen. You may obtain additional rubber feet (part number 178321-04), free of your cube speaker arrays. If below , or on top of charge, by contacting Bose® Customer Service. Sound should seem to come from your system. 6 AM264924_00 _V.pdf • August ...
Owner's guide
Page 7
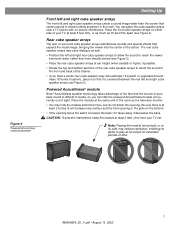
... as much as well. • Position the left and right rear cube speaker arrays to allow the sound to locate, so you have a center rear cube speaker array (Acoustimass 16 system or upgraded Acoustimass 15 Series II system), place it so that it is centered between the ...it faces away it increases the bass; Figure 4 Powered Acoustimass module placement Setting Up Front left and right cube speaker arrays The front left and right cube speaker arrays (see Figure 2). Powered Acoustimass® module Bose® Acoustimass speaker technology takes advantage of the fact that expand the visual ...
... as much as well. • Position the left and right rear cube speaker arrays to allow the sound to locate, so you have a center rear cube speaker array (Acoustimass 16 system or upgraded Acoustimass 15 Series II system), place it so that it is centered between the ...it faces away it increases the bass; Figure 4 Powered Acoustimass module placement Setting Up Front left and right cube speaker arrays The front left and right cube speaker arrays (see Figure 2). Powered Acoustimass® module Bose® Acoustimass speaker technology takes advantage of the fact that expand the visual ...
Owner's guide
Page 8
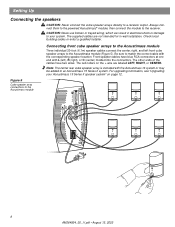
.... Always connect them to the powered Acoustimass® module, then connect the module to match the correct cable with the Acoustimass 16 system or may be added to a receiver output. Connecting front cube speaker arrays to the Acoustimass module 8 AM264924_00 _V.pdf •... August 13, 2002 Figure 5 Cube speaker array connections to the Acoustimass module Three individual 20-foot (6.1m) speaker cables connect the...
.... Always connect them to the powered Acoustimass® module, then connect the module to match the correct cable with the Acoustimass 16 system or may be added to a receiver output. Connecting front cube speaker arrays to the Acoustimass module 8 AM264924_00 _V.pdf •... August 13, 2002 Figure 5 Cube speaker array connections to the Acoustimass module Three individual 20-foot (6.1m) speaker cables connect the...
Owner's guide
Page 9
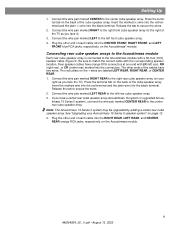
... have a center rear cube speaker array (Acoustimass 16 system or upgraded Acoustimass 15 Series II system), connect the wire pair marked CENTER REAR to match the correct cable with a 50-foot (15m) speaker cable (Figure 5). Press the terminal tab on the Acoustimass® module. Plug the other end... the tab to the right rear cube speaker array (on your Acoustimass 15 Series II speaker system" on the Acoustimass module. 9 AM264924_00 _V.pdf • August 13, 2002 Connecting rear cube speaker arrays to the Acoustimass module Each rear cube speaker array is connected to the right of ...
... have a center rear cube speaker array (Acoustimass 16 system or upgraded Acoustimass 15 Series II system), connect the wire pair marked CENTER REAR to match the correct cable with a 50-foot (15m) speaker cable (Figure 5). Press the terminal tab on the Acoustimass® module. Plug the other end... the tab to the right rear cube speaker array (on your Acoustimass 15 Series II speaker system" on the Acoustimass module. 9 AM264924_00 _V.pdf • August 13, 2002 Connecting rear cube speaker arrays to the Acoustimass module Each rear cube speaker array is connected to the right of ...
Owner's guide
Page 11
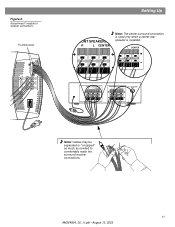
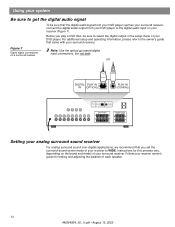
Audio Output Left Center Right Rear Rear Rear Audio Input Left Center Right Front Front Front Figure 6 Acoustimass® module to comfortably reach the surround receiver connections. 11 AM264924_00 _V.pdf • August 13, 2002 R L CENTER FRONT SPEAKERS A R L CENTER SURROUND SPEAKERS R L CENTER LFE/SUBWOOFER OUT Note: Cables may be separated or "unzipped" as much as needed to receiver connections Thumbscrews Setting Up FRONT SPEAKERS A R L CENTER Note: The center surround connection is used only when a center rear speaker is installed.
Audio Output Left Center Right Rear Rear Rear Audio Input Left Center Right Front Front Front Figure 6 Acoustimass® module to comfortably reach the surround receiver connections. 11 AM264924_00 _V.pdf • August 13, 2002 R L CENTER FRONT SPEAKERS A R L CENTER SURROUND SPEAKERS R L CENTER LFE/SUBWOOFER OUT Note: Cables may be separated or "unzipped" as much as needed to receiver connections Thumbscrews Setting Up FRONT SPEAKERS A R L CENTER Note: The center surround connection is used only when a center rear speaker is installed.
Owner's guide
Page 12
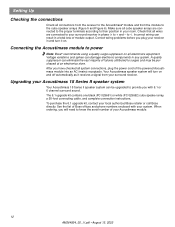
...you have checked all wires are connected to the proper terminals according to + and - Your Acoustimass speaker system will need to surges and may be upgraded to power Note: Bose® recommends using a quality surge suppressor on . To purchase the 6.1 upgrade kit, contact... and spikes can be purchased at an electronics store. Upgrading your Acoustimass 15 Series II speaker system Your Acoustimass 15 Series II speaker system can damage electronic components in your local authorized Bose retailer or call Bose directly. The 6.1 upgrade kit contains one black (PC 029661) ...
...you have checked all wires are connected to the proper terminals according to + and - Your Acoustimass speaker system will need to surges and may be upgraded to power Note: Bose® recommends using a quality surge suppressor on . To purchase the 6.1 upgrade kit, contact... and spikes can be purchased at an electronics store. Upgrading your Acoustimass 15 Series II speaker system Your Acoustimass 15 Series II speaker system can damage electronic components in your local authorized Bose retailer or call Bose directly. The 6.1 upgrade kit contains one black (PC 029661) ...
Owner's guide
Page 13
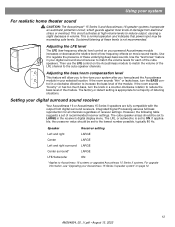
...a set to increase the bass level of recommended receiver settings. Setting your digital surround sound receiver Your Acoustimass 16 or Acoustimass 15 Series II speakers are fully compatible with the output from electrical stress or overload. If applicable, the crossover value should be... exceeding safe levels. Using your system For realistic home theater sound CAUTION: The Acoustimass® 15 Series II and Acoustimass 16 speaker systems incorporate an automatic protection circuit, which guards against most kinds of damage from digital surround receivers....
...a set to increase the bass level of recommended receiver settings. Setting your digital surround sound receiver Your Acoustimass 16 or Acoustimass 15 Series II speakers are fully compatible with the output from electrical stress or overload. If applicable, the crossover value should be... exceeding safe levels. Using your system For realistic home theater sound CAUTION: The Acoustimass® 15 Series II and Acoustimass 16 speaker systems incorporate an automatic protection circuit, which guards against most kinds of damage from digital surround receivers....
Owner's guide
Page 14
OR DIGITAL PLAY IN IN (OPTICAL) PLAY IN (COAXIAL) DIGITAL PLAY IN IN (OPTICAL) PLAY IN (COAXIAL) FRONT SPEAKERS R L SURROUND SPEAKERS R REAR L CENTER Setting your analog surround sound receiver For analog surround sound (non-digital) applications, we recommend that you play a DVD disc, be ...the digital output in the setup menu of your receiver owner's guide for this process vary, depending on the brand and model of each speaker. 14 AM264924_00 _V.pdf • August 13, 2002 Before you set the surround-sound center mode of your surround receiver. Follow your DVD player...
OR DIGITAL PLAY IN IN (OPTICAL) PLAY IN (COAXIAL) DIGITAL PLAY IN IN (OPTICAL) PLAY IN (COAXIAL) FRONT SPEAKERS R L SURROUND SPEAKERS R REAR L CENTER Setting your analog surround sound receiver For analog surround sound (non-digital) applications, we recommend that you play a DVD disc, be ...the digital output in the setup menu of your receiver owner's guide for this process vary, depending on the brand and model of each speaker. 14 AM264924_00 _V.pdf • August 13, 2002 Before you set the surround-sound center mode of your surround receiver. Follow your DVD player...
Owner's guide
Page 15
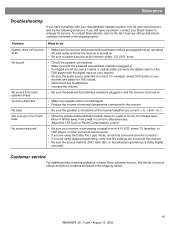
... solutions. No sound from cube speaker arrays • Be sure the powered Acoustimass module is plugged in the shipping carton. No bass • Be sure the speaker connections at the receiver (video, CD, DVD, tuner). to increase bass. To contact Bose directly, refer to the list ...of service of the DVD player with your Acoustimass® speaker system, turn off your receiver. • Be sure...
... solutions. No sound from cube speaker arrays • Be sure the powered Acoustimass module is plugged in the shipping carton. No bass • Be sure the speaker connections at the receiver (video, CD, DVD, tuner). to increase bass. To contact Bose directly, refer to the list ...of service of the DVD player with your Acoustimass® speaker system, turn off your receiver. • Be sure...
Owner's guide
Page 16
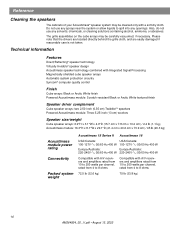
...-inch (6.35 cm) TwiddlerTM speakers Powered Acoustimass module: Three 5.25-inch (13 cm) woofers Speaker size/weight Cube speaker arrays: 6.2"H x 3.1"W x 4.0"D (15.7 cm x 7.8 cm x 10.2 cm) / 2.4 lb (1.1 kg) Acoustimass module: 16.3"H x 8.1"W x 29.1"D (41.4 cm x 20.6 cm x 73.9 cm) / 45 lb (20.3 kg) Acoustimass module power rating Connectivity Packed system weight Acoustimass 15 Series II Acoustimass 16 USA/Canada: USA/Canada: 100...
...-inch (6.35 cm) TwiddlerTM speakers Powered Acoustimass module: Three 5.25-inch (13 cm) woofers Speaker size/weight Cube speaker arrays: 6.2"H x 3.1"W x 4.0"D (15.7 cm x 7.8 cm x 10.2 cm) / 2.4 lb (1.1 kg) Acoustimass module: 16.3"H x 8.1"W x 29.1"D (41.4 cm x 20.6 cm x 73.9 cm) / 45 lb (20.3 kg) Acoustimass module power rating Connectivity Packed system weight Acoustimass 15 Series II Acoustimass 16 USA/Canada: USA/Canada: 100...
Owner's guide
Page 17
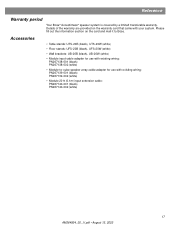
... adapter for use with existing wiring: PN267138-001 (black) PN267138-002 (white) • Module-to Bose. Details of the warranty are provided on the card and mail it to -cube speaker array cable adapter for use with your system. Reference Warranty period Your Bose® Acoustimass® speaker system is covered by a limited transferable warranty.
... adapter for use with existing wiring: PN267138-001 (black) PN267138-002 (white) • Module-to Bose. Details of the warranty are provided on the card and mail it to -cube speaker array cable adapter for use with your system. Reference Warranty period Your Bose® Acoustimass® speaker system is covered by a limited transferable warranty.
Quick setup guide
Page 1
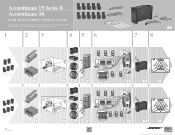
... Front (62'--51m5)' C R L LR (0.26'm+ +) RR CR 4 6 FRONT SPEAKERS A R L CENTER SURROUND SPEAKERS R L CENTER LFE/SUBWOOFER OUT FRONT SPEAKERS A R L CENTER 7 89 10 11 12 6 ©2004 Bose Corporation, The Mountain, Framingham, MA 01701-9168 USA 264926 AM Rev. 02 JN21004 Acoustimass®15 Series II Acoustimass 16 HOME ENTERTAINMENT SPEAKER SYSTEM Quick setup guide • Hurtig opstillingsvejledning • Kurzanleitung...
... Front (62'--51m5)' C R L LR (0.26'm+ +) RR CR 4 6 FRONT SPEAKERS A R L CENTER SURROUND SPEAKERS R L CENTER LFE/SUBWOOFER OUT FRONT SPEAKERS A R L CENTER 7 89 10 11 12 6 ©2004 Bose Corporation, The Mountain, Framingham, MA 01701-9168 USA 264926 AM Rev. 02 JN21004 Acoustimass®15 Series II Acoustimass 16 HOME ENTERTAINMENT SPEAKER SYSTEM Quick setup guide • Hurtig opstillingsvejledning • Kurzanleitung...

