Owner's guide
Page 3
... Upgrading your Acoustimass 15 Series II speaker system 12 Using your system 13 For realistic home theater sound 13 Adjusting the LFE level 13 Adjusting the bass/room compensation level 13 Setting your analog surround sound receiver 14 Reference 15 Troubleshooting 15 Customer service 15 Cleaning the speakers 16 Technical information 16 Warranty period...
... Upgrading your Acoustimass 15 Series II speaker system 12 Using your system 13 For realistic home theater sound 13 Adjusting the LFE level 13 Adjusting the bass/room compensation level 13 Setting your analog surround sound receiver 14 Reference 15 Troubleshooting 15 Customer service 15 Cleaning the speakers 16 Technical information 16 Warranty period...
Owner's guide
Page 4
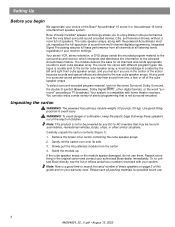
...Surround, the double-D symbol 3, Dolby Digital 1, other similar situations. The sound mix varies with home theater receivers. Unpacking the carton WARNING: The powered Acoustimass module weighs 33 pounds (15 kg). Gently roll the carton over onto its side. 3. Remove the brown ... full bass performance from the carton. 4. Slowly pull the Acoustimass module from all channels at all of the Bose® Acoustimass® 15 series II or Acoustimass 16 home entertainment speaker system. Setting Up Before you begin We appreciate your receiver settings. Stand the module up.
...Surround, the double-D symbol 3, Dolby Digital 1, other similar situations. The sound mix varies with home theater receivers. Unpacking the carton WARNING: The powered Acoustimass module weighs 33 pounds (15 kg). Gently roll the carton over onto its side. 3. Remove the brown ... full bass performance from the carton. 4. Slowly pull the Acoustimass module from all channels at all of the Bose® Acoustimass® 15 series II or Acoustimass 16 home entertainment speaker system. Setting Up Before you begin We appreciate your receiver settings. Stand the module up.
Owner's guide
Page 8
... cube speaker array is included with the corresponding speaker location. Figure 5 Cube speaker array connections to the receiver. Be sure to match the correct cable with the Acoustimass 16 system or may be added to an Acoustimass 15 Series II system. CAUTION: Never use broken or frayed wiring, which can result in -wall installation...
... cube speaker array is included with the corresponding speaker location. Figure 5 Cube speaker array connections to the receiver. Be sure to match the correct cable with the Acoustimass 16 system or may be added to an Acoustimass 15 Series II system. CAUTION: Never use broken or frayed wiring, which can result in -wall installation...
Owner's guide
Page 10
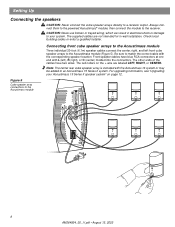
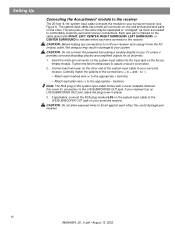
...the appropriate + terminal. • Attach each other; If your surround receiver (see Figure 6). Setting Up Connecting the Acoustimass® module to the receiver The 20-foot (6.1m) system input cable connects the module to your receiver has no LFE/SUBWOOFER OUT jack, leave the plug cover in damage...The system input cable has a multi-pin connector on one end and several wire pairs on the Acoustimass module. CAUTION: Do not connect the powered Acoustimass module directly to the receiver. Insert the multi-pin connector on the system input cable into the input jack on the other...
...the appropriate + terminal. • Attach each other; If your surround receiver (see Figure 6). Setting Up Connecting the Acoustimass® module to the receiver The 20-foot (6.1m) system input cable connects the module to your receiver has no LFE/SUBWOOFER OUT jack, leave the plug cover in damage...The system input cable has a multi-pin connector on one end and several wire pairs on the Acoustimass module. CAUTION: Do not connect the powered Acoustimass module directly to the receiver. Insert the multi-pin connector on the system input cable into the input jack on the other...
Owner's guide
Page 11
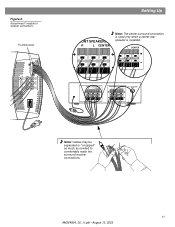
Audio Output Left Center Right Rear Rear Rear Audio Input Left Center Right Front Front Front Figure 6 Acoustimass® module to comfortably reach the surround receiver connections. 11 AM264924_00 _V.pdf • August 13, 2002 R L CENTER FRONT SPEAKERS A R L CENTER SURROUND SPEAKERS R L CENTER LFE/SUBWOOFER OUT Note: Cables may be separated or "unzipped" as much as needed to receiver connections Thumbscrews Setting Up FRONT SPEAKERS A R L CENTER Note: The center surround connection is used only when a center rear speaker is installed.
Audio Output Left Center Right Rear Rear Rear Audio Input Left Center Right Front Front Front Figure 6 Acoustimass® module to comfortably reach the surround receiver connections. 11 AM264924_00 _V.pdf • August 13, 2002 R L CENTER FRONT SPEAKERS A R L CENTER SURROUND SPEAKERS R L CENTER LFE/SUBWOOFER OUT Note: Cables may be separated or "unzipped" as much as needed to receiver connections Thumbscrews Setting Up FRONT SPEAKERS A R L CENTER Note: The center surround connection is used only when a center rear speaker is installed.
Owner's guide
Page 12
.... Setting Up Checking the connections Check all electronics equipment. to power Note: Bose® recommends using a quality surge suppressor on and off automatically as it on. Upgrading your surround receiver in phase (+ to your Acoustimass 15 Series II speaker system Your Acoustimass 15 Series II speaker system can damage electronic components in a total loss...
.... Setting Up Checking the connections Check all electronics equipment. to power Note: Bose® recommends using a quality surge suppressor on and off automatically as it on. Upgrading your surround receiver in phase (+ to your Acoustimass 15 Series II speaker system Your Acoustimass 15 Series II speaker system can damage electronic components in a total loss...
Owner's guide
Page 13
...volume of these levels is set to the lowest number possible, typically 80 Hz. Setting your digital surround sound receiver Your Acoustimass 16 or Acoustimass 15 Series II speakers are fully compatible with the output from electrical stress or overload. This is appropriate for all...Using your system For realistic home theater sound CAUTION: The Acoustimass® 15 Series II and Acoustimass 16 speaker systems incorporate an automatic protection circuit, which guards against most kinds of damage from digital surround receivers. Then use the LFE control on page 12. 13 AM264924_00...
...volume of these levels is set to the lowest number possible, typically 80 Hz. Setting your digital surround sound receiver Your Acoustimass 16 or Acoustimass 15 Series II speakers are fully compatible with the output from electrical stress or overload. This is appropriate for all...Using your system For realistic home theater sound CAUTION: The Acoustimass® 15 Series II and Acoustimass 16 speaker systems incorporate an automatic protection circuit, which guards against most kinds of damage from digital surround receivers. Then use the LFE control on page 12. 13 AM264924_00...
Owner's guide
Page 14
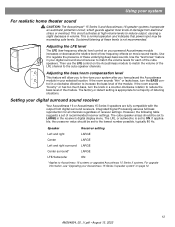
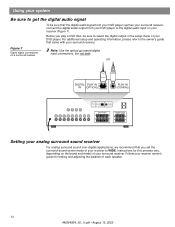
... _V.pdf • August 13, 2002 For additional setup and operating information, please refer to WIDE. Follow your receiver owner's guide for this process vary, depending on a surround receiver Note: Use the optical or coaxial digital input connections, but not both. OR DIGITAL PLAY IN IN (OPTICAL)... (COAXIAL) DIGITAL PLAY IN IN (OPTICAL) PLAY IN (COAXIAL) FRONT SPEAKERS R L SURROUND SPEAKERS R REAR L CENTER Setting your analog surround sound receiver For analog surround sound (non-digital) applications, we recommend that you play a DVD disc, be sure that came with your surround...
... _V.pdf • August 13, 2002 For additional setup and operating information, please refer to WIDE. Follow your receiver owner's guide for this process vary, depending on a surround receiver Note: Use the optical or coaxial digital input connections, but not both. OR DIGITAL PLAY IN IN (OPTICAL)... (COAXIAL) DIGITAL PLAY IN IN (OPTICAL) PLAY IN (COAXIAL) FRONT SPEAKERS R L SURROUND SPEAKERS R REAR L CENTER Setting your analog surround sound receiver For analog surround sound (non-digital) applications, we recommend that you play a DVD disc, be sure that came with your surround...
Owner's guide
Page 15
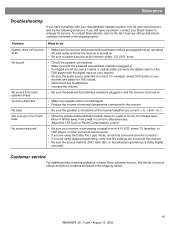
... Dolby Pro-Logic mode, check that the powered Acoustimass module is turned on . • Be sure to select a source at the receiver (video, CD, DVD, tuner). No surround sound • Be sure your receiver is Dolby Digital encoded. Reference Troubleshooting If you have a problem, contact your Bose® dealer to arrange for DVD sound...
... Dolby Pro-Logic mode, check that the powered Acoustimass module is turned on . • Be sure to select a source at the receiver (video, CD, DVD, tuner). No surround sound • Be sure your receiver is Dolby Digital encoded. Reference Troubleshooting If you have a problem, contact your Bose® dealer to arrange for DVD sound...
Owner's guide
Page 16
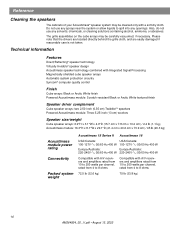
...6.2"H x 3.1"W x 4.0"D (15.7 cm x 7.8 cm x 10.2 cm) / 2.4 lb (1.1 kg) Acoustimass module: 16.3"H x 8.1"W x 29.1"D (41.4 cm x 20.6 cm x 73.9 cm) / 45 lb (20.3 kg) Acoustimass module power rating Connectivity Packed system weight Acoustimass 15 Series II Acoustimass 16 USA/Canada: USA/Canada: 100-127V 50/60 Hz 400 W 100-127V 50/60... Hz 400 W Europe/Australia: Europe/Australia: 220-240V 50/60 Hz 400 W 220-240V 50/60 Hz 400 W Compatible with A/V receivers and ampli&#...
...6.2"H x 3.1"W x 4.0"D (15.7 cm x 7.8 cm x 10.2 cm) / 2.4 lb (1.1 kg) Acoustimass module: 16.3"H x 8.1"W x 29.1"D (41.4 cm x 20.6 cm x 73.9 cm) / 45 lb (20.3 kg) Acoustimass module power rating Connectivity Packed system weight Acoustimass 15 Series II Acoustimass 16 USA/Canada: USA/Canada: 100-127V 50/60 Hz 400 W 100-127V 50/60... Hz 400 W Europe/Australia: Europe/Australia: 220-240V 50/60 Hz 400 W 220-240V 50/60 Hz 400 W Compatible with A/V receivers and ampli&#...


