Owner's guide
Page 2
... Laboratories. Additional safety information See the additional safety information on the rear of the Acoustimass module: The lightning flash with arrowhead symbol within an equilateral triangle is intended to ...an equilateral triangle, as lighted candles, should be reproduced, modified, distributed or otherwise used without prior written permission. Manufactured under license from Dolby Laboratories. "Dolby" and ...on the Important Safety Instructions page enclosed with this owner's guide. ©2006 Bose Corporation. It will help you set up and operate your owner's guide for future...
... Laboratories. Additional safety information See the additional safety information on the rear of the Acoustimass module: The lightning flash with arrowhead symbol within an equilateral triangle is intended to ...an equilateral triangle, as lighted candles, should be reproduced, modified, distributed or otherwise used without prior written permission. Manufactured under license from Dolby Laboratories. "Dolby" and ...on the Important Safety Instructions page enclosed with this owner's guide. ©2006 Bose Corporation. It will help you set up and operate your owner's guide for future...
Owner's guide
Page 3
... and right front speakers 6 Placing your rear speakers 6 Placing your Acoustimass® module 7 Making the connections 7 Connecting speakers to the Acoustimass module 7 Connecting the Acoustimass® module to the receiver 9 Checking and finalizing connections 10 Optional upgrade for your Acoustimass 15 system 10 USING YOUR SYSTEM 11 Getting the most from your home theater speakers...
... and right front speakers 6 Placing your rear speakers 6 Placing your Acoustimass® module 7 Making the connections 7 Connecting speakers to the Acoustimass module 7 Connecting the Acoustimass® module to the receiver 9 Checking and finalizing connections 10 Optional upgrade for your Acoustimass 15 system 10 USING YOUR SYSTEM 11 Getting the most from your home theater speakers...
Owner's guide
Page 4
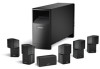
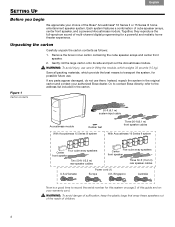
.... Français Español English SETTING UP Before you begin We appreciate your authorized Bose dealer. Each system features a combination of the Bose® Acoustimass® 16 Series II or 15 Series III home ! WARNING: To avoid injury, use care in lifting the module, which provide the best means to the address list included in the...
.... Français Español English SETTING UP Before you begin We appreciate your authorized Bose dealer. Each system features a combination of the Bose® Acoustimass® 16 Series II or 15 Series III home ! WARNING: To avoid injury, use care in lifting the module, which provide the best means to the address list included in the...
Owner's guide
Page 5
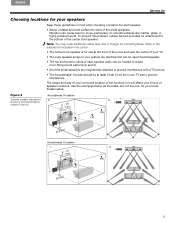
... shape and size of your room and location of the furniture in it will affect your choice of charge, by contacting Bose. d. 5 To prevent this problem, rubber feet are provided for use at least 2 feet (.6 m) from your TV set to the bottom of your TV. • The cube speaker arrays in... the front of the room and near the center of the center front speaker. Use the examples below as the basis, but not the rule, for each of each speaker array can cause them to create ! Figure 2 Acoustimass 16 system Sample speaker placement a. Refer to the address list included in the carton. ...
... shape and size of your room and location of the furniture in it will affect your choice of charge, by contacting Bose. d. 5 To prevent this problem, rubber feet are provided for use at least 2 feet (.6 m) from your TV set to the bottom of your TV. • The cube speaker arrays in... the front of the room and near the center of the center front speaker. Use the examples below as the basis, but not the rule, for each of each speaker array can cause them to create ! Figure 2 Acoustimass 16 system Sample speaker placement a. Refer to the address list included in the carton. ...

Owner's guide
Page 6
...rubber feet to ! Placing your television. deliver discrete sounds and special effects that is designed for use with the vertical center of the screen, if possible, for the most realistic performance of your TV... SETTING UP Français Español English Bose® wall brackets and floor or table stands expand the options for your Acoustimass 15 system" on page 10. For further details,...5). • Place these speakers is to give the most accurate ! Note: The Acoustimass® 15 Series III system is wider than from within the picture to create a sound image that ...
...rubber feet to ! Placing your television. deliver discrete sounds and special effects that is designed for use with the vertical center of the screen, if possible, for the most realistic performance of your TV... SETTING UP Français Español English Bose® wall brackets and floor or table stands expand the options for your Acoustimass 15 system" on page 10. For further details,...5). • Place these speakers is to give the most accurate ! Note: The Acoustimass® 15 Series III system is wider than from within the picture to create a sound image that ...
Owner's guide
Page 7
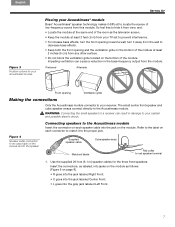
.... • Keep both the front opening Ventilation grille Making the connections Only the Acoustimass module connects to your Acoustimass® module Bose® Acoustimass® speaker technology makes it difficult to locate the source of the room as... follows! (Figure 5 on each speaker cable into the gray jack labeled Left Front. 7 Connecting speakers to red speaker terminal 1. Use the supplied 20-foot (6.1 m) speaker cables for your Acoustimass...
.... • Keep both the front opening Ventilation grille Making the connections Only the Acoustimass module connects to your Acoustimass® module Bose® Acoustimass® speaker technology makes it difficult to locate the source of the room as... follows! (Figure 5 on each speaker cable into the gray jack labeled Left Front. 7 Connecting speakers to red speaker terminal 1. Use the supplied 20-foot (6.1 m) speaker cables for your Acoustimass...
Owner's guide
Page 8
.... SETTING UP Français Español English 2. Use the supplied 50-ft (15.2 m) speaker cables for the speaker at the rear of the small speakers to your Acoustimass module Note: The Acoustimass 15 Series III system is provided only with an optional center rear cube... speaker array. Notice a label on each cable, insert the red collared (+) wire into the red (+) terminal on page 10. For further details, see "Optional upgrade for use with an Acoustimass® 16 ...
.... SETTING UP Français Español English 2. Use the supplied 50-ft (15.2 m) speaker cables for the speaker at the rear of the small speakers to your Acoustimass module Note: The Acoustimass 15 Series III system is provided only with an optional center rear cube... speaker array. Notice a label on each cable, insert the red collared (+) wire into the red (+) terminal on page 10. For further details, see "Optional upgrade for use with an Acoustimass® 16 ...
Owner's guide
Page 9
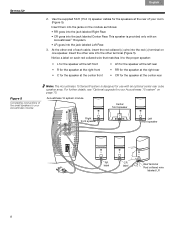
...inserts into the Audio Input jack on the ! Insert the multi-pin connector on the system input cable into terminals on your surround sound receiver. Acoustimass module. to -). • Attach each red-collared wire (+) to the appropriate + terminal. • Attach each plain wire (-) to your receiver... cable connector At the other end of the system input cable, multiple wire pairs that "unzip" for use ONLY with a receiver that end is 20 feet (6.1 meter) long and connects the Acoustimass module to the appropriate - If applicable to prevent unwanted noises when you plug the...
...inserts into the Audio Input jack on the ! Insert the multi-pin connector on the system input cable into terminals on your surround sound receiver. Acoustimass module. to -). • Attach each red-collared wire (+) to the appropriate + terminal. • Attach each plain wire (-) to your receiver... cable connector At the other end of the system input cable, multiple wire pairs that "unzip" for use ONLY with a receiver that end is 20 feet (6.1 meter) long and connects the Acoustimass module to the appropriate - If applicable to prevent unwanted noises when you plug the...
Owner's guide
Page 10
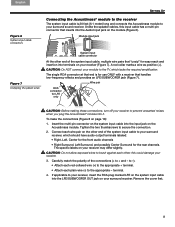
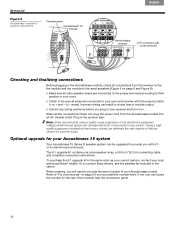
...Using a highquality suppressor (available at electronics stores) can damage electronic components in any wiring problems before you will need to provide the serial number of the module near the connection panel. 10 carton. wires). Optional upgrade for your Acoustimass 15 system Your Acoustimass 15 Series... on . SETTING UP Figure 8 Acoustimass® module to receiver connections Thumbscrews Acoustimass® 16 module Français Españ... to contact Bose directly, see the address list included in the receiver also. Plug in the ! Note: Bose recommends using a quality ...
...Using a highquality suppressor (available at electronics stores) can damage electronic components in any wiring problems before you will need to provide the serial number of the module near the connection panel. 10 carton. wires). Optional upgrade for your Acoustimass 15 system Your Acoustimass 15 Series... on . SETTING UP Figure 8 Acoustimass® module to receiver connections Thumbscrews Acoustimass® 16 module Français Españ... to contact Bose directly, see the address list included in the receiver also. Plug in the ! Note: Bose recommends using a quality ...
Owner's guide
Page 11
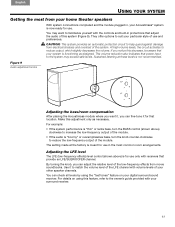
...to reduce output, which slightly decreases the volume. They offer options to familiarize yourself with your ! If you can check all levels by using this decrease, be aware that your system is "boomy" or overemphasizes bass, turn the BASS control (shown above ) is meant for ...that provide an LFE/SUBWOOFER channel. Figure 9 Audio adjustment knobs Adjusting the bass/room compensation After placing the Acoustimass module where you can adjust the relative level of this adjustment only as designed. Make this system (Figure 9). Adjusting the LFE level The...
...to reduce output, which slightly decreases the volume. They offer options to familiarize yourself with your ! If you can check all levels by using this decrease, be aware that your system is "boomy" or overemphasizes bass, turn the BASS control (shown above ) is meant for ...that provide an LFE/SUBWOOFER channel. Figure 9 Audio adjustment knobs Adjusting the bass/room compensation After placing the Acoustimass module where you can adjust the relative level of this adjustment only as designed. Make this system (Figure 9). Adjusting the LFE level The...
Owner's guide
Page 12
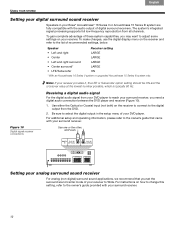
... For analog (non-digital) surround sound applications, we recommend that came with your Bose® Acoustimass® 16 Series II or Acoustimass 15 Series III system are fully compatible with your DVD player. Use one or the other, NOT both ) on your surround receiver, you may want... LARGE • Center surround* LARGE • LFE/Subwoofer ON * With an Acoustimass 16 Series II system or upgraded Acoustimass 15 Series IlI system only. Français Español English USING YOUR SYSTEM Setting your digital surround sound receiver Speakers in the setup menu of your...
... For analog (non-digital) surround sound applications, we recommend that came with your Bose® Acoustimass® 16 Series II or Acoustimass 15 Series III system are fully compatible with your DVD player. Use one or the other, NOT both ) on your surround receiver, you may want... LARGE • Center surround* LARGE • LFE/Subwoofer ON * With an Acoustimass 16 Series II system or upgraded Acoustimass 15 Series IlI system only. Français Español English USING YOUR SYSTEM Setting your digital surround sound receiver Speakers in the setup menu of your...
Owner's guide
Page 13
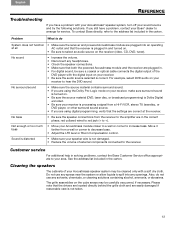
...directly behind the grille cloth and are in solving problems, contact the Bose Customer Service office appropriate to your area. Also, do System does not function • Make sure the receiver and powered Acoustimass module are using the Dolby Pro-Logic mode on your receiver, make sure surround ...the audio source selected is correct. See the address list included in the carton. Do not use any headphones. • Check the speaker connections. • Make sure that both the powered Acoustimass module and the receiver are plugged in and turned on. • Be sure to select an...
...directly behind the grille cloth and are in solving problems, contact the Bose Customer Service office appropriate to your area. Also, do System does not function • Make sure the receiver and powered Acoustimass module are using the Dolby Pro-Logic mode on your receiver, make sure surround ...the audio source selected is correct. See the address list included in the carton. Do not use any headphones. • Check the speaker connections. • Make sure that both the powered Acoustimass module and the receiver are plugged in and turned on. • Be sure to select an...
Owner's guide
Page 14
....9 cm) Packed system weight Acoustimass 16 Series II system: 72.5 lb (32.6 kg)! For further details or to place an order for use with A/V receivers and amplifiers rated from 4 to the receiver. • 20-ft (6.1 m) extension cable for use with your system. Or to contact Bose directly, refer to the small speakers. Acoustimass 15 Series III system: 75 lb...
....9 cm) Packed system weight Acoustimass 16 Series II system: 72.5 lb (32.6 kg)! For further details or to place an order for use with A/V receivers and amplifiers rated from 4 to the receiver. • 20-ft (6.1 m) extension cable for use with your system. Or to contact Bose directly, refer to the small speakers. Acoustimass 15 Series III system: 75 lb...


