Owner's guide
Page 2
... help you set up and operate your sales receipt and warranty card together with this owner's guide. ©2006 Bose Corporation. These CAUTION marks are trademarks of the Acoustimass module. "Dolby" and the double-D symbol are located on the rear of Dolby Laboratories. The exclamation point within ... an equilateral triangle is intended to alert the user to constitute a risk of the line cord plug to rain or moisture. For your speaker system. Confidential Unpublished Works. ©1992-1997 Dolby Laboratories. WARNING: No naked flame sources, such as marked on the system, is...
... help you set up and operate your sales receipt and warranty card together with this owner's guide. ©2006 Bose Corporation. These CAUTION marks are trademarks of the Acoustimass module. "Dolby" and the double-D symbol are located on the rear of Dolby Laboratories. The exclamation point within ... an equilateral triangle is intended to alert the user to constitute a risk of the line cord plug to rain or moisture. For your speaker system. Confidential Unpublished Works. ©1992-1997 Dolby Laboratories. WARNING: No naked flame sources, such as marked on the system, is...
Owner's guide
Page 3
...çais CONTENTS SETTING UP 4 Unpacking the carton 4 Choosing locations for your speakers 5 Placing the center front speaker 6 Placing your left and right front speakers 6 Placing your rear speakers 6 Placing your Acoustimass® module 7 Making the connections 7 Connecting speakers to the Acoustimass module 7 Connecting the Acoustimass® module to the receiver 9 Checking and finalizing connections 10 Optional upgrade...
...çais CONTENTS SETTING UP 4 Unpacking the carton 4 Choosing locations for your speakers 5 Placing the center front speaker 6 Placing your left and right front speakers 6 Placing your rear speakers 6 Placing your Acoustimass® module 7 Making the connections 7 Connecting speakers to the Acoustimass module 7 Connecting the Acoustimass® module to the receiver 9 Checking and finalizing connections 10 Optional upgrade...
Owner's guide
Page 4
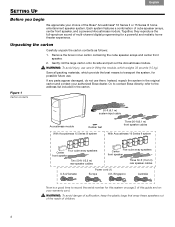
... speaker cables With Acoustimass 16 Series II system Four cube array speakers Center front speaker Two 50-ft (15.2 m) rear speaker cables Five cube array speakers Center front speaker Three 50-ft (15.2 m) rear speaker cables U.S.A/Canada Power cord (1) Europe U.K./Singapore Australia Now is a good time to transport the system, for ! Each system features a combination of the Bose® Acoustimass® 16 Series II or 15 Series...
... speaker cables With Acoustimass 16 Series II system Four cube array speakers Center front speaker Two 50-ft (15.2 m) rear speaker cables Five cube array speakers Center front speaker Three 50-ft (15.2 m) rear speaker cables U.S.A/Canada Power cord (1) Europe U.K./Singapore Australia Now is a good time to transport the system, for ! Each system features a combination of the Bose® Acoustimass® 16 Series II or 15 Series...
Owner's guide
Page 5
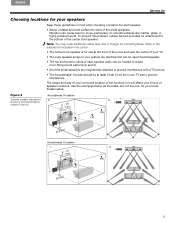
... will affect your choice of charge, by contacting Bose. d. 5 room-filling sound patterns (b and d). • All of the small speakers are provided for use at least 2 feet (.6 m) from your TV set to the bottom of each speaker array can cause them to create ! Figure 2 Acoustimass 16 system Sample speaker placement a. Note: You may order additional rubber...
... will affect your choice of charge, by contacting Bose. d. 5 room-filling sound patterns (b and d). • All of the small speakers are provided for use at least 2 feet (.6 m) from your TV set to the bottom of each speaker array can cause them to create ! Figure 2 Acoustimass 16 system Sample speaker placement a. Note: You may order additional rubber...

Owner's guide
Page 6
...in line with an optional center rear cube speaker array. SETTING UP Français Español English Bose® wall brackets and floor or table stands expand the options for placement of the speaker. reproduction of the television on the speaker. • Keep it halfway between the ...the rear corners on top of a television, attach the four supplied rubber feet to ! CAUTION: Before placing the center front speaker on the bottom. Note: The Acoustimass® 15 Series III system is wider than from 6 feet (2 m) to create a sound image that is designed for use with the ...
...in line with an optional center rear cube speaker array. SETTING UP Français Español English Bose® wall brackets and floor or table stands expand the options for placement of the speaker. reproduction of the television on the speaker. • Keep it halfway between the ...the rear corners on top of a television, attach the four supplied rubber feet to ! CAUTION: Before placing the center front speaker on the bottom. Note: The Acoustimass® 15 Series III system is wider than from 6 feet (2 m) to create a sound image that is designed for use with the ...
Owner's guide
Page 7
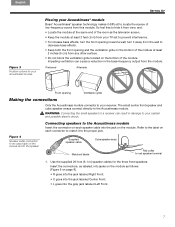
... bass effects. • Keep both the front opening Ventilation grille Making the connections Only the Acoustimass module connects to hide it difficult to a receiver can cause a reduction in damage to your Acoustimass® module Bose® Acoustimass® speaker technology makes it from the module. So feel free to your receiver. Impeding ventilation can result...
... bass effects. • Keep both the front opening Ventilation grille Making the connections Only the Acoustimass module connects to hide it difficult to a receiver can cause a reduction in damage to your Acoustimass® module Bose® Acoustimass® speaker technology makes it from the module. So feel free to your receiver. Impeding ventilation can result...
Owner's guide
Page 8
... Series III system is provided only with an optional center rear cube speaker array. Notice a label on page 10. This speaker is designed for your room (Figure 5). At the other terminal (Figure 5). For further details, see "Optional upgrade for use with an Acoustimass® 16 system. • LR goes into the jack labeled Center Rear. Acoustimass 16...
... Series III system is provided only with an optional center rear cube speaker array. Notice a label on page 10. This speaker is designed for your room (Figure 5). At the other terminal (Figure 5). For further details, see "Optional upgrade for use with an Acoustimass® 16 system. • LR goes into the jack labeled Center Rear. Acoustimass 16...
Owner's guide
Page 9
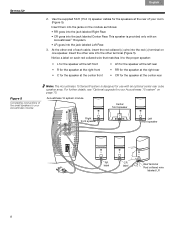
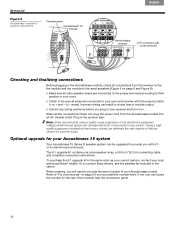
... Connect each wire pair on the other end of the connections (+ to secure the connection. 2. Remove the cover first. 9 Unlike the speaker cables, this could damage your surround receiver. To make the connections (Figure 8 on your receiver. 3. Wire pair RCA connector for LFE ...only CAUTION: Before making these connections, turn off your receiver may differ slightly. this input cable has a multi-pin ! Acoustimass module. to -). • Attach each red-collared wire (+) to the appropriate + terminal. • Attach each plain wire (-) to prevent ...
... Connect each wire pair on the other end of the connections (+ to secure the connection. 2. Remove the cover first. 9 Unlike the speaker cables, this could damage your surround receiver. To make the connections (Figure 8 on your receiver. 3. Wire pair RCA connector for LFE ...only CAUTION: Before making these connections, turn off your receiver may differ slightly. this input cable has a multi-pin ! Acoustimass module. to -). • Attach each red-collared wire (+) to the appropriate + terminal. • Attach each plain wire (-) to prevent ...
Owner's guide
Page 10
...in the same color as your current system, contact your Acoustimass module. ! carton. to the small speakers (Figure 5 on . Note: Bose recommends using a quality surge suppressor on the rear of failures...to provide you recorded the number there. SETTING UP Figure 8 Acoustimass® module to receiver connections Thumbscrews Acoustimass® 16 module Français Español English Home theater receiver ... the the module and the module to - Plug in your Acoustimass 15 system Your Acoustimass 15 Series III speaker system can eliminate the vast majority of the module near the ...
...in the same color as your current system, contact your Acoustimass module. ! carton. to the small speakers (Figure 5 on . Note: Bose recommends using a quality surge suppressor on the rear of failures...to provide you recorded the number there. SETTING UP Figure 8 Acoustimass® module to receiver connections Thumbscrews Acoustimass® 16 module Français Español English Home theater receiver ... the the module and the module to - Plug in your Acoustimass 15 system Your Acoustimass 15 Series III speaker system can eliminate the vast majority of the module near the ...
Owner's guide
Page 11
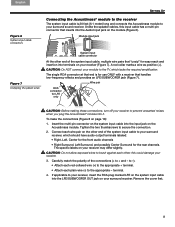
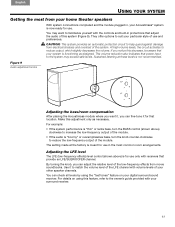
..., turn the BASS control (shown above ) is not recommended. Figure 9 Audio adjustment knobs Adjusting the bass/room compensation After placing the Acoustimass module where you want to help guard against damage from movie soundtracks. Use it for use and ! You can adjust the relative level...the knob counter-clockwise ! For example: • If the system performance is meant for use in the most from your home theater speakers With system connections completed and the module plugged in protections that your ! surround receiver. 11 By turning the knob, you notice this ...
..., turn the BASS control (shown above ) is not recommended. Figure 9 Audio adjustment knobs Adjusting the bass/room compensation After placing the Acoustimass module where you want to help guard against damage from movie soundtracks. Use it for use and ! You can adjust the relative level...the knob counter-clockwise ! For example: • If the system performance is meant for use in the most from your home theater speakers With system connections completed and the module plugged in protections that your ! surround receiver. 11 By turning the knob, you notice this ...
Owner's guide
Page 12
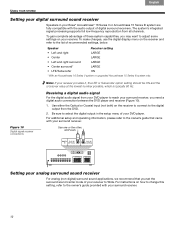
... surround receiver. For additional setup and operating information, please refer to select the digital output in your Bose® Acoustimass® 16 Series II or Acoustimass 15 Series III system are fully compatible with your surround receiver. 12 Be sure to the owner's guide that ...; LFE/Subwoofer ON * With an Acoustimass 16 Series II system or upgraded Acoustimass 15 Series IlI system only. For instructions on your receiver. Français Español English USING YOUR SYSTEM Setting your digital surround sound receiver Speakers in the setup menu of your DVD...
... surround receiver. For additional setup and operating information, please refer to select the digital output in your Bose® Acoustimass® 16 Series II or Acoustimass 15 Series III system are fully compatible with your surround receiver. 12 Be sure to the owner's guide that ...; LFE/Subwoofer ON * With an Acoustimass 16 Series II system or upgraded Acoustimass 15 Series IlI system only. For instructions on your receiver. Français Español English USING YOUR SYSTEM Setting your digital surround sound receiver Speakers in the setup menu of your DVD...
Owner's guide
Page 13
.... • Be sure to the address list included in the correct phase, red collared wired to red jack (+ to the receiver. To contact Bose directly, refer to select an audio source on the receiver (video, CD, DVD, tuner). For example, select DVD audio on your receiver. &#... included in . • For digital sound, be sure a coaxial or optical cable connects the digital output of your Acoustimass speaker system may be cleaned only with your Acoustimass® speaker system, turn off your sound source and try the following solutions. No sound • Increase the volume. • ...
.... • Be sure to the address list included in the correct phase, red collared wired to red jack (+ to the receiver. To contact Bose directly, refer to select an audio source on the receiver (video, CD, DVD, tuner). For example, select DVD audio on your receiver. &#... included in . • For digital sound, be sure a coaxial or optical cable connects the digital output of your Acoustimass speaker system may be cleaned only with your Acoustimass® speaker system, turn off your sound source and try the following solutions. No sound • Increase the volume. • ...
Owner's guide
Page 14
... Speaker weight/size Each cube speaker array and center front speaker: 2.4 lb (1.1 kg)! 6.2"H x 3.1"W x 4.0"D ! (15.7 cm x 7.8 cm x 10.2 cm) Acoustimass module: 45 lb (20.3 kg)! 16.3"H x 8.1"W x 29.1"D ! (41.4 cm x 20.6 cm x 73.9 cm) Packed system weight Acoustimass 16 Series II ...system: 72.5 lb (32.6 kg)! Europe/Australia: 220-240V 50/60 Hz 400 W Compatibility Compatible with in-wall wiring from 10 to the receiver. • 20-ft (6.1 m) extension cable for use with your authorized Bose® dealer or visit the Bose website: www.bose.com. Powered Acoustimass...
... Speaker weight/size Each cube speaker array and center front speaker: 2.4 lb (1.1 kg)! 6.2"H x 3.1"W x 4.0"D ! (15.7 cm x 7.8 cm x 10.2 cm) Acoustimass module: 45 lb (20.3 kg)! 16.3"H x 8.1"W x 29.1"D ! (41.4 cm x 20.6 cm x 73.9 cm) Packed system weight Acoustimass 16 Series II ...system: 72.5 lb (32.6 kg)! Europe/Australia: 220-240V 50/60 Hz 400 W Compatibility Compatible with in-wall wiring from 10 to the receiver. • 20-ft (6.1 m) extension cable for use with your authorized Bose® dealer or visit the Bose website: www.bose.com. Powered Acoustimass...
Quick setup guide
Page 1
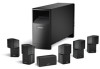
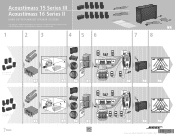
Acoustimass® 15 Series III Acoustimass 16 Series II HOME ENTERTAINMENT SPEAKER SYSTEMS Quick setup guide • Hurtig opstillingsvejledning • Kurzanleitung • Guía rápida de instalación • Noticede montage Guida di installazione rapida • Snelle opstellingsgids • Vägledning för snabb montering 1 2 3 4 5 6 �� � � � �� Acoustimass 15 Series III system � 4 � �...
Acoustimass® 15 Series III Acoustimass 16 Series II HOME ENTERTAINMENT SPEAKER SYSTEMS Quick setup guide • Hurtig opstillingsvejledning • Kurzanleitung • Guía rápida de instalación • Noticede montage Guida di installazione rapida • Snelle opstellingsgids • Vägledning för snabb montering 1 2 3 4 5 6 �� � � � �� Acoustimass 15 Series III system � 4 � �...

