Owner's guide
Page 3
...; module 7 Connecting the speakers 8 Connecting front cube speaker arrays to the Acoustimass module 8 Connecting rear cube speaker arrays to the Acoustimass module 9 Connecting the Acoustimass module to the receiver 10 Checking the connections 12 Connecting the Acoustimass module to power 12 Upgrading your Acoustimass 15 Series II speaker system 12 Using your system 13 For realistic home theater sound...
...; module 7 Connecting the speakers 8 Connecting front cube speaker arrays to the Acoustimass module 8 Connecting rear cube speaker arrays to the Acoustimass module 9 Connecting the Acoustimass module to the receiver 10 Checking the connections 12 Connecting the Acoustimass module to power 12 Upgrading your Acoustimass 15 Series II speaker system 12 Using your system 13 For realistic home theater sound...
Owner's guide
Page 4
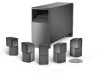
...you may hear sound from the very latest surround-sound encoded movies, CDs, and television shows, without a room full of your receiver settings. Stand the module up. Your stereo VCR, stereo television, or DVD player sends the encoded program material to the surround-sound... are directed to record the serial number of these speakers out of the reach of the Bose® Acoustimass® 15 series II or Acoustimass 16 home entertainment speaker system. Note: Now is compatible with the powered Acoustimass module, reproduce the full-spectrum of this guide and on page 2 of sound from the...
...you may hear sound from the very latest surround-sound encoded movies, CDs, and television shows, without a room full of your receiver settings. Stand the module up. Your stereo VCR, stereo television, or DVD player sends the encoded program material to the surround-sound... are directed to record the serial number of these speakers out of the reach of the Bose® Acoustimass® 15 series II or Acoustimass 16 home entertainment speaker system. Note: Now is compatible with the powered Acoustimass module, reproduce the full-spectrum of this guide and on page 2 of sound from the...
Owner's guide
Page 8
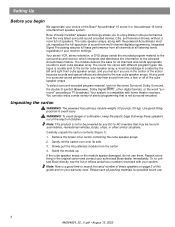
Check local building codes or enlist a qualified installer. Front speaker cables have two wires. For upgrading information, see "Upgrading your Acoustimass 15 Series II speaker system" on the + wire are not intended for in electrical shock or damage to your system. The other ends of the cables have blue ... Rear Rear Audio Input Left Center Right Front Front Front Setting Up Connecting the speakers CAUTION: Never connect the cube speaker arrays directly to the receiver. Always connect them to the powered Acoustimass® module, then connect the module to...
Check local building codes or enlist a qualified installer. Front speaker cables have two wires. For upgrading information, see "Upgrading your Acoustimass 15 Series II speaker system" on the + wire are not intended for in electrical shock or damage to your system. The other ends of the cables have blue ... Rear Rear Audio Input Left Center Right Front Front Front Setting Up Connecting the speakers CAUTION: Never connect the cube speaker arrays directly to the receiver. Always connect them to the powered Acoustimass® module, then connect the module to...
Owner's guide
Page 10
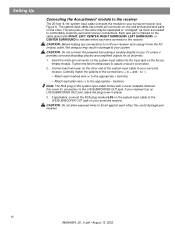
Setting Up Connecting the Acoustimass® module to the receiver The 20-foot (6.1m) system input cable connects the module to your receiver and unplug it provides surround decoding circuitry and amplified outputs for connection to your receiver. 10 AM264924_00 _V.pdf • August 13, ...or CENTER SURROUND to indicate where each plain wire (-) to the LFE/SUBWOOFER OUT jack on the other ; CAUTION: Do not connect the powered Acoustimass module directly to the LFE/SUBWOOFER OUT jack. this cover for all channels. 1. to -). • Attach each marked wire (+) to the ...
Setting Up Connecting the Acoustimass® module to the receiver The 20-foot (6.1m) system input cable connects the module to your receiver and unplug it provides surround decoding circuitry and amplified outputs for connection to your receiver. 10 AM264924_00 _V.pdf • August 13, ...or CENTER SURROUND to indicate where each plain wire (-) to the LFE/SUBWOOFER OUT jack on the other ; CAUTION: Do not connect the powered Acoustimass module directly to the LFE/SUBWOOFER OUT jack. this cover for all channels. 1. to -). • Attach each marked wire (+) to the ...
Owner's guide
Page 11
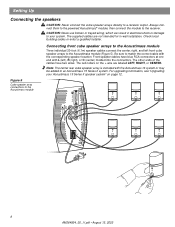
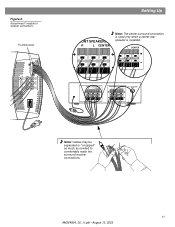
R L CENTER FRONT SPEAKERS A R L CENTER SURROUND SPEAKERS R L CENTER LFE/SUBWOOFER OUT Note: Cables may be separated or "unzipped" as much as needed to receiver connections Thumbscrews Setting Up FRONT SPEAKERS A R L CENTER Note: The center surround connection is used only when a center rear speaker is installed. Audio Output Left Center Right Rear Rear Rear Audio Input Left Center Right Front Front Front Figure 6 Acoustimass® module to comfortably reach the surround receiver connections. 11 AM264924_00 _V.pdf • August 13, 2002
R L CENTER FRONT SPEAKERS A R L CENTER SURROUND SPEAKERS R L CENTER LFE/SUBWOOFER OUT Note: Cables may be separated or "unzipped" as much as needed to receiver connections Thumbscrews Setting Up FRONT SPEAKERS A R L CENTER Note: The center surround connection is used only when a center rear speaker is installed. Audio Output Left Center Right Rear Rear Rear Audio Input Left Center Right Front Front Front Figure 6 Acoustimass® module to comfortably reach the surround receiver connections. 11 AM264924_00 _V.pdf • August 13, 2002
Owner's guide
Page 12
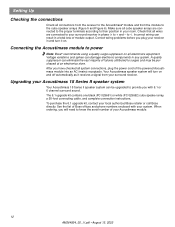
... Your Acoustimass 15 Series II speaker system can damage electronic components in a total loss of fices and phone numbers enclosed with 6.1 or 6 channel surround sound. Setting Up Checking the connections Check all connections from the receiver to the Acoustimass® module and from your surround receiver. Connecting the Acoustimass module to -). After you with your local authorized Bose...
... Your Acoustimass 15 Series II speaker system can damage electronic components in a total loss of fices and phone numbers enclosed with 6.1 or 6 channel surround sound. Setting Up Checking the connections Check all connections from the receiver to the Acoustimass® module and from your surround receiver. Connecting the Acoustimass module to -). After you with your local authorized Bose...
Owner's guide
Page 13
... against most kinds of the cube speakers. The factory or detent setting is normal operation and indicates that power input may be set of receiver settings. Using your Acoustimass 15 Series II speaker system" on page 12. 13 AM264924_00 _V.pdf • August 13, 2002 If the room sounds "thin" or lacks bass, turn the...
... against most kinds of the cube speakers. The factory or detent setting is normal operation and indicates that power input may be set of receiver settings. Using your Acoustimass 15 Series II speaker system" on page 12. 13 AM264924_00 _V.pdf • August 13, 2002 If the room sounds "thin" or lacks bass, turn the...
Owner's guide
Page 14
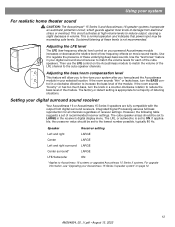
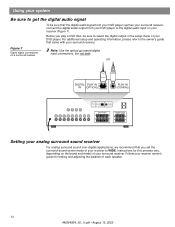
... R L SURROUND SPEAKERS R REAR L CENTER Setting your analog surround sound receiver For analog surround sound (non-digital) applications, we recommend that you play a DVD disc, be sure that came with your surround receiver. For additional setup and operating information, please refer to the owner's guide... from your DVD player to the digital audio input on your receiver (Figure 7). Before you set the surround-sound center mode of your receiver owner's guide for this process vary, depending on a surround receiver Note: Use the optical or coaxial digital input connections, but ...
... R L SURROUND SPEAKERS R REAR L CENTER Setting your analog surround sound receiver For analog surround sound (non-digital) applications, we recommend that you play a DVD disc, be sure that came with your surround receiver. For additional setup and operating information, please refer to the owner's guide... from your DVD player to the digital audio input on your receiver (Figure 7). Before you set the surround-sound center mode of your receiver owner's guide for this process vary, depending on a surround receiver Note: Use the optical or coaxial digital input connections, but ...
Owner's guide
Page 15
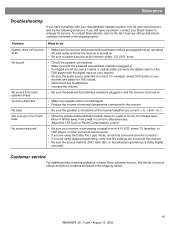
...encoded. No bass • Be sure the speaker connections at the receiver (video, CD, DVD, tuner). Move it farther away from cube speaker arrays • Be sure the powered Acoustimass module is plugged in solving problems, contact Bose customer service. to increase bass. No sound • Check the ... shipping carton. 15 AM264924_00 _V.pdf • August 13, 2002 For example, select DVD audio on . • Be sure to decrease bass. • Adjust the LFE Level or Room Compensation control. No sound from a wall or corner to select a source at the receiver/amplifier...
...encoded. No bass • Be sure the speaker connections at the receiver (video, CD, DVD, tuner). Move it farther away from cube speaker arrays • Be sure the powered Acoustimass module is plugged in solving problems, contact Bose customer service. to increase bass. No sound • Check the ... shipping carton. 15 AM264924_00 _V.pdf • August 13, 2002 For example, select DVD audio on . • Be sure to decrease bass. • Adjust the LFE Level or Room Compensation control. No sound from a wall or corner to select a source at the receiver/amplifier...
Owner's guide
Page 16
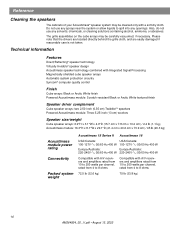
... size/weight Cube speaker arrays: 6.2"H x 3.1"W x 4.0"D (15.7 cm x 7.8 cm x 10.2 cm) / 2.4 lb (1.1 kg) Acoustimass module: 16.3"H x 8.1"W x 29.1"D (41.4 cm x 20.6 cm x 73.9 cm) / 45 lb (20.3 kg) Acoustimass module power rating Connectivity Packed system weight Acoustimass 15 Series II Acoustimass 16 USA/Canada: USA/Canada: 100-127V 50/60 Hz... 400 W 100-127V 50/60 Hz 400 W Europe/Australia: Europe/Australia: 220-240V 50/60 Hz 400 W 220-240V 50/60 Hz 400 W Compatible with A/V receivers and ...
... size/weight Cube speaker arrays: 6.2"H x 3.1"W x 4.0"D (15.7 cm x 7.8 cm x 10.2 cm) / 2.4 lb (1.1 kg) Acoustimass module: 16.3"H x 8.1"W x 29.1"D (41.4 cm x 20.6 cm x 73.9 cm) / 45 lb (20.3 kg) Acoustimass module power rating Connectivity Packed system weight Acoustimass 15 Series II Acoustimass 16 USA/Canada: USA/Canada: 100-127V 50/60 Hz... 400 W 100-127V 50/60 Hz 400 W Europe/Australia: Europe/Australia: 220-240V 50/60 Hz 400 W 220-240V 50/60 Hz 400 W Compatible with A/V receivers and ...


