Owner's guide
Page 3
... adjustments 11 Set your speakers 6 Left and right front cube speakers 6 Center cube speaker 6 Surround cube speakers 7 Acoustimass module 7 Connect the speakers 8 Use the cable correctly 8 Connect the Acoustimass module to the center and front cube speakers 9 Connect the Acoustimass module to the surround cube speakers 9 Connect the Acoustimass module to the receiver 9 Check the connections 10 Using Your Acoustimass-10 speakers For realistic home theater...
... adjustments 11 Set your speakers 6 Left and right front cube speakers 6 Center cube speaker 6 Surround cube speakers 7 Acoustimass module 7 Connect the speakers 8 Use the cable correctly 8 Connect the Acoustimass module to the center and front cube speakers 9 Connect the Acoustimass module to the surround cube speakers 9 Connect the Acoustimass module to the receiver 9 Check the connections 10 Using Your Acoustimass-10 speakers For realistic home theater...
Owner's guide
Page 4
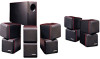
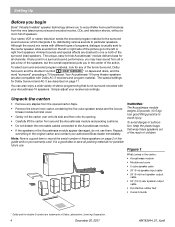
... to avoid injury. Your Acoustimass-10 home theater speakers are directed to save all or just a few of the speakers, but the overall experience puts you in the carton: • Acoustimass module • Module end cover • 5 cube speaker pairs • 20' (6 m) speaker input cable • 20' (6 m) front speaker output cable • 50' (15 m) rear speaker output cable • 8 protective rubber feet...
... to avoid injury. Your Acoustimass-10 home theater speakers are directed to save all or just a few of the speakers, but the overall experience puts you in the carton: • Acoustimass module • Module end cover • 5 cube speaker pairs • 20' (6 m) speaker input cable • 20' (6 m) front speaker output cable • 50' (15 m) rear speaker output cable • 8 protective rubber feet...

Owner's guide
Page 5
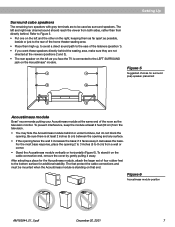
... extend your placement options. Bose wall brackets and floor stands can hide the Acoustimass module conveniently out of the cube speakers are magnetically shielded. NOTE:...center speakers near a TV screen with sufficient cable lengths to allow the sound to 50 feet (15 m) between the Acoustimass module and the front and center cube speakers. ...Acoustimass module and the surround speakers. A suggested home theater layout AM183644_01_V.pdf December 20, 2001 5 Setting Up Placing your Acoustimass®-10 speakers to viewers sitting anywhere in Figure 2. The surround speakers...
... extend your placement options. Bose wall brackets and floor stands can hide the Acoustimass module conveniently out of the cube speakers are magnetically shielded. NOTE:...center speakers near a TV screen with sufficient cable lengths to allow the sound to 50 feet (15 m) between the Acoustimass module and the front and center cube speakers. ...Acoustimass module and the surround speakers. A suggested home theater layout AM183644_01_V.pdf December 20, 2001 5 Setting Up Placing your Acoustimass®-10 speakers to viewers sitting anywhere in Figure 2. The surround speakers...

Owner's guide
Page 6
...Acoustimass®-10 system vary in a lateral position, with your TV, at least 6 feet (2 m), or as much as close to come from within the picture. Ask for the most accurate dialogue reproduction (positions 1 or 2). Left and right front cube speakers Use the two cube speakers...the Bose® customer service numbers inside the back cover of the screen for the best sound balance (position 1). Additional rubber feet are placing the center speaker on the left and right front speaker placement 1 1 2 Center cube speaker Select one speaker with a gray terminal for your speakers The cables ...
...Acoustimass®-10 system vary in a lateral position, with your TV, at least 6 feet (2 m), or as much as close to come from within the picture. Ask for the most accurate dialogue reproduction (positions 1 or 2). Left and right front cube speakers Use the two cube speakers...the Bose® customer service numbers inside the back cover of the screen for the best sound balance (position 1). Additional rubber feet are placing the center speaker on the left and right front speaker placement 1 1 2 Center cube speaker Select one speaker with a gray terminal for your speakers The cables ...
Owner's guide
Page 7
...left as you face the TV is connected to the LEFT SURROUND jack on the Acoustimass® module. 1 1 Figure 5 Suggested choices for surround (rear) speaker placement 2 2 3 3 Acoustimass module Bose® recommends putting your Acoustimass module at least 2 inches (5 cm) between the opening and any surface. ...place the opening 2 to 3 inches (5 to be mounted when the Acoustimass module is standing on the cable connection end, remove the cover by gently pulling it decreases the bass. Figure 6 Acoustimass module position AM183644_01_V.pdf December 20, 2001 7 To stand it on...
...left as you face the TV is connected to the LEFT SURROUND jack on the Acoustimass® module. 1 1 Figure 5 Suggested choices for surround (rear) speaker placement 2 2 3 3 Acoustimass module Bose® recommends putting your Acoustimass module at least 2 inches (5 cm) between the opening and any surface. ...place the opening 2 to 3 inches (5 to be mounted when the Acoustimass module is standing on the cable connection end, remove the cover by gently pulling it decreases the bass. Figure 6 Acoustimass module position AM183644_01_V.pdf December 20, 2001 7 To stand it on...

Owner's guide
Page 8
Separate these wires just enough to an receiver output. Call Bose® customer service for cables specifically designed for in making any of insulated wire pairs attached to connect your system. Never ...speakers and are laying out the cable lengths. • The 20 foot (6 m) cable with three pairs of wires connects the Acoustimass module to the center, left, and right front cube speakers. • The 50 foot (15 m) cable with L, R, C, LS, and RS. Always connect the cube speakers to the Acoustimass module, then connect the Acoustimass module to splice cables. The supplied cables...
Separate these wires just enough to an receiver output. Call Bose® customer service for cables specifically designed for in making any of insulated wire pairs attached to connect your system. Never ...speakers and are laying out the cable lengths. • The 20 foot (6 m) cable with three pairs of wires connects the Acoustimass module to the center, left, and right front cube speakers. • The 50 foot (15 m) cable with L, R, C, LS, and RS. Always connect the cube speakers to the Acoustimass module, then connect the Acoustimass module to splice cables. The supplied cables...

Owner's guide
Page 9
... red (+) output. Insert the gray connector marked LS into the gray terminal on the receiver. Connect the Acoustimass module to the receiver Use the 20 foot (6 m) cable with a red collar (+) to the Right Surround (rear) SPEAKER OUTPUT connections. 2. LS wires go to the R jack. Match the polarity on the left of wires to...
... red (+) output. Insert the gray connector marked LS into the gray terminal on the receiver. Connect the Acoustimass module to the receiver Use the 20 foot (6 m) cable with a red collar (+) to the Right Surround (rear) SPEAKER OUTPUT connections. 2. LS wires go to the R jack. Match the polarity on the left of wires to...

Owner's guide
Page 12
...8226; Increase the volume. • Disconnect any headphones. • Make sure speaker cable is not damaged. • Reduce the volume of any external components connected to the receiver. • Make sure the speaker connections at the receiver or amplifier are correct (+ to select a source at the... turned on. • Be sure to + and - Maintaining Your Acoustimass®-10 Speakers Troubleshooting If you are using AC-3 programming, verify that the settings are using in solving problems, contact Bose customer service. See the inside back cover of the receiver is distorted ...
...8226; Increase the volume. • Disconnect any headphones. • Make sure speaker cable is not damaged. • Reduce the volume of any external components connected to the receiver. • Make sure the speaker connections at the receiver or amplifier are correct (+ to select a source at the... turned on. • Be sure to + and - Maintaining Your Acoustimass®-10 Speakers Troubleshooting If you are using AC-3 programming, verify that the settings are using in solving problems, contact Bose customer service. See the inside back cover of the receiver is distorted ...


