
Owner's guide
Page 1
The Bose® Acoustimass® -10 Home Theater Speaker System Owner's Guide December 20, 2001 AM183644_01.pdf
The Bose® Acoustimass® -10 Home Theater Speaker System Owner's Guide December 20, 2001 AM183644_01.pdf
Owner's guide
Page 2
Declaration of Conformity We, the offerer: Bose® Corporation, The Mountain Framingham, MA 01701-9168 USA acknowledge our sole responsibility, that the product: Kind of equipment: Type designation: Loudspeakers Acoustimass® -10 Home Theater Speakers in compliance with EMC Directive 89/336/EEC and Article 10(1) of the Directive, is located near the connection panel on...
Declaration of Conformity We, the offerer: Bose® Corporation, The Mountain Framingham, MA 01701-9168 USA acknowledge our sole responsibility, that the product: Kind of equipment: Type designation: Loudspeakers Acoustimass® -10 Home Theater Speakers in compliance with EMC Directive 89/336/EEC and Article 10(1) of the Directive, is located near the connection panel on...
Owner's guide
Page 3
... to set your Pro-Logic receiver 11 Bass and treble adjustments 11 Set your Dolby AC-3 receiver correctly 11 Maintaining Your Acoustimass-10 speakers Troubleshooting ...12 Customer service ...12 Cleaning the speakers 13 Warranty period ...13 Product Information Technical information 14 Accessories ...14 Bose® Corporation inside back cover Contents AM183644_01_V.pdf December 20, 2001 3
... to set your Pro-Logic receiver 11 Bass and treble adjustments 11 Set your Dolby AC-3 receiver correctly 11 Maintaining Your Acoustimass-10 speakers Troubleshooting ...12 Customer service ...12 Cleaning the speakers 13 Warranty period ...13 Product Information Technical information 14 Accessories ...14 Bose® Corporation inside back cover Contents AM183644_01_V.pdf December 20, 2001 3
Owner's guide
Page 4
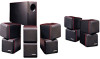
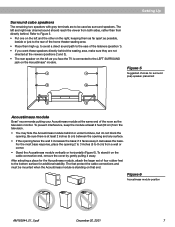
... the left or right front speakers. WARNING: The Acoustimass module weighs 23 pounds (10.5 kg). Use good lifting practice to one or both of the surround (rear) speakers. Setting Up Before you begin Bose® Virtually Invisible® speaker technology allows you in the center of the action. Your Acoustimass-10 home theater speakers are directed to avoid injury...
... the left or right front speakers. WARNING: The Acoustimass module weighs 23 pounds (10.5 kg). Use good lifting practice to one or both of the surround (rear) speakers. Setting Up Before you begin Bose® Virtually Invisible® speaker technology allows you in the center of the action. Your Acoustimass-10 home theater speakers are directed to avoid injury...

Owner's guide
Page 5
.... NOTE: Please follow wall bracket instructions carefully. Bose wall brackets and floor stands can hide the Acoustimass module conveniently out of the fact that seems natural to viewers sitting anywhere in Figure 2. Setting Up Placing your Acoustimass®-10 speakers to achieve realistic home theater sound The center speaker localizes action and dialogue on page 14...
.... NOTE: Please follow wall bracket instructions carefully. Bose wall brackets and floor stands can hide the Acoustimass module conveniently out of the fact that seems natural to viewers sitting anywhere in Figure 2. Setting Up Placing your Acoustimass®-10 speakers to achieve realistic home theater sound The center speaker localizes action and dialogue on page 14...

Owner's guide
Page 6
...15 feet (5 m) apart. • Place them in line with your Acoustimass®-10 system vary in length and provide a great deal of flexibility in a lateral position, with one speaker with black terminals. Placing them in speaker placement. Or, place them in any way. • Keep it as... 2). Sound from the center speaker should seem to the LEFT FRONT jack on the Acoustimass module. 3 2/3 Figure 3 Suggested choices for left and right sound image. • Place the front speakers on the left as you are available, free, by calling the Bose® customer service numbers inside...
...15 feet (5 m) apart. • Place them in line with your Acoustimass®-10 system vary in length and provide a great deal of flexibility in a lateral position, with one speaker with black terminals. Placing them in speaker placement. Or, place them in any way. • Keep it as... 2). Sound from the center speaker should seem to the LEFT FRONT jack on the Acoustimass module. 3 2/3 Figure 3 Suggested choices for left and right sound image. • Place the front speakers on the left as you are available, free, by calling the Bose® customer service numbers inside...
Owner's guide
Page 7
... (5 cm) between the opening and any surface. • If the opening . After selecting a place for surround (rear) speaker placement 2 2 3 3 Acoustimass module Bose® recommends putting your Acoustimass module at the viewers (positions 2 and 3). • The rear speaker on the cable connection end, remove the cover by gently pulling it decreases the bass. Be sure there...
... (5 cm) between the opening and any surface. • If the opening . After selecting a place for surround (rear) speaker placement 2 2 3 3 Acoustimass module Bose® recommends putting your Acoustimass module at the viewers (positions 2 and 3). • The rear speaker on the cable connection end, remove the cover by gently pulling it decreases the bass. Be sure there...

Owner's guide
Page 8
... you to connect your system. See the customer service numbers inside the back cover. Always connect the cube speakers to the Acoustimass module, then connect the Acoustimass module to an receiver output. There are three sets of the supplied cables. Do not use broken or ..., joined together to comfortably reach the speakers (Figure 7). Check local building codes or enlist a qualified installer. 8 December 20, 2001 AM183644_01_V.pdf Separate the cables as needed to form ribbons, which can result in -wall installation. Call Bose® customer service for cables specifically ...
... you to connect your system. See the customer service numbers inside the back cover. Always connect the cube speakers to the Acoustimass module, then connect the Acoustimass module to an receiver output. There are three sets of the supplied cables. Do not use broken or ..., joined together to comfortably reach the speakers (Figure 7). Check local building codes or enlist a qualified installer. 8 December 20, 2001 AM183644_01_V.pdf Separate the cables as needed to form ribbons, which can result in -wall installation. Call Bose® customer service for cables specifically ...

Owner's guide
Page 9
...red (+) output. Insert the black connector marked L into the proper OUTPUT TO CUBE SPEAKER jacks. a. Connect the wire pairs in place. 1. b. Setting Up Connect the Acoustimass® module to the center and front cube speakers Use the 20 foot (6 m) cable with gray RCA connectors to join the module ...for all RCA connectors are firmly inserted into the proper INPUT FROM RECEIVER OR AMPLIFIER jacks. Figure 8 Making cube speaker connections Connect the Acoustimass module to the surround cube speakers Use the 50 foot (15 m) cable with three pairs of the TV as you face it), and the black...
...red (+) output. Insert the black connector marked L into the proper OUTPUT TO CUBE SPEAKER jacks. a. Connect the wire pairs in place. 1. b. Setting Up Connect the Acoustimass® module to the center and front cube speakers Use the 20 foot (6 m) cable with gray RCA connectors to join the module ...for all RCA connectors are firmly inserted into the proper INPUT FROM RECEIVER OR AMPLIFIER jacks. Figure 8 Making cube speaker connections Connect the Acoustimass module to the surround cube speakers Use the 50 foot (15 m) cable with three pairs of the TV as you face it), and the black...

Owner's guide
Page 10
... your receiver. L C R Figure 9 Completed connections FRONT SPEAKERS R L SURROUND SPEAKERS L REAR R CENTER LS RS OUTPUTS TO CUBE SPEAKERS L C R LS RS LEFT CENTER RIGHT LEFT RIGHT SURROUND SURROUND INPUTS FROM RECEIVER OR AMPLIFIER L C R LS RS 10 December 20, 2001 AM183644_01_V.pdf Make sure all connections from the receiver to the Acoustimass® module and the module to...
... your receiver. L C R Figure 9 Completed connections FRONT SPEAKERS R L SURROUND SPEAKERS L REAR R CENTER LS RS OUTPUTS TO CUBE SPEAKERS L C R LS RS LEFT CENTER RIGHT LEFT RIGHT SURROUND SURROUND INPUTS FROM RECEIVER OR AMPLIFIER L C R LS RS 10 December 20, 2001 AM183644_01_V.pdf Make sure all connections from the receiver to the Acoustimass® module and the module to...

Owner's guide
Page 11
Using Your Acoustimass®-10 Speakers For realistic home theater sound Each speaker produces only the sound directed to help you set volume levels. The center channel and surround (rear) speakers have a test tone to it does, follow these speakers may have a wider response ... 26 3 27 2 1 0 28 29 30 Figure 10 A Dolby Pro-Logic receiver set your speaker system sound bass heavy. Bare floors and walls and hard surface furniture can adjust these levels at your Dolby AC-3 receiver correctly Your Acoustimass-10 speakers are full-range loudspeakers and must set up as SMALL...
Using Your Acoustimass®-10 Speakers For realistic home theater sound Each speaker produces only the sound directed to help you set volume levels. The center channel and surround (rear) speakers have a test tone to it does, follow these speakers may have a wider response ... 26 3 27 2 1 0 28 29 30 Figure 10 A Dolby Pro-Logic receiver set your speaker system sound bass heavy. Bare floors and walls and hard surface furniture can adjust these levels at your Dolby AC-3 receiver correctly Your Acoustimass-10 speakers are full-range loudspeakers and must set up as SMALL...

Owner's guide
Page 12
...is turned ON. If you still have a problem with your Acoustimass-10 speakers, turn off your sound source and try the solutions below. Or, to contact Bose directly, refer to the receiver. • Make sure the speaker connections at the receiver or amplifier are correct at the receiver ... bass Not enough or too much bass No stereo sound • Check the speaker connections. to increase bass. If you have a problem, contact your Acoustimass-10 speakers must be connected to arrange for Bose customer service offices and phone numbers. 12 December 20, 2001 AM183644_01_V.pdf Move...
...is turned ON. If you still have a problem with your Acoustimass-10 speakers, turn off your sound source and try the solutions below. Or, to contact Bose directly, refer to the receiver. • Make sure the speaker connections at the receiver or amplifier are correct at the receiver ... bass Not enough or too much bass No stereo sound • Check the speaker connections. to increase bass. If you have a problem, contact your Acoustimass-10 speakers must be connected to arrange for Bose customer service offices and phone numbers. 12 December 20, 2001 AM183644_01_V.pdf Move...

Owner's guide
Page 13
... a damp cloth. You may choose to record it on page 2 of this guide. the drivers are covered by a limited 5-year transferable warranty. Warranty period Bose® Acoustimass-10 speakers are directly behind the grille cloth. Do not use solvents or chemicals. No other maintenance is located on the warranty card packed with your card...
... a damp cloth. You may choose to record it on page 2 of this guide. the drivers are covered by a limited 5-year transferable warranty. Warranty period Bose® Acoustimass-10 speakers are directly behind the grille cloth. Do not use solvents or chemicals. No other maintenance is located on the warranty card packed with your card...
Owner's guide
Page 14
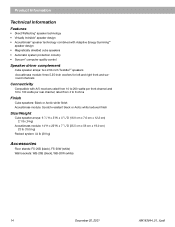
... watts per front channel and 10 to 8 ohms Finish Cube speakers: Black or Arctic white finish Acoustimass module: Scratch-resistant black or Arctic white textured finish Size/Weight Cube speaker arrays: 6 1/4"H x 3"W x 4 3/4"D (16.0 cm x 7.6 cm x 12.2 cm) 2.1 lb (.9 kg) Acoustimass module: 14"H x 22"W x 7 1/2"D (35.5 cm x 56 cm x 19.0 cm) 23 lb (10.5 kg) Packed system: 44 lb...
... watts per front channel and 10 to 8 ohms Finish Cube speakers: Black or Arctic white finish Acoustimass module: Scratch-resistant black or Arctic white textured finish Size/Weight Cube speaker arrays: 6 1/4"H x 3"W x 4 3/4"D (16.0 cm x 7.6 cm x 12.2 cm) 2.1 lb (.9 kg) Acoustimass module: 14"H x 22"W x 7 1/2"D (35.5 cm x 56 cm x 19.0 cm) 23 lb (10.5 kg) Packed system: 44 lb...


