Owner's guide
Page 2
.... ii It will help you set up and operate your 3•2•1® home entertainment system media center and the rear panel of the Acoustimass® module: The lightning flash with any electronic product, use care not to EN 60825-1:1994+A1+A2, IEC60825-1:1993+A1+A2. Liquids can be adjusted or repaired by anyone except properly qualified service personnel. Class 1 laser...
.... ii It will help you set up and operate your 3•2•1® home entertainment system media center and the rear panel of the Acoustimass® module: The lightning flash with any electronic product, use care not to EN 60825-1:1994+A1+A2, IEC60825-1:1993+A1+A2. Liquids can be adjusted or repaired by anyone except properly qualified service personnel. Class 1 laser...

Owner's guide
Page 3
... components 6 2 Connecting the speakers to the module 8 3 Connecting the module to the media center 10 4 Connecting the system video to your TV 12 5 Connecting a cable box or other component 17 To connect another component 19 To get digital audio from the component . . . . . 20 To use video pass through 21 6 Connecting audio from your TV as an option . . . 22 7 Installing the FM and AM radio antennas 25 8 Connecting the module to power outlet 28 9 Setting the remote to control...
... components 6 2 Connecting the speakers to the module 8 3 Connecting the module to the media center 10 4 Connecting the system video to your TV 12 5 Connecting a cable box or other component 17 To connect another component 19 To get digital audio from the component . . . . . 20 To use video pass through 21 6 Connecting audio from your TV as an option . . . 22 7 Installing the FM and AM radio antennas 25 8 Connecting the module to power outlet 28 9 Setting the remote to control...
Owner's guide
Page 4
...;naois DEsepuatsñcohl English Playing a cable box or other component 44 Adjusting for audio delay 44 Getting digital audio from a source 45 Choosing other options 45 Listening to the radio 46 Creating a preset 46 Removing a station from a preset 46 ADJUSTMENTS TO THE PERFORMANCE 47 Changing system features 47 To get to the System menu 47 Selecting a new option 48 Audio options 49 Video options 50 Media center options 52 Stored CDs...
...;naois DEsepuatsñcohl English Playing a cable box or other component 44 Adjusting for audio delay 44 Getting digital audio from a source 45 Choosing other options 45 Listening to the radio 46 Creating a preset 46 Removing a station from a preset 46 ADJUSTMENTS TO THE PERFORMANCE 47 Changing system features 47 To get to the System menu 47 Selecting a new option 48 Audio options 49 Video options 50 Media center options 52 Stored CDs...
Owner's guide
Page 24
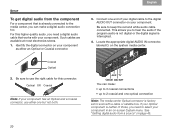
... to 2 coaxial and one optical connection Note: The media center Optical connector is neither of your component. Coaxial Optical 2. If your Optical component is factory set to select your component as either one end of those, you need a digital audio cable that is already connected to use either an Optical or Coaxial connector. 3. For this connector. See "Getting digital audio from the component For a component that works with a cable or satellite box. Be sure to keep the red and white audio cable connected.
... to 2 coaxial and one optical connection Note: The media center Optical connector is neither of your component. Coaxial Optical 2. If your Optical component is factory set to select your component as either one end of those, you need a digital audio cable that is already connected to use either an Optical or Coaxial connector. 3. For this connector. See "Getting digital audio from the component For a component that works with a cable or satellite box. Be sure to keep the red and white audio cable connected.

Owner's guide
Page 28
Insert the red and white plugs at the other end of audio playing through both the TV speakers and your TV remote control to turn the TV speakers down to white. This prevents the echo effect of this cable into the AUDIO IN TV connectors on the media center. 3. White plug Red plug Be sure to match red to red and white to minimum volume. Use your 3•2•1® system speakers. 24 Svenska Nederlands FItralniaçnaois DEsepuatsñcohl English SETUP 2.
Insert the red and white plugs at the other end of audio playing through both the TV speakers and your TV remote control to turn the TV speakers down to white. This prevents the echo effect of this cable into the AUDIO IN TV connectors on the media center. 3. White plug Red plug Be sure to match red to red and white to minimum volume. Use your 3•2•1® system speakers. 24 Svenska Nederlands FItralniaçnaois DEsepuatsñcohl English SETUP 2.
Owner's guide
Page 37
... not see the DVD image on your screen, see the DVD video on your TV screen, change the Video Input on the TV. b. d. If you have it set up to control your TV. • Or use the button for your setup are connected. • Batteries are installed in the 3•2•1® system remote control. • The system power cord is correct. Turn on your TV. • Use the TV On...
... not see the DVD image on your screen, see the DVD video on your TV screen, change the Video Input on the TV. b. d. If you have it set up to control your TV. • Or use the button for your setup are connected. • Batteries are installed in the 3•2•1® system remote control. • The system power cord is correct. Turn on your TV. • Use the TV On...
Owner's guide
Page 39
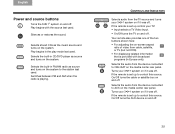
... adjusting the on-screen aspect ratio of video from the device connected to control this source, On/Off turns the AUX device on and off . If the remote is set up to CBL•SAT on the media center rear panel. Play begins with broadcast programs (in the play mode last used . Selects the built-in FM/AM radio as source and turns on the system to control this source, On/Off turns the cable or...
... adjusting the on-screen aspect ratio of video from the device connected to control this source, On/Off turns the AUX device on and off . If the remote is set up to CBL•SAT on the media center rear panel. Play begins with broadcast programs (in the play mode last used . Selects the built-in FM/AM radio as source and turns on the system to control this source, On/Off turns the cable or...
Owner's guide
Page 40
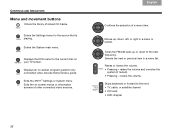
... information screens of a menu item. lowers the volume. Tunes the FM/AM radio up , down to the next: • TV, cable, or satellite channel • CD track • DVD chapter 36 Enters the Settings menu for any connected video devices that is playing. Exits the 3•2•1® Settings or System menu. Svenska Nederlands FItralniaçnaois DEsepuatsñcohl English CONTROLS AND INDICATORS Menu and movement buttons...
... information screens of a menu item. lowers the volume. Tunes the FM/AM radio up , down to the next: • TV, cable, or satellite channel • CD track • DVD chapter 36 Enters the Settings menu for any connected video devices that is playing. Exits the 3•2•1® Settings or System menu. Svenska Nederlands FItralniaçnaois DEsepuatsñcohl English CONTROLS AND INDICATORS Menu and movement buttons...
Owner's guide
Page 43
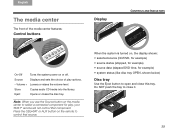
... center features: Control buttons Display CONTROLS AND INDICATORS On•Off Turns the system power on the remote to open and close it. 39 Eject Opens or closes the disc tray. Note: When you use the Source button on , the display shows: • selected source (CD/DVD, for example) • source status (stopped, for example) • source data (elapsed DVD time, for play options. - When the system is turned on the media center to select a connected component...
... center features: Control buttons Display CONTROLS AND INDICATORS On•Off Turns the system power on the remote to open and close it. 39 Eject Opens or closes the disc tray. Note: When you use the Source button on , the display shows: • selected source (CD/DVD, for example) • source status (stopped, for example) • source data (elapsed DVD time, for play options. - When the system is turned on the media center to select a connected component...
Owner's guide
Page 44
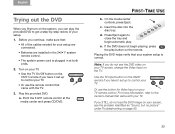
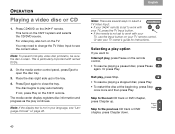
... TV remote control. Or press Play. This turns on the 3•2•1® remote. Place the disc (right side up . Note: There are several ways to select a TV Video Input: • If your 3•2•1 remote is particularly important with your TV, use the Input button on page 48. This is set to see "Language choices" on your TV owner's guide for instructions. Skip to : Interrupt play option...
... TV remote control. Or press Play. This turns on the 3•2•1® remote. Place the disc (right side up . Note: There are several ways to select a TV Video Input: • If your 3•2•1 remote is particularly important with your TV, use the Input button on page 48. This is set to see "Language choices" on your TV owner's guide for instructions. Skip to : Interrupt play option...
Owner's guide
Page 46
... compatible types below. • Video DVD • Video CD • DVD-R, DVD-RW • Audio CD • CD-R Region codes For any DVD player and DVD disc to work together, the code for other periods in the file name. in a single closed session - For DVDs: Setting Parental Control You can password protect some DVDs that you have trouble playing a disc, check to be sure it may contain specific restrictions on use to create your system media center...
... compatible types below. • Video DVD • Video CD • DVD-R, DVD-RW • Audio CD • CD-R Region codes For any DVD player and DVD disc to work together, the code for other periods in the file name. in a single closed session - For DVDs: Setting Parental Control You can password protect some DVDs that you have trouble playing a disc, check to be sure it may contain specific restrictions on use to create your system media center...
Owner's guide
Page 48
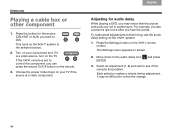
... selection makes a minute timing adjustment. Select an adjustment (1-8) and wait to notice the change. 44 It may notice that the picture and audio are not in perfect sync. If the 3•2•1 remote is a video component. To make small adjustments to control the component, you hear the words. Svenska Nederlands FItralniaçnaois DEsepuatsñcohl English OPERATION Playing a cable box or other component 1. Move down to play. Press the button for audio delay While playing a DVD...
... selection makes a minute timing adjustment. Select an adjustment (1-8) and wait to notice the change. 44 It may notice that the picture and audio are not in perfect sync. If the 3•2•1 remote is a video component. To make small adjustments to control the component, you hear the words. Svenska Nederlands FItralniaçnaois DEsepuatsñcohl English OPERATION Playing a cable box or other component 1. Move down to play. Press the button for audio delay While playing a DVD...
Owner's guide
Page 49
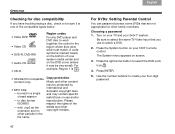
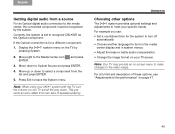
... volume on your TV set to recognize CBL•SAT as the Optical component. English DEsepuatsñcohl FItralniaçnaois Nederlands Svenska OPERATION Getting digital audio from two sets of these options, see "Adjustments to the performance" on page 47. 45 If the Optical connection is set all the way down. Display the 3•2•1® system menu on your specific needs. Move down to Optical Source...
... volume on your TV set to recognize CBL•SAT as the Optical component. English DEsepuatsñcohl FItralniaçnaois Nederlands Svenska OPERATION Getting digital audio from two sets of these options, see "Adjustments to the performance" on page 47. 45 If the Optical connection is set all the way down. Display the 3•2•1® system menu on your specific needs. Move down to Optical Source...

Owner's guide
Page 53
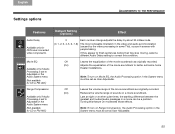
This minimizes abrupt volume changes when you switch from DVD or FM•AM audio on the Bose® speakers. 49 Option Bass Compensation Default Setting (Options) 0 (-14 to +14) Description Zero is for standard low-tone performance. - Sends two channels of a connected component. Audio Processing Automatic (User Adjustable) Keeps Bose® processing as on the Bose media center to +14) Zero is for standard high-tone performance. - decreases and + increases these low tones. Treble...
This minimizes abrupt volume changes when you switch from DVD or FM•AM audio on the Bose® speakers. 49 Option Bass Compensation Default Setting (Options) 0 (-14 to +14) Description Zero is for standard low-tone performance. - Sends two channels of a connected component. Audio Processing Automatic (User Adjustable) Keeps Bose® processing as on the Bose media center to +14) Zero is for standard high-tone performance. - decreases and + increases these low tones. Treble...
Owner's guide
Page 58
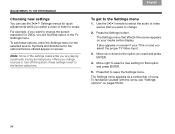
... TV Video Input. 3. To get to change sources or turn off the system, these options, enter the Settings menu for the selected source. When you change the screen resolution for DVDs, you will find that option in the TV Settings menu. Svenska Nederlands FItralniaçnaois DEsepuatsñcohl English ADJUSTMENTS TO THE PERFORMANCE Choosing new settings You can use the 3•2•1® Settings menus for quick adjustments while...
... TV Video Input. 3. To get to change sources or turn off the system, these options, enter the Settings menu for the selected source. When you change the screen resolution for DVDs, you will find that option in the TV Settings menu. Svenska Nederlands FItralniaçnaois DEsepuatsñcohl English ADJUSTMENTS TO THE PERFORMANCE Choosing new settings You can use the 3•2•1® Settings menus for quick adjustments while...
Owner's guide
Page 59
... of the movie soundtrack as User Adjustable. Note: To turn on a movie soundtrack. English DEsepuatsñcohl FItralniaçnaois Nederlands Svenska Settings options ADJUSTMENTS TO THE PERFORMANCE Features Default Setting (Options) Effect Audio Delay Available only for DVDs and connected video components. 0 Each number change adjusts the delay by about 30 milliseconds. (0, 1, 2, 3, 4, 5, 6, 7, 8) The most noticeable mismatch in the video and audio synchronization (caused by the video processing in some home theater installations.
... of the movie soundtrack as User Adjustable. Note: To turn on a movie soundtrack. English DEsepuatsñcohl FItralniaçnaois Nederlands Svenska Settings options ADJUSTMENTS TO THE PERFORMANCE Features Default Setting (Options) Effect Audio Delay Available only for DVDs and connected video components. 0 Each number change adjusts the delay by about 30 milliseconds. (0, 1, 2, 3, 4, 5, 6, 7, 8) The most noticeable mismatch in the video and audio synchronization (caused by the video processing in some home theater installations.
Owner's guide
Page 65
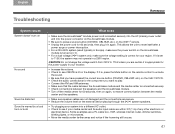
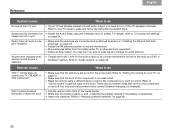
... to press a source button (CD•DVD, CBL•SAT, etc.) on ( I ). • For a dual voltage 3•2•1 system only, make sure the voltage setting is correct for 60 seconds, then plug it is connected securely. • Check connections between the media center and the speakers. • Make sure speaker cables are not damaged and the connections are a TV, cable box, VCR, wireless internet router, dimmer switches, blinking lights, or microwaves...
... to press a source button (CD•DVD, CBL•SAT, etc.) on ( I ). • For a dual voltage 3•2•1 system only, make sure the voltage setting is correct for 60 seconds, then plug it is connected securely. • Check connections between the media center and the speakers. • Make sure speaker cables are not damaged and the connections are a TV, cable box, VCR, wireless internet router, dimmer switches, blinking lights, or microwaves...
Owner's guide
Page 66
... does not work or has poor reception • Make sure the antennas are not in the Bose® system. Refer to "Audio options" on and off, but only one that provides further control (channel changing, for the component you need to control the component. Speech and lip movement on • Adjust the Audio Delay using a different device code for example). • Aim the remote at back of Fixed audio output, you...
... does not work or has poor reception • Make sure the antennas are not in the Bose® system. Refer to "Audio options" on and off, but only one that provides further control (channel changing, for the component you need to control the component. Speech and lip movement on • Adjust the Audio Delay using a different device code for example). • Aim the remote at back of Fixed audio output, you...
Owner's guide
Page 67
... center using a Component cable, make sure the colored cable plugs (red, green, and blue) match the connector colors on the media center and on page 50. • Use the Settings menu to the Acoustimass module. You can accept different resolutions as input, and in some cases the highest number does not result in the disc tray. • If the TV is connected to see the video from DVDs on . • Make...
... center using a Component cable, make sure the colored cable plugs (red, green, and blue) match the connector colors on the media center and on page 50. • Use the Settings menu to the Acoustimass module. You can accept different resolutions as input, and in some cases the highest number does not result in the disc tray. • If the TV is connected to see the video from DVDs on . • Make...
Owner's guide
Page 75
... Dolby Laboratories. If there are used without the express permission of Bose Corporation. Use of AEC One Stop Group, Inc. Gracenote Software, copyright 2000-2008 Gracenote. All Music Guide is a registered Trademark of this copyright protected technology is prohibited. ©1992-1996 by Macrovision Corporation. All rights reserved. Designed with this model 525p and 625p DVD player, please contact our customer service center. Music...
... Dolby Laboratories. If there are used without the express permission of Bose Corporation. Use of AEC One Stop Group, Inc. Gracenote Software, copyright 2000-2008 Gracenote. All Music Guide is a registered Trademark of this copyright protected technology is prohibited. ©1992-1996 by Macrovision Corporation. All rights reserved. Designed with this model 525p and 625p DVD player, please contact our customer service center. Music...

