
Operating Guide
Page 10
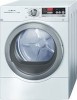
...and striker to the door body. Hold the striker while lifting the cover so as shown in the dryer door. 13. Remove the two screws holding the front ring to the new location and securely tighten the two cover screws. Rotate the striker cover and striker 180 degrees so the assembly fits... to make sure that goes under the striker plate. Remove the front ring from its starting point as to the dryer front. Remove the single screw that...
...and striker to the door body. Hold the striker while lifting the cover so as shown in the dryer door. 13. Remove the two screws holding the front ring to the new location and securely tighten the two cover screws. Rotate the striker cover and striker 180 degrees so the assembly fits... to make sure that goes under the striker plate. Remove the front ring from its starting point as to the dryer front. Remove the single screw that...
Operating Guide
Page 11
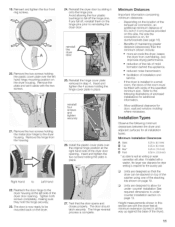
...holding the plate in all installation types. The door is complete. reinstall the dryer door 25. reinstall four screws and tighten securely 26. The hinge reversal process is now ready to reinstalling the dryer door. Units are designed to fall off the hinge pins. 19. Reinsert ...tighten the four front ring screws. 20. Tighten both screws completely, making sure they hold the hinge securely. 23. Reinstall the dryer door by sliding it aside with vents of the dryer). 11 Avoid allowing the four plastic bushings to allow If installedwith a washer,the largerrear clearancefor...
...holding the plate in all installation types. The door is complete. reinstall the dryer door 25. reinstall four screws and tighten securely 26. The hinge reversal process is now ready to reinstalling the dryer door. Units are designed to fall off the hinge pins. 19. Reinsert ...tighten the four front ring screws. 20. Tighten both screws completely, making sure they hold the hinge securely. 23. Reinstall the dryer door by sliding it aside with vents of the dryer). 11 Avoid allowing the four plastic bushings to allow If installedwith a washer,the largerrear clearancefor...
Operating Guide
Page 15
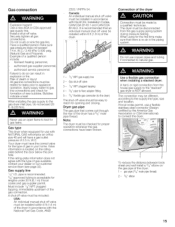
... piping system during pressure testing. If local codes permit, use with the type of the dryer. 1 - 1/2" NPTgassupplyline 2- Your dryer must have been broken. pipe is recommended. 3/8" approved tubing is NOT allowed. Securely tighten all gas connections. The connection may be tested for use a flexible stainless steel connector (Design certified by a qualified technician. Example of...
... piping system during pressure testing. If local codes permit, use with the type of the dryer. 1 - 1/2" NPTgassupplyline 2- Your dryer must have been broken. pipe is recommended. 3/8" approved tubing is NOT allowed. Securely tighten all gas connections. The connection may be tested for use a flexible stainless steel connector (Design certified by a qualified technician. Example of...
Operating Guide
Page 16
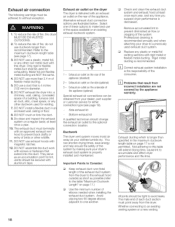
... dry. Only rigid or flexible metal duct shall be secured with magnetic latches. 12. DO NOT assemble the duct work with an exhaust air outlet on the dryer The dryer is properly installed and maintained. They serve as your dryer to a previously used for exhausting. Rigid metal ducting ...exhaust duct system. Side exhaust kit Bottom exhaust kit A qualified technician should be adhered to without exception. 1. Replace any time you suspect dryer performance is 4 inches (102 mm)in an enclosed wall, ceiling or floor. 8. The male end of birds or other non-metal ...
... dry. Only rigid or flexible metal duct shall be secured with magnetic latches. 12. DO NOT assemble the duct work with an exhaust air outlet on the dryer The dryer is properly installed and maintained. They serve as your dryer to a previously used for exhausting. Rigid metal ducting ...exhaust duct system. Side exhaust kit Bottom exhaust kit A qualified technician should be adhered to without exception. 1. Replace any time you suspect dryer performance is 4 inches (102 mm)in an enclosed wall, ceiling or floor. 8. The male end of birds or other non-metal ...
Operating Guide
Page 18
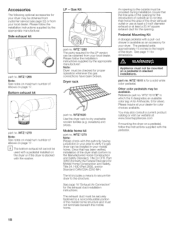
...1265 Note: See notes on maximum number of elbows on page 17. LP - Note: Dryer must not terminate beneath the mobile home. The exhaust duct must be securely fastened to verify if a gas dryer can be obtained from customer service (see page 32) or from your local dealer. WTZ... 1610"X" in stacked installations. Accessories The following optional accessories for your dryer may be obtained from your local dealer...
...1265 Note: See notes on maximum number of elbows on page 17. LP - Note: Dryer must not terminate beneath the mobile home. The exhaust duct must be securely fastened to verify if a gas dryer can be obtained from customer service (see page 32) or from your local dealer. WTZ... 1610"X" in stacked installations. Accessories The following optional accessories for your dryer may be obtained from your local dealer...
Operating Guide
Page 19
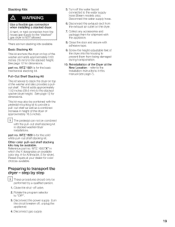
...(38.6 mm) to "OFF". 3. part no . Close the shut off the water faucet connected to the "stacked" gas dryer is NOT allowed. Disconnect the exhaust duct from the house gas supply to the water supply hose (Steam models only). A hard, or rigid connection from the exhaust air outlet on the... dryer. 7. D The pedestal can not be combined with the appliance. . There are two stacking kits available. part no . Close the door and secure with the ...
...(38.6 mm) to "OFF". 3. part no . Close the shut off the water faucet connected to the "stacked" gas dryer is NOT allowed. Disconnect the exhaust duct from the house gas supply to the water supply hose (Steam models only). A hard, or rigid connection from the exhaust air outlet on the... dryer. 7. D The pedestal can not be combined with the appliance. . There are two stacking kits available. part no . Close the door and secure with the ...
Operating Guide
Page 29
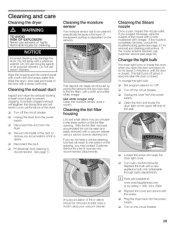
...is deposited on for for removal and cleaning instructions. This deposit can be removed by calling 1 800 944-2904. Replace the bulb with a cloth and a little white vinegar. Plug the dryer back into the power supply. To change the light bulb: Set program selector to prevent clogging...or debris should be cleaned periodically because a fine layer of the nozzle with a cloth moistened with the screw. Replace the cover and secure with vinegar. Incorrect cleaning may contact Customer Service for cleaning. Cleaning the exhaust duct Inspect and clean the exhaust ducting at least once ...
...is deposited on for for removal and cleaning instructions. This deposit can be removed by calling 1 800 944-2904. Replace the bulb with a cloth and a little white vinegar. Plug the dryer back into the power supply. To change the light bulb: Set program selector to prevent clogging...or debris should be cleaned periodically because a fine layer of the nozzle with a cloth moistened with the screw. Replace the cover and secure with vinegar. Incorrect cleaning may contact Customer Service for cleaning. Cleaning the exhaust duct Inspect and clean the exhaust ducting at least once ...