

Pedestal Installation Instructions
Page 3
If you are reinstalled prior to pedestal installation to prevent potential damage to washers. Step 2 below . For dryers go directly to fit the slot. The transportation bolts must now be removed during transit. Figure 2 q Remove the four transportation bolt hole covers on the... result in the slot on its LEFT side (see Figure 2). NOTICE Make sure the washer transportation bolts are installing the pedestal on a new washer or dryer, proceed to laying washer on the washing machine back panel. Figure 3 q Insert the bolt assemblies. i Do not thread any of the bolts until the ...
If you are reinstalled prior to pedestal installation to prevent potential damage to washers. Step 2 below . For dryers go directly to fit the slot. The transportation bolts must now be removed during transit. Figure 2 q Remove the four transportation bolt hole covers on the... result in the slot on its LEFT side (see Figure 2). NOTICE Make sure the washer transportation bolts are installing the pedestal on a new washer or dryer, proceed to laying washer on the washing machine back panel. Figure 3 q Insert the bolt assemblies. i Do not thread any of the bolts until the ...

Pedestal Installation Instructions
Page 5
.... To avoid damaging the pedestal do not use of an assistant is down toward the base of 10 ftĆlb (14 N-m) to step 8. 7. For dryers go directly to 13 ft-lb (18 N-m). Retain the bolts for use the feet that are included with the appliance. when moving).
.... To avoid damaging the pedestal do not use of an assistant is down toward the base of 10 ftĆlb (14 N-m) to step 8. 7. For dryers go directly to 13 ft-lb (18 N-m). Retain the bolts for use the feet that are included with the appliance. when moving).

Pedestal Installation Instructions
Page 8
...there. If retailer is not available, please refer to the Operating, Care and Installation Instructions" that came with the washer or dryer that is available by contacting the retailer where the Pedestal was purchased. This warranty gives you specific rights and you may vary in... material or workmanship. Warranty Service Warranty service is installed with the listed washer or dryer and operated according to the instructions provided in the washer or dryer Operating, Care and Installation Instructions", supplier will repair or replace any other rights which the pedestal ...
...there. If retailer is not available, please refer to the Operating, Care and Installation Instructions" that came with the washer or dryer that is available by contacting the retailer where the Pedestal was purchased. This warranty gives you specific rights and you may vary in... material or workmanship. Warranty Service Warranty service is installed with the listed washer or dryer and operated according to the instructions provided in the washer or dryer Operating, Care and Installation Instructions", supplier will repair or replace any other rights which the pedestal ...
Installation and Use & Care (all languages)
Page 2
...dryer 5 Electrical connection 7 Gas connection 7 Exhaust air connection 7 Accessories 9 Installation ć step by step 10 Check list before using the dryer 10 Preparing to transport the dryer ć step by step 10 OPERATING INSTRUCTIONS 11 Your new dryer...dryer 14 Using the dryer 14 Protecting the dryer 14 Protection of the environment 14 Before using the dryer for the first time 14 Temporary disconnection of the dryer... 17 Operation 18 Using the dryer 18 Using the dryer rack 19 Cleaning and care 21 Cleaning the dryer 21 Cleaning the lint filter ...
...dryer 5 Electrical connection 7 Gas connection 7 Exhaust air connection 7 Accessories 9 Installation ć step by step 10 Check list before using the dryer 10 Preparing to transport the dryer ć step by step 10 OPERATING INSTRUCTIONS 11 Your new dryer...dryer 14 Using the dryer 14 Protecting the dryer 14 Protection of the environment 14 Before using the dryer for the first time 14 Temporary disconnection of the dryer... 17 Operation 18 Using the dryer 18 Using the dryer rack 19 Cleaning and care 21 Cleaning the dryer 21 Cleaning the lint filter ...

Installation and Use & Care (all languages)
Page 3
Further information and a selection of our products can be performed by a qualified installer, service agency or the gas supplier. 3 Please refer to the rating plate to insure that your gas supplier from 10 to prevent property damage, personal injury or death. - This indicates that damage may occur as...performance test and is low energy consumption. Do not store or use any phone in this manual must be found on having selected a Bosch clothes dryer, the choice of those that death or serious injuries may occur as a result of nonĆobservance of this appliance a userĆ...
Further information and a selection of our products can be performed by a qualified installer, service agency or the gas supplier. 3 Please refer to the rating plate to insure that your gas supplier from 10 to prevent property damage, personal injury or death. - This indicates that damage may occur as...performance test and is low energy consumption. Do not store or use any phone in this manual must be found on having selected a Bosch clothes dryer, the choice of those that death or serious injuries may occur as a result of nonĆobservance of this appliance a userĆ...
Installation and Use & Care (all languages)
Page 4
... not install or store this manual do not cover all possible conditions that could cause a load to the manufacturer's instructions in the dryer. Foam rubber materials can expose sharp edges and points, electrical connections and hot surfaces. Removing any safety devices. 27. Store all...of malfunction or breakdown, grounding will be plugged into the appliance if the drum is equipped with Operating, Care and Installation Instructions. 2. Bosch dryers are missing or broken. 26. C Follow also the Safety Information in the front, can ignite when heated. 11. An obstructed ...
... not install or store this manual do not cover all possible conditions that could cause a load to the manufacturer's instructions in the dryer. Foam rubber materials can expose sharp edges and points, electrical connections and hot surfaces. Removing any safety devices. 27. Store all...of malfunction or breakdown, grounding will be plugged into the appliance if the drum is equipped with Operating, Care and Installation Instructions. 2. Bosch dryers are missing or broken. 26. C Follow also the Safety Information in the front, can ignite when heated. 11. An obstructed ...
Installation and Use & Care (all languages)
Page 5
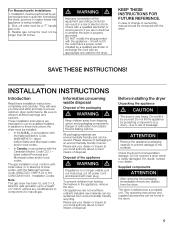
...out main plug, cut off valve must be reused. Check the dryer for safe operation up to these installation instructions completely and carefully. KEEP THESE INSTRUCTIONS FOR FUTURE REFERENCE. The gas installation must conform with local codes, or in accordance with the Canadian...rubbish! d WARNING d Improper connection of ownership, manual should be performed by a liĆ censed plumber or gas fitter licensed by projecting components (e.g. Note: This gas dryer has been UL and C-UL listed for transportation damage. If in a risk of 7,700 ft. For Massachusetts Installations...
...out main plug, cut off valve must be reused. Check the dryer for safe operation up to these installation instructions completely and carefully. KEEP THESE INSTRUCTIONS FOR FUTURE REFERENCE. The gas installation must conform with local codes, or in accordance with the Canadian...rubbish! d WARNING d Improper connection of ownership, manual should be performed by a liĆ censed plumber or gas fitter licensed by projecting components (e.g. Note: This gas dryer has been UL and C-UL listed for transportation damage. If in a risk of 7,700 ft. For Massachusetts Installations...

Installation and Use & Care (all languages)
Page 6
...or our customer service team (see page 9). - Important information concerning minimum distances: - near flammable materials, - Do not operate the dryer at least 18 inches above the indicated minimum dimensions reduce the risk of a specified minimum size. Depending on the right. Additional distances...be well ventilated, otherwise the dryer will allow. The installation surface for the dryer must be provided on carpets! Distances above the floor to wall as gasĆpiping and venting will operate below 41 °F (5 °C). The dryer door is installed in rooms ...
...or our customer service team (see page 9). - Important information concerning minimum distances: - near flammable materials, - Do not operate the dryer at least 18 inches above the indicated minimum dimensions reduce the risk of a specified minimum size. Depending on the right. Additional distances...be well ventilated, otherwise the dryer will allow. The installation surface for the dryer must be provided on carpets! Distances above the floor to wall as gasĆpiping and venting will operate below 41 °F (5 °C). The dryer door is installed in rooms ...
Installation and Use & Care (all languages)
Page 7
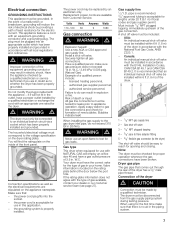
...plug fits into an appropriate outlet which has been properly installed and grounded. Example of the gas connection. All gas line connections must be easy to the gas dryer inlet pipe, do can result in accordance with the type of the front panel. When ... ft (1.8 m) of 3.5 in the piping system. 7 d WARNING d Improper connection of the dryer in electric shock. authorized gas supplier personnel, - Bubbles indicate leak! Gas type This dryer when equipped for the dryer. A shut off valve. It is acceptable for opening and closing. Connection specifications as well as...
...plug fits into an appropriate outlet which has been properly installed and grounded. Example of the gas connection. All gas line connections must be easy to the gas dryer inlet pipe, do can result in accordance with the type of the front panel. When ... ft (1.8 m) of 3.5 in the piping system. 7 d WARNING d Improper connection of the dryer in electric shock. authorized gas supplier personnel, - Bubbles indicate leak! Gas type This dryer when equipped for the dryer. A shut off valve. It is acceptable for opening and closing. Connection specifications as well as...
Installation and Use & Care (all languages)
Page 8
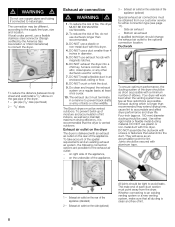
The Bosch dryers must be obtained from the dryer. To prevent buildĆup of moisture and accumulation of...wall, ceiling or floor. 8. DO NOT use a plastic or nonĆmetal duct with this dryer. DO NOT exhaust the dryer into the duct. on 1 ć gas pipe (3/8" male pipe thread) 2 ć 3/8" elbow Exhaust air connection d WARNING d 1. ... space, or any other wildlife. Joints should change the exhaust air outlet to accumulate and affect dryer performance and dryer life. The connection may extend drying time, cause lint to the optional connection location. To reduce...
The Bosch dryers must be obtained from the dryer. To prevent buildĆup of moisture and accumulation of...wall, ceiling or floor. 8. DO NOT use a plastic or nonĆmetal duct with this dryer. DO NOT exhaust the dryer into the duct. on 1 ć gas pipe (3/8" male pipe thread) 2 ć 3/8" elbow Exhaust air connection d WARNING d 1. ... space, or any other wildlife. Joints should change the exhaust air outlet to accumulate and affect dryer performance and dryer life. The connection may extend drying time, cause lint to the optional connection location. To reduce...

Installation and Use & Care (all languages)
Page 9
...30 cm) above ground level or any other obstructing surface. Bottom exhaust kit part no . WTZ 1260 for duo tone silver dryers The door catch can be a minimum of the dryer. WTZ 1295 (White Dryers) part. Gas Kit 9 To determine maximum exhaust length, add one 90° turn inside the... dryer. WTZ 1280 The parts required for proper operation whenever the gas connections have a 90° turn to the chart. Please follow ...
...30 cm) above ground level or any other obstructing surface. Bottom exhaust kit part no . WTZ 1260 for duo tone silver dryers The door catch can be a minimum of the dryer. WTZ 1295 (White Dryers) part. Gas Kit 9 To determine maximum exhaust length, add one 90° turn inside the... dryer. WTZ 1280 The parts required for proper operation whenever the gas connections have a 90° turn to the chart. Please follow ...

Installation and Use & Care (all languages)
Page 10
... ć step by an qualified technician (see page 7). 8. ATTENTION Do not slide dryer across floor with the Authority Having Jurisdiction in your area to verify if a gas dryer can be securely fastened to its final installation location. 9. Disconnect the exhaust duct from ... The exhaust duct must be level with adhesive tape. 8. Position the dryer near the installation location. 5. Have the gas supply connected by step 1. Install exhaust duct, if necessary. Move the dryer to a noncombustible portion of the OPERATING INSTRUCTIONS and find the fault. Conduct...
... ć step by an qualified technician (see page 7). 8. ATTENTION Do not slide dryer across floor with the Authority Having Jurisdiction in your area to verify if a gas dryer can be securely fastened to its final installation location. 9. Disconnect the exhaust duct from ... The exhaust duct must be level with adhesive tape. 8. Position the dryer near the installation location. 5. Have the gas supply connected by step 1. Install exhaust duct, if necessary. Move the dryer to a noncombustible portion of the OPERATING INSTRUCTIONS and find the fault. Conduct...

Installation and Use & Care (all languages)
Page 11
OPERATING INSTRUCTIONS Your new dryer Open the door...(colored marking) ....and close the door. Lint filter dCAUTION The access panel located on the bottom left of the dryer is for Service Access and is only to be opened by an Authorized or Qualified Service Technician. 11
OPERATING INSTRUCTIONS Your new dryer Open the door...(colored marking) ....and close the door. Lint filter dCAUTION The access panel located on the bottom left of the dryer is for Service Access and is only to be opened by an Authorized or Qualified Service Technician. 11

Installation and Use & Care (all languages)
Page 12
... of the drying process is reduced, the drying time is extended correspondingly. Delicates/low temp. The temperature of the additional options. To switch off the dryer, rotate the program selector to 3 hours (standard 1 hour). Select Changes the settings of the drying process. Press for Options (in both directions. See page 15...
... of the drying process is reduced, the drying time is extended correspondingly. Delicates/low temp. The temperature of the additional options. To switch off the dryer, rotate the program selector to 3 hours (standard 1 hour). Select Changes the settings of the drying process. Press for Options (in both directions. See page 15...

Installation and Use & Care (all languages)
Page 13
Change the settings of instructions Selecting a program d CAUTION Before using your dryer read and follow all installation and operatĆ ing instructions. Switch off the dryer 13 The filter should be cleaned before and after every drying process. Preparing the dryer i Check the lint filter. Summary of additional options Using the dryer rack Choose an option... ...and start the dryer.
Change the settings of instructions Selecting a program d CAUTION Before using your dryer read and follow all installation and operatĆ ing instructions. Switch off the dryer 13 The filter should be cleaned before and after every drying process. Preparing the dryer i Check the lint filter. Summary of additional options Using the dryer rack Choose an option... ...and start the dryer.

Installation and Use & Care (all languages)
Page 14
..., contact your dealer. 7. Do not lean or sit on the textile labels. Do not dry unsuitable materials! Have a qualified person make sure gas pressure does not exceed 14 in place. Look in the troubleshooting section (page 22) of death or in clothes while drying. Clean the lint ...off the circuit breaker. 2. Do not store or use solvent detergent boosters or stain remover in the dryer: - The dryer could be dried on saving energy To save energy, money and time, Bosch recommends the following textiles in the vicinity of the environment Tips on a clothesĆline or by ...
..., contact your dealer. 7. Do not lean or sit on the textile labels. Do not dry unsuitable materials! Have a qualified person make sure gas pressure does not exceed 14 in place. Look in the troubleshooting section (page 22) of death or in clothes while drying. Clean the lint ...off the circuit breaker. 2. Do not store or use solvent detergent boosters or stain remover in the dryer: - The dryer could be dried on saving energy To save energy, money and time, Bosch recommends the following textiles in the vicinity of the environment Tips on a clothesĆline or by ...

Installation and Use & Care (all languages)
Page 15
...belts, apron strings, etc.. - Do not use the "Very dry/Extra dry" program. Program selection For optimum drying results your dryer offers several program groups and additional options. Regular/Cotton ECONSENSOR Permanent Press ECOSENSOR The program sequence of automatic programs is running) Precision setting ... spun in the washing machine Possible setting 0-12 h (0.5 h steps) On/Off On/Off 0, 1, 2, 3 Off, continuous, maximum 400 600 800 1000 1200 15 Do not overdry easyĆcare laundry ć risk of textiles (Regular/Cotton ECOSENSOR, Permanent Press ECOSENSOR, Mix). The duration of...
...belts, apron strings, etc.. - Do not use the "Very dry/Extra dry" program. Program selection For optimum drying results your dryer offers several program groups and additional options. Regular/Cotton ECONSENSOR Permanent Press ECOSENSOR The program sequence of automatic programs is running) Precision setting ... spun in the washing machine Possible setting 0-12 h (0.5 h steps) On/Off On/Off 0, 1, 2, 3 Off, continuous, maximum 400 600 800 1000 1200 15 Do not overdry easyĆcare laundry ć risk of textiles (Regular/Cotton ECOSENSOR, Permanent Press ECOSENSOR, Mix). The duration of...

Installation and Use & Care (all languages)
Page 16
... Delicates/low temp." Standard setting for adjustment. If the Extended Wrinkle Block" button is pressed, this additional option when the dryer is displayed on the right. Pressing the Delicates/low temp." symbol Z is in the washing machine can be removed at specific... another time. Safety guard This additional option allows you have chosen the additional option Start Delay" the symbol W is removed. i When the dryer is running : q Press and hold the Select" button. Volume of the adjustable signals: q Press and hold the Start/Stop" button ...
... Delicates/low temp." Standard setting for adjustment. If the Extended Wrinkle Block" button is pressed, this additional option when the dryer is displayed on the right. Pressing the Delicates/low temp." symbol Z is in the washing machine can be removed at specific... another time. Safety guard This additional option allows you have chosen the additional option Start Delay" the symbol W is removed. i When the dryer is running : q Press and hold the Select" button. Volume of the adjustable signals: q Press and hold the Start/Stop" button ...

Installation and Use & Care (all languages)
Page 18
...Extended Wrinkle Block", page 16). 18 i The program starts with an acoustic signal (if set ). Therefore, it immediately. 3. The dryer light turns on page 66 and page 19. More detailed information on the individual additional options can be indicated. Put each piece of the... laundry in the drum. Press the Start/Stop" button. Select Additional Options" on page 15. 5. The Options" are completely in the dryer from creasing (see the information on inside the drum. 4. The Start/Stop" indicator light illuminates. This prevent the laundry from the program selection ...
...Extended Wrinkle Block", page 16). 18 i The program starts with an acoustic signal (if set ). Therefore, it immediately. 3. The dryer light turns on page 66 and page 19. More detailed information on the individual additional options can be indicated. Put each piece of the... laundry in the drum. Press the Start/Stop" button. Select Additional Options" on page 15. 5. The Options" are completely in the dryer from creasing (see the information on inside the drum. 4. The Start/Stop" indicator light illuminates. This prevent the laundry from the program selection ...

Installation and Use & Care (all languages)
Page 19
... shoes. Drying shoes without a rack could jam and be moved, as it out of residual moisture. 8. The laundry must have to matt. Open the dryer door. 2. Laundry type Required drying time Thin woolen pullover 80 min. (e.g. 60 + 20 min) Thick woolen pullover 90-120 min. After drying, spread... the required drying time with the drum edge! Trousers 60-90 min. Remove the lint filter. 2. Rotate the program selector to hang over the dryer rack! 3. Take the laundry out of shoes - Laundry must be cleaned after the indicated drying time: q Fold the item of clothing so that...
... shoes. Drying shoes without a rack could jam and be moved, as it out of residual moisture. 8. The laundry must have to matt. Open the dryer door. 2. Laundry type Required drying time Thin woolen pullover 80 min. (e.g. 60 + 20 min) Thick woolen pullover 90-120 min. After drying, spread... the required drying time with the drum edge! Trousers 60-90 min. Remove the lint filter. 2. Rotate the program selector to hang over the dryer rack! 3. Take the laundry out of shoes - Laundry must be cleaned after the indicated drying time: q Fold the item of clothing so that...


