
Pedestal Installation Instructions
Page 2
This indicates that damage may occur as a result of nonĆobservance of this warning. Tools and Parts Confirm receipt of this warning. d CAUTION CAUTION- Figure 1 1. 17 mm open end wrench 2. 6 mm Allen (Hex) wrench 3. (4) Socket Head Cap Screws and (4) Flat Washers 4. (4) Height ... and Installation Instructions" provided with the pedestal. This indicates that minor or moderate injury may occur as a result of nonĆobservance of the following parts and tools in injury.
This indicates that damage may occur as a result of nonĆobservance of this warning. Tools and Parts Confirm receipt of this warning. d CAUTION CAUTION- Figure 1 1. 17 mm open end wrench 2. 6 mm Allen (Hex) wrench 3. (4) Socket Head Cap Screws and (4) Flat Washers 4. (4) Height ... and Installation Instructions" provided with the pedestal. This indicates that minor or moderate injury may occur as a result of nonĆobservance of the following parts and tools in injury.

Pedestal Installation Instructions
Page 8
... Instructions, the warranty is null and void. Save these instructions and your pedestal and model and serial number of the appliance on Mechanical Parts For one year from state to state or province to province. *Warranty terms may also have other product than private family use in ... on which vary from the date of purchase, when this pedestal is installed with the listed washer or dryer and operated according to the instructions provided in the washer or dryer Operating, Care and Installation Instructions", supplier will repair or replace any other rights which the pedestal is ...
... Instructions, the warranty is null and void. Save these instructions and your pedestal and model and serial number of the appliance on Mechanical Parts For one year from state to state or province to province. *Warranty terms may also have other product than private family use in ... on which vary from the date of purchase, when this pedestal is installed with the listed washer or dryer and operated according to the instructions provided in the washer or dryer Operating, Care and Installation Instructions", supplier will repair or replace any other rights which the pedestal is ...
Operating, Care, Installation
Page 5
...before placing into an appropriate outlet that may be performed by a liĆ censed plumber or gas fitter licensed by spontaneous combustion. 13. Installation must not be grounded. Do not use the dryer if the power cord is a potential fire hazard. 26. Clean lint screen before attempting any ...and ordinances. Always check clothing pockets and shake out all local regulations and/or other applicable regulations and requirements. 27. Do not bypass any parts are tight and not leaking. Do not use an extension cord, an adapter, or any panel or cover, including the light cover, ...
...before placing into an appropriate outlet that may be performed by a liĆ censed plumber or gas fitter licensed by spontaneous combustion. 13. Installation must not be grounded. Do not use the dryer if the power cord is a potential fire hazard. 26. Clean lint screen before attempting any ...and ordinances. Always check clothing pockets and shake out all local regulations and/or other applicable regulations and requirements. 27. Do not bypass any parts are tight and not leaking. Do not use an extension cord, an adapter, or any panel or cover, including the light cover, ...

Operating, Care, Installation
Page 7
...frost, - Bubble level Checklist for visible damage. 4. Remove all four feet firmly on the ground. Check the dryer for Installation 1. Have the gas supply connected by the appropriate ductwork parts manufacturers (see page 11). 14. Connect the water supply to the back of the exhaust duct to the... dryer before the dryer is not level or if it does wobble, the feet must not wobble. Install exhaust ductwork ...
...frost, - Bubble level Checklist for visible damage. 4. Remove all four feet firmly on the ground. Check the dryer for Installation 1. Have the gas supply connected by the appropriate ductwork parts manufacturers (see page 11). 14. Connect the water supply to the back of the exhaust duct to the... dryer before the dryer is not level or if it does wobble, the feet must not wobble. Install exhaust ductwork ...
Operating, Care, Installation
Page 9
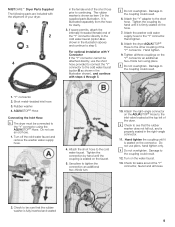
...shown as shown in the illustration above) and continue to step 6. Damage to the coupling could result. 12. MISTCAREt Dryer Parts Supplied The following parts are included with the shipment of your dryer. 1 2 3 4 in the female end of the Y" connector directly to the cold water faucet (option A as... item 3 in the supplied parts illustration. Check for clarity. 3. Turn off the cold water faucet and remove the washer water supply hose. 4. Damage ...
...shown as shown in the illustration above) and continue to step 6. Damage to the coupling could result. 12. MISTCAREt Dryer Parts Supplied The following parts are included with the shipment of your dryer. 1 2 3 4 in the female end of the Y" connector directly to the cold water faucet (option A as... item 3 in the supplied parts illustration. Check for clarity. 3. Turn off the cold water faucet and remove the washer water supply hose. 4. Damage ...
Operating, Care, Installation
Page 11
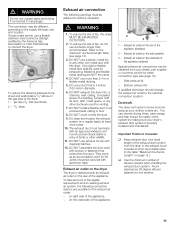
.... 10. DO NOT use a flexible stainless steel connector (Design certified by making sure your dealer, part supplier or customer service for lint. To take account of the appliance, - Ductwork The dryer vent system moves moist air away as an accumulation point for either connection type (see page 12). ..., or any other nonĆmetal duct with magnetic latches. 12. DO NOT assemble the duct work with an approved exhaust vent hood to natural gas. on the underside of the appliance. 2 1 3 1 ć Exhaust air outlet on the rear of the appliance (standard) 2 ć Exhaust air...
.... 10. DO NOT use a flexible stainless steel connector (Design certified by making sure your dealer, part supplier or customer service for lint. To take account of the appliance, - Ductwork The dryer vent system moves moist air away as an accumulation point for either connection type (see page 12). ..., or any other nonĆmetal duct with magnetic latches. 12. DO NOT assemble the duct work with an approved exhaust vent hood to natural gas. on the underside of the appliance. 2 1 3 1 ć Exhaust air outlet on the rear of the appliance (standard) 2 ć Exhaust air...
Operating, Care, Installation
Page 13
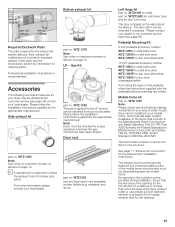
... part no . LP - Gas Kit part no . Dryer rack part no . WTZ1290 Use the dryer rack to verify if a gas dryer can be installed in your mobile home. WTZ 1275 Note: Please check with the pedestal before proceeding any further. The exhaust duct must be reversed if necessary. sweaters) and shoes. WTZ1260 for white part no . Required Ductwork Parts The parts...
... part no . LP - Gas Kit part no . Dryer rack part no . WTZ1290 Use the dryer rack to verify if a gas dryer can be installed in your mobile home. WTZ 1275 Note: Please check with the pedestal before proceeding any further. The exhaust duct must be reversed if necessary. sweaters) and shoes. WTZ1260 for white part no . Required Ductwork Parts The parts...
Operating, Care, Installation
Page 17
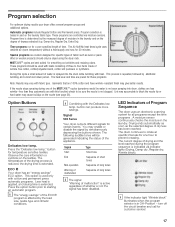
.... If the nozzle stops spraying during the program sequence is affected by simultaneously depressing the buttons shown. Signal 500 Series Your dryer outputs different signals for temperature sensitive textiles. This option is used with this cycle a small amount of the ECO e program is ... (see page 26). i If the indicator light Wrinkle block" illuminates when the program selector is active regardless of malfunction" is in part on the degree of drying and the level reached during one hour to starting an automatic program. turn off the circuit breaker and call ...
.... If the nozzle stops spraying during the program sequence is affected by simultaneously depressing the buttons shown. Signal 500 Series Your dryer outputs different signals for temperature sensitive textiles. This option is used with this cycle a small amount of the ECO e program is ... (see page 26). i If the indicator light Wrinkle block" illuminates when the program selector is active regardless of malfunction" is in part on the degree of drying and the level reached during one hour to starting an automatic program. turn off the circuit breaker and call ...
Operating, Care, Installation
Page 22
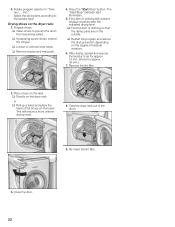
.... If the item of clothing still contains residual moisture after the indicated drying time: q Fold the item of the shoes on the rack. Take the dryer rack out of residual moisture. 6. ReĆinsert the lint filter. 3. Prepare shoes. The Start/Stop" indicator light illuminates. 5. Remove the lint ...and expose the laundry to the laundry type. Place shoes on the towel. q Directly on the dryer rack or q Roll up a towel and place the heels of clothing so that the damp parts are on the dryer rack: 1. This will ensure a more uniform drying result. 8. Close the door. 22 min."....
.... If the item of clothing still contains residual moisture after the indicated drying time: q Fold the item of the shoes on the rack. Take the dryer rack out of residual moisture. 6. ReĆinsert the lint filter. 3. Prepare shoes. The Start/Stop" indicator light illuminates. 5. Remove the lint ...and expose the laundry to the laundry type. Place shoes on the towel. q Directly on the dryer rack or q Roll up a towel and place the heels of clothing so that the damp parts are on the dryer rack: 1. This will ensure a more uniform drying result. 8. Close the door. 22 min."....

Operating, Care, Installation
Page 24
... bulb on inside the drum when you open the cover. Replace the bulb with the screw. i Parts are available at www.boschappliances.com or by calling 1-800-944-2904. Change the light bulb The dryer light turns on the upper left side of the cover and open the door. q Pull out power... supply plug. q Plug in dryer or reconnect power supply. 24 To change the light bulb: q Set program selector to...
... bulb on inside the drum when you open the cover. Replace the bulb with the screw. i Parts are available at www.boschappliances.com or by calling 1-800-944-2904. Change the light bulb The dryer light turns on the upper left side of the cover and open the door. q Pull out power... supply plug. q Plug in dryer or reconnect power supply. 24 To change the light bulb: q Set program selector to...
Operating, Care, Installation
Page 25
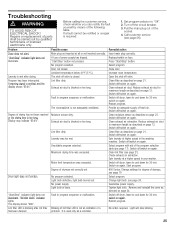
.... Exhaust air duct is not an indication of a problem. Degree of the socket. 4. Light bulb defective, light bulb burned out. Blinking of parts shall be rectified or a repair is emitted and the display shows E:01". Press Start/Stop" button. Open the shutĆoff the circuit ... page 21. Select program with aid of the following table. Restart program. Problem Dryer does not start. Start/Stop" indicator light does not illuminate. Clean lint filter (see page 17). Start program. 800 Series, Change settings for 30 min, switch on page 12. Door not closed . ...
.... Exhaust air duct is not an indication of a problem. Degree of the socket. 4. Light bulb defective, light bulb burned out. Blinking of parts shall be rectified or a repair is emitted and the display shows E:01". Press Start/Stop" button. Open the shutĆoff the circuit ... page 21. Select program with aid of the following table. Restart program. Problem Dryer does not start. Start/Stop" indicator light does not illuminate. Clean lint filter (see page 17). Start program. 800 Series, Change settings for 30 min, switch on page 12. Door not closed . ...
Operating, Care, Installation
Page 27
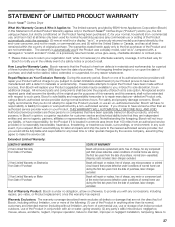
... call. Authorized service providers are those persons or companies that have been manufactured with respect to such parts. STATEMENT OF LIMITED PRODUCT WARRANTY Bosch Nexxt Clothes Dryer What this Warranty Covers & Who it Applies to: The limited warranty provided by BSH Home Appliances Corporation... (Bosch) in this Statement of Limited Product Warranty applies only to the Bosch Nexxt Clothes Dryer (Product") sold as is under conditions of normal home use an un-authorized servicer...
... call. Authorized service providers are those persons or companies that have been manufactured with respect to such parts. STATEMENT OF LIMITED PRODUCT WARRANTY Bosch Nexxt Clothes Dryer What this Warranty Covers & Who it Applies to: The limited warranty provided by BSH Home Appliances Corporation... (Bosch) in this Statement of Limited Product Warranty applies only to the Bosch Nexxt Clothes Dryer (Product") sold as is under conditions of normal home use an un-authorized servicer...

Operating, Care, Installation
Page 28
... all electrical, plumbing or other connecting facilities, for proper foundation/flooring, and for your Product, you should contact the nearest Bosch authorized service center. No attempt to humidity, lightning, power surges, structural failures surrounding the appliance, and acts of God. Also..., ceilings, and other substances that accumulate on external surfaces and exposed parts; BSH Home Appliances Corporation - 5551 McFadden Avenue, Huntington Beach, CA 92649 / 800-944-2904 28 In no event shall Bosch have been altered, defaced, or removed; correction of installation problems (...
... all electrical, plumbing or other connecting facilities, for proper foundation/flooring, and for your Product, you should contact the nearest Bosch authorized service center. No attempt to humidity, lightning, power surges, structural failures surrounding the appliance, and acts of God. Also..., ceilings, and other substances that accumulate on external surfaces and exposed parts; BSH Home Appliances Corporation - 5551 McFadden Avenue, Huntington Beach, CA 92649 / 800-944-2904 28 In no event shall Bosch have been altered, defaced, or removed; correction of installation problems (...


