Use & Care Manual (all languages)
Page 3
...electric shock, serious injury or death to persons and /or damage when using the dryer. Before the appliance is used for its intended purpose. 3 Do not tamper with automatic drum stop function - Do not repair or replace any part.... The dryer must not be sure to unplug the dryer from service or discarded, remove the door to the manufacĆ turer's instructions in your dryer, follow these...cleaning rags, mop heads and the like materials. Congratulations on having selected a Bosch clothes dryer, the choice of those that demand exceptional drying performance and care from the...
...electric shock, serious injury or death to persons and /or damage when using the dryer. Before the appliance is used for its intended purpose. 3 Do not tamper with automatic drum stop function - Do not repair or replace any part.... The dryer must not be sure to unplug the dryer from service or discarded, remove the door to the manufacĆ turer's instructions in your dryer, follow these...cleaning rags, mop heads and the like materials. Congratulations on having selected a Bosch clothes dryer, the choice of those that demand exceptional drying performance and care from the...

Use & Care Manual (all languages)
Page 4
... WARNING d Keep children away from environmentally friendly recycling. Do not operate the dryer if any parts are a potential fire hazard. 28. d WARNING d Improper connection of a local code: - Check with the Canadian Electric Code C22.1 ć latest edition/Provincial and Municipal codes and/or local ... cord. Valuable raw materials can result in doubt as to the INSTALLATION INSTRUCTIONS and that the dryer has been installed according to whether the dryer is very heavy. door) ć due to observe all local codes or, in accordance with a qualified electrician or...
... WARNING d Keep children away from environmentally friendly recycling. Do not operate the dryer if any parts are a potential fire hazard. 28. d WARNING d Improper connection of a local code: - Check with the Canadian Electric Code C22.1 ć latest edition/Provincial and Municipal codes and/or local ... cord. Valuable raw materials can result in doubt as to the INSTALLATION INSTRUCTIONS and that the dryer has been installed according to whether the dryer is very heavy. door) ć due to observe all local codes or, in accordance with a qualified electrician or...
Use & Care Manual (all languages)
Page 8
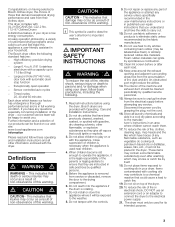
..., exhaust air outlets) are not included in prepared side panel is required. Side exhaust kit part no . WTZ1290 Use the dryer rack to fit the initial parts of the dryer. WTZ126S (Silver Dryers) The door catch can be adjusted. The door is slid across the floor if heightĆadjustable feet have customer service install the exhaust...
..., exhaust air outlets) are not included in prepared side panel is required. Side exhaust kit part no . WTZ1290 Use the dryer rack to fit the initial parts of the dryer. WTZ126S (Silver Dryers) The door catch can be adjusted. The door is slid across the floor if heightĆadjustable feet have customer service install the exhaust...
Use & Care Manual (all languages)
Page 17
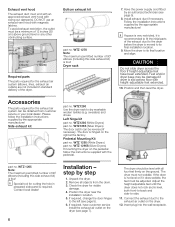
... the drying duration depending on the basket. Never use solvents or highly flammable liquids for approx. 30 min.). 5. Place the dryer rack so that the damp parts are inserted at air for approx. 15 min. (shoes for cleaning. 17 If the item of clothing still contains residual moisture... after the indicated drying time: q Fold the item of residual moisture. 4. Close the door. 4. Close the door. Take the dryer rack out of the ...
... the drying duration depending on the basket. Never use solvents or highly flammable liquids for approx. 30 min.). 5. Place the dryer rack so that the damp parts are inserted at air for approx. 15 min. (shoes for cleaning. 17 If the item of clothing still contains residual moisture... after the indicated drying time: q Fold the item of residual moisture. 4. Close the door. 4. Close the door. Take the dryer rack out of the ...
Use & Care Manual (all languages)
Page 18
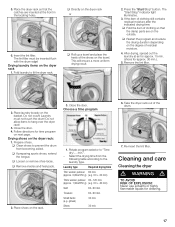
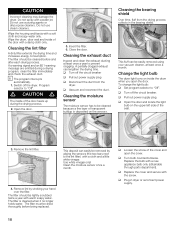
... bulb counterclockwise. CAUTION Incorrect cleaning may damage the dryer. Do not spray with the screw. Wipe the drum, door seal and inside the drum when you open the cover. d CAUTION d The inside of the door heats up during a drying program, clean the ...filter immediately and check the exhaust duct. Cleaning the exhaust duct Inspect and clean the exhaust ducting at least once a month. To change the light bulb: q Set program selector to Off". Wipe the housing and fascia with a new appliance bulb only (obtainable through parts...
... bulb counterclockwise. CAUTION Incorrect cleaning may damage the dryer. Do not spray with the screw. Wipe the drum, door seal and inside the drum when you open the cover. d CAUTION d The inside of the door heats up during a drying program, clean the ...filter immediately and check the exhaust duct. Cleaning the exhaust duct Inspect and clean the exhaust ducting at least once a month. To change the light bulb: q Set program selector to Off". Wipe the housing and fascia with a new appliance bulb only (obtainable through parts...
Use & Care Manual (all languages)
Page 19
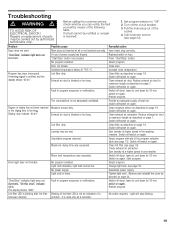
...Light bulb is blocked or too long. Fault in program sequence or malfunction. Close door. Restart program. Switch off /switch on again. Switch off /switch on again. ..." button. Increase room temperature. Switch off /switch on again. Switch off dryer, leave to cool down for 30 min. Clean exhaust air extraction. Switch ...on again. No action required. Troubleshooting d WARNING d TO AVOID RISK OF ELECTRICAL SHOCK! Repairs or replacement of the program selection table (see page 18. ... of parts may indicate E:03". Change light bulb, see page 15).
...Light bulb is blocked or too long. Fault in program sequence or malfunction. Close door. Restart program. Switch off /switch on again. Switch off /switch on again. ..." button. Increase room temperature. Switch off /switch on again. Switch off dryer, leave to cool down for 30 min. Clean exhaust air extraction. Switch ...on again. No action required. Troubleshooting d WARNING d TO AVOID RISK OF ELECTRICAL SHOCK! Repairs or replacement of the program selection table (see page 18. ... of parts may indicate E:03". Change light bulb, see page 15).


