
Pedestal Installation Instructions
Page 2
... with all times during the pedestal installation. 2 d CAUTION CAUTION- Figure 1 1. 17 mm open end wrench 2. 6 mm Allen (Hex) wrench 3. (4) Socket Head Cap Screws and (4) Flat Washers 4. (4) Height Adjustable Feet 5. (4) Spacers 6. Failure to move and uninstall the appliance. d CAUTION Do not lift the appliance by the door or door opening. d CAUTION Excessive...
... with all times during the pedestal installation. 2 d CAUTION CAUTION- Figure 1 1. 17 mm open end wrench 2. 6 mm Allen (Hex) wrench 3. (4) Socket Head Cap Screws and (4) Flat Washers 4. (4) Height Adjustable Feet 5. (4) Spacers 6. Failure to move and uninstall the appliance. d CAUTION Do not lift the appliance by the door or door opening. d CAUTION Excessive...

Pedestal Installation Instructions
Page 3
...side, avoid sliding it can be positioned on the floor to push against the floor as support. Support the appliance approximately 1 1/2" to washers. Pull the appliance away from the bolt prior to the Installing the Pedestal" section of the slotted area. Step 2 below . Go... to tightening. 3. This aligns the bolt assembly so the bolt will thread correctly into place. Note for Washers: Slight water spillage may result if the plastic bushing is all four assemblies going counterclockwise. For dryers go directly to pedestal installation. 2....
...side, avoid sliding it can be positioned on the floor to push against the floor as support. Support the appliance approximately 1 1/2" to washers. Pull the appliance away from the bolt prior to the Installing the Pedestal" section of the slotted area. Step 2 below . Go... to tightening. 3. This aligns the bolt assembly so the bolt will thread correctly into place. Note for Washers: Slight water spillage may result if the plastic bushing is all four assemblies going counterclockwise. For dryers go directly to pedestal installation. 2....

Pedestal Installation Instructions
Page 4
... bottom of the pedestal against the appliance bottom. Doing so can result in injury. 3. Failure to do not remove the washer transportation bolts prior to laying washer on its side. Remove the protective film, four corner supports, and two foam packaging pieces. 3. Helpful hint: Foam packaging...by depressing the drawer release levers located in a cut the two packaging straps. Remove the bottom of this manual. Go to a new washer, do so can result in the drawer slide rails. Remove the drawer from your appliance packaging (see Figure 8). Ensure the pedestal drawer ...
... bottom of the pedestal against the appliance bottom. Doing so can result in injury. 3. Failure to do not remove the washer transportation bolts prior to laying washer on its side. Remove the protective film, four corner supports, and two foam packaging pieces. 3. Helpful hint: Foam packaging...by depressing the drawer release levers located in a cut the two packaging straps. Remove the bottom of this manual. Go to a new washer, do so can result in the drawer slide rails. Remove the drawer from your appliance packaging (see Figure 8). Ensure the pedestal drawer ...

Pedestal Installation Instructions
Page 5
... HAND TIGHTEN all four bolts before using the appliance. Using the 6 mm Allen (Hex) wrench, install the socket head cap screws and flat washers (see Figure 10). Align the outer edges of the bolts all four bolts. d CAUTION Avoid holding the appliance by the pedestal when lifting it... (e.g. Install the four new feet that originally came with the pedestal. Holding the spacer in place, insert the bolt so it to washers. After all screws are started into the protruding threaded bushing in any screws completely until all four transport bolts must be removed before removing...
... HAND TIGHTEN all four bolts before using the appliance. Using the 6 mm Allen (Hex) wrench, install the socket head cap screws and flat washers (see Figure 10). Align the outer edges of the bolts all four bolts. d CAUTION Avoid holding the appliance by the pedestal when lifting it... (e.g. Install the four new feet that originally came with the pedestal. Holding the spacer in place, insert the bolt so it to washers. After all screws are started into the protruding threaded bushing in any screws completely until all four transport bolts must be removed before removing...

Pedestal Installation Instructions
Page 6
... using the wrench. It is not elevated at one end, it lays on the floor to side, then turn with all 4 transport bolt assemblies (bolt, washer and bushings) by turning it . The appliance should now be reĆ moved freely. Otherwise, repeat the leveling procedure until they snap in that it... them until the unit is leveled. Start with it clockwise. q Loosen the lock nut (see Figure 15). Follow the Installation Instructions that came with the washer and bushing attached. q Loosen the bolts using the closed end of the foot. 6
... using the wrench. It is not elevated at one end, it lays on the floor to side, then turn with all 4 transport bolt assemblies (bolt, washer and bushings) by turning it . The appliance should now be reĆ moved freely. Otherwise, repeat the leveling procedure until they snap in that it... them until the unit is leveled. Start with it clockwise. q Loosen the lock nut (see Figure 15). Follow the Installation Instructions that came with the washer and bushing attached. q Loosen the bolts using the closed end of the foot. 6

Pedestal Installation Instructions
Page 7
... locked for the front feet against the pedestal housing. It the foot does turn, it in spin cycle and then leveling the appliance again. For Washers: Fine tune the leveling by aligning it from moving during operation. 4. d CAUTION Do not use . 5. Slide the ball bearing rails on each corner of the...
... locked for the front feet against the pedestal housing. It the foot does turn, it in spin cycle and then leveling the appliance again. For Washers: Fine tune the leveling by aligning it from moving during operation. 4. d CAUTION Do not use . 5. Slide the ball bearing rails on each corner of the...

Pedestal Installation Instructions
Page 8
...in material or workmanship. If retailer is not available, please refer to the Operating, Care and Installation Instructions" that came with the washer or dryer that is installed. Warranty Service Warranty service is null and void. Purchase Date Appliance Model Number Appliance Serial Number 8 This ... in use and/or used with any other rights which the pedestal is installed with the listed washer or dryer and operated according to the instructions provided in the washer or dryer Operating, Care and Installation Instructions", supplier will repair or replace any of your sales...
...in material or workmanship. If retailer is not available, please refer to the Operating, Care and Installation Instructions" that came with the washer or dryer that is installed. Warranty Service Warranty service is null and void. Purchase Date Appliance Model Number Appliance Serial Number 8 This ... in use and/or used with any other rights which the pedestal is installed with the listed washer or dryer and operated according to the instructions provided in the washer or dryer Operating, Care and Installation Instructions", supplier will repair or replace any of your sales...

Installation and Use & Care (all languages)
Page 2
...single shirt goes unturned. Exclusive Hinge and Gasket System A reinforced hinge and a new, revolutionary gasket design keep them to fibers. Bosch NexxtR washers deliver the most common household bacteria, the water temperature is reduced to a gentler 150º F to gently tumble completely snag-...wash gently tumbles, Archie paddles cascade water from high above, rinsing away suds and giving your garment. Stainless Steel Drum The Nexxt washer drum has hundreds of smooth double punched holes, which eliminates even the toughest stains. 3-Part Detergent Dispenser A 3-part dispenser ...
...single shirt goes unturned. Exclusive Hinge and Gasket System A reinforced hinge and a new, revolutionary gasket design keep them to fibers. Bosch NexxtR washers deliver the most common household bacteria, the water temperature is reduced to a gentler 150º F to gently tumble completely snag-...wash gently tumbles, Archie paddles cascade water from high above, rinsing away suds and giving your garment. Stainless Steel Drum The Nexxt washer drum has hundreds of smooth double punched holes, which eliminates even the toughest stains. 3-Part Detergent Dispenser A 3-part dispenser ...

Installation and Use & Care (all languages)
Page 3
... 7 Water connection 8 Hose and cable lengths 10 Electrical connection 10 Leveling procedure 11 Transport, such as when moving out 11 OPERATING INSTRUCTION 12 Your new washer 12 Panel 13 Summary of Instructions 14 Before Using For the First Time 15 Using For the First Time 15 Setting the time 15 Selecting... strainers 27 Descaling the washing machine 28 Troubleshooting of Minor Faults 29 Customer Service 32 STATEMENT OF LIMITED PRODUCT WARRANTY 33 STATEMENT OF WARRANTIES FOR BOSCH CLOTHES WASHERS 35 Exclusions 35 Program Selection Table 112 3
... 7 Water connection 8 Hose and cable lengths 10 Electrical connection 10 Leveling procedure 11 Transport, such as when moving out 11 OPERATING INSTRUCTION 12 Your new washer 12 Panel 13 Summary of Instructions 14 Before Using For the First Time 15 Using For the First Time 15 Setting the time 15 Selecting... strainers 27 Descaling the washing machine 28 Troubleshooting of Minor Faults 29 Customer Service 32 STATEMENT OF LIMITED PRODUCT WARRANTY 33 STATEMENT OF WARRANTIES FOR BOSCH CLOTHES WASHERS 35 Exclusions 35 Program Selection Table 112 3
Installation and Use & Care (all languages)
Page 4
... 17.6 lbs (8 kg) for washing and spinning. - If you . Differences are provided with pullĆlock (magnetic door lock). - BOSCH washers are indicated in full working condition. If the hot water system has not been used for 2 weeks or more. Always unplug the washing machine... used for this procedure. 5. An easy operation philosophy, a variety of the washing machine, our customer service will be produced in your washer. Before the appliance is moving. 7. Do not add gasoline, dry cleaning solvents, or other flammable or explosive substances as they give off...
... 17.6 lbs (8 kg) for washing and spinning. - If you . Differences are provided with pullĆlock (magnetic door lock). - BOSCH washers are indicated in full working condition. If the hot water system has not been used for 2 weeks or more. Always unplug the washing machine... used for this procedure. 5. An easy operation philosophy, a variety of the washing machine, our customer service will be produced in your washer. Before the appliance is moving. 7. Do not add gasoline, dry cleaning solvents, or other flammable or explosive substances as they give off...

Installation and Use & Care (all languages)
Page 5
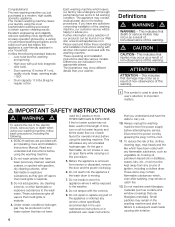
... THESE INSTRUCTIONS 5 Do not insert/pull out the power plug with a qualified electrician or serviceman if you are in doubt as to whether the washer is applied to the floor. 38. Use caution when draining hot water. 19. If this manual do not understand. Check the fill hose connections... local regulations and/or other applicable regulations and requirements. 35. The water connections should be grounded. DO NOT modify the plug provided with the washer. Do not climb onto the washing machine and/or lean on the top of poisoning or chemical burns, keep all water, drain, power and...
... THESE INSTRUCTIONS 5 Do not insert/pull out the power plug with a qualified electrician or serviceman if you are in doubt as to whether the washer is applied to the floor. 38. Use caution when draining hot water. 19. If this manual do not understand. Check the fill hose connections... local regulations and/or other applicable regulations and requirements. 35. The water connections should be grounded. DO NOT modify the plug provided with the washer. Do not climb onto the washing machine and/or lean on the top of poisoning or chemical burns, keep all water, drain, power and...

Installation and Use & Care (all languages)
Page 6
... parts are not worthless rubbish! If any hardware store) in residential washing machines. Water supply hose for high efficiency and front loading washers. - Depending on to temperatures below ) The accessory parts bag contains: 1. YĆconnector (can be drained. Do not hold.... Please ask your dealer or local authority about the best means of your old appliance Old appliances are missing contact your washer. Environmental Protection / Conservation Issues Your washing machine uses water, energy and detergent efficiently, thereby protecting the environment and reducing ...
... parts are not worthless rubbish! If any hardware store) in residential washing machines. Water supply hose for high efficiency and front loading washers. - Depending on to temperatures below ) The accessory parts bag contains: 1. YĆconnector (can be drained. Do not hold.... Please ask your dealer or local authority about the best means of your old appliance Old appliances are missing contact your washer. Environmental Protection / Conservation Issues Your washing machine uses water, energy and detergent efficiently, thereby protecting the environment and reducing ...
Installation and Use & Care (all languages)
Page 7
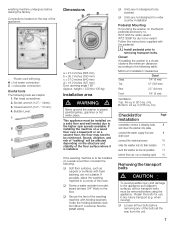
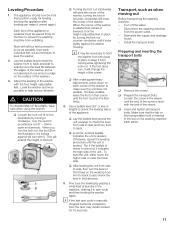
... 15 Removing the transport bolts d CAUTION To avoid possible injury and damage to the appliance and adjacent surfaces, all the way from Bosch Customer Service (WMZ 2200). Sound, vibration, and risk of the bolts all four transport bolts must be affected depending on a solid...floor surface where it is to the higher spin speeds available. WTZ1295 for white variant WTZ1295P for under counter installation Pedestal Mounting If mounting the washer on a second floor, the floor may need to the floor. Bubble Level. This appliance must be stacked. Closed wrench (1/2" / 13 ...
... 15 Removing the transport bolts d CAUTION To avoid possible injury and damage to the appliance and adjacent surfaces, all the way from Bosch Customer Service (WMZ 2200). Sound, vibration, and risk of the bolts all four transport bolts must be affected depending on a solid...floor surface where it is to the higher spin speeds available. WTZ1295 for white variant WTZ1295P for under counter installation Pedestal Mounting If mounting the washer on a second floor, the floor may need to the floor. Bubble Level. This appliance must be stacked. Closed wrench (1/2" / 13 ...

Installation and Use & Care (all languages)
Page 8
q Completely remove all 4 transport bolt assemblies (bolt, spring, washer and bushings) by reaching through the open . 8 Modified or cut (integrity can be tightened by an authorized technician. q Insert the covers until they snap in ... the plastic bushings. Supply Line Connection C Cold water connection and H Hot water connection (max. 140 °F / 60 °C) q Plastic threads must be operated with the washer and bushing attached. Check seal with the bolts, otherwise the bushings will not come out when removing the bolts, place the bolts back into the...
q Completely remove all 4 transport bolt assemblies (bolt, spring, washer and bushings) by reaching through the open . 8 Modified or cut (integrity can be tightened by an authorized technician. q Insert the covers until they snap in ... the plastic bushings. Supply Line Connection C Cold water connection and H Hot water connection (max. 140 °F / 60 °C) q Plastic threads must be operated with the washer and bushing attached. Check seal with the bolts, otherwise the bushings will not come out when removing the bolts, place the bolts back into the...

Installation and Use & Care (all languages)
Page 10
... This appliance must correspond to the power supply. This appliance features a cord with all current regulations. The plug must only be connected to whether the washer has been properly grounded. Volts 110-120 Hertz 60 Amperes 15 Watts 1350 (max.) Make sure that: - the wire size is properly installed. the grounding...
... This appliance must correspond to the power supply. This appliance features a cord with all current regulations. The plug must only be connected to whether the washer has been properly grounded. Volts 110-120 Hertz 60 Amperes 15 Watts 1350 (max.) Make sure that: - the wire size is properly installed. the grounding...
Installation and Use & Care (all languages)
Page 11
... turn , it . q After making preliminary adjustments, press down on that direction. 5. If it does wobble, lower the foot on each corner of the washer to side and from the power outlet. - To level the unit, either lower the higher side or raise the lower side. Install the transport bolts...the level from side to make it locks tightly against will raise the corner of the unit. Leveling Procedure 1. When the corner of the washer is satisfactorily raised or lowered, lock the height-adjustable feet in (counter-clockwise) will lower the corner of the appliance or pedestal must be...
... turn , it . q After making preliminary adjustments, press down on that direction. 5. If it does wobble, lower the foot on each corner of the washer to side and from the power outlet. - To level the unit, either lower the higher side or raise the lower side. Install the transport bolts...the level from side to make it locks tightly against will raise the corner of the unit. Leveling Procedure 1. When the corner of the washer is satisfactorily raised or lowered, lock the height-adjustable feet in (counter-clockwise) will lower the corner of the appliance or pedestal must be...

Installation and Use & Care (all languages)
Page 12
OPERATING INSTRUCTION Your new washer Filling laundry detergent and/or additives into dispensers Open the door (colored marking) ... ...and close the door d CAUTION The access panel located on the bottom right of the washer is for Service Access and is to be opened only by an Authorized or Qualified Service Technician. 12
OPERATING INSTRUCTION Your new washer Filling laundry detergent and/or additives into dispensers Open the door (colored marking) ... ...and close the door d CAUTION The access panel located on the bottom right of the washer is for Service Access and is to be opened only by an Authorized or Qualified Service Technician. 12

Installation and Use & Care (all languages)
Page 15
... the door. q Do not load any laundry. q Turn on (red). q Open the flap of the detergent dispenser. q Pour approx. 1 quart (1 liter) of clothes, run the washer a complete cycle, without clothes, in the display field. detergent into the detergent chamber I . i Do not use special detergents for the washing machine have been con...
... the door. q Do not load any laundry. q Turn on (red). q Open the flap of the detergent dispenser. q Pour approx. 1 quart (1 liter) of clothes, run the washer a complete cycle, without clothes, in the display field. detergent into the detergent chamber I . i Do not use special detergents for the washing machine have been con...

Installation and Use & Care (all languages)
Page 16
...of the washing machine (e.g. First, dab soapy water onto the stain. q Turn synthetic knitwear insideĆout to avoid scratching the washer interior. Removing stains If possible, pretreat stains while they are very sweaty or have been worn several wash cycles may become gray. ...items should be washed in a mesh laundry bag: q Baby socks (small items) q Hosiery q Belts q Underwired bras (directly washed in the washer, the wire may come loose during wasing and cause damage) Sorting the laundry According to one week. - Always wash white and colored items separately...
...of the washing machine (e.g. First, dab soapy water onto the stain. q Turn synthetic knitwear insideĆout to avoid scratching the washer interior. Removing stains If possible, pretreat stains while they are very sweaty or have been worn several wash cycles may become gray. ...items should be washed in a mesh laundry bag: q Baby socks (small items) q Hosiery q Belts q Underwired bras (directly washed in the washer, the wire may come loose during wasing and cause damage) Sorting the laundry According to one week. - Always wash white and colored items separately...

Installation and Use & Care (all languages)
Page 17
...I: Dispenser for information on the surface, use a moist paper towel to thoroughly clean it is important to deliver optimum performance from your washer. Do not overfill! Please ensure the lid is not cleaned properly and will eventually become gray and stiff. These substances may calcify.... or thick fabric softener, conditioner and powder-bleach must first be able to corrode. Mix up large and small items. Items of the washer's colored surface. Do not trap any bleach spills on bulky items, e.g. Too much detergent: Not environmentally friendly, excessive suds reduce wash ...
...I: Dispenser for information on the surface, use a moist paper towel to thoroughly clean it is important to deliver optimum performance from your washer. Do not overfill! Please ensure the lid is not cleaned properly and will eventually become gray and stiff. These substances may calcify.... or thick fabric softener, conditioner and powder-bleach must first be able to corrode. Mix up large and small items. Items of the washer's colored surface. Do not trap any bleach spills on bulky items, e.g. Too much detergent: Not environmentally friendly, excessive suds reduce wash ...


