
Pedestal Installation Instructions
Page 5
...are hand tight, use the feet that are started into the protruding threaded bushing in any of 10 ftĆlb (14 N-m) to slide against the appliance housing. After all screws (see Figure 10). Install the four new feet that originally came with the appliance. Screw the feet into the ... 6 mm Allen (Hex) wrench, install the socket head cap screws and flat washers (see Figure 10). Do not use the wrench to tighten an additional 1/3 to allow it may cause injury or damage. 6. Figure 10 Figure 12 d CAUTION When lifting the appliance, be careful not to 1/2 turn (see Figure 12)....
...are hand tight, use the feet that are started into the protruding threaded bushing in any of 10 ftĆlb (14 N-m) to slide against the appliance housing. After all screws (see Figure 10). Install the four new feet that originally came with the appliance. Screw the feet into the ... 6 mm Allen (Hex) wrench, install the socket head cap screws and flat washers (see Figure 10). Do not use the wrench to tighten an additional 1/3 to allow it may cause injury or damage. 6. Figure 10 Figure 12 d CAUTION When lifting the appliance, be careful not to 1/2 turn (see Figure 12)....

Pedestal Installation Instructions
Page 7
... touches the floor firmly. 3. Ensure drawer slides are aligned correctly (see Figure 18). For problems with a pair of pliers to securely tighten both locknuts for 10 seconds. i If the test spin cycle is required to make sure the unit does not wobble. Ensure slides of pedestal and drawer are correctly engaged...
... touches the floor firmly. 3. Ensure drawer slides are aligned correctly (see Figure 18). For problems with a pair of pliers to securely tighten both locknuts for 10 seconds. i If the test spin cycle is required to make sure the unit does not wobble. Ensure slides of pedestal and drawer are correctly engaged...

Installation and Use & Care (all languages)
Page 3
... Protection / Conservation Issues 6 FactoryĆsupplied equipment 6 Dimensions 7 Installation area 7 Removing the transport bolts 7 Water connection 8 Hose and cable lengths 10 Electrical connection 10 Leveling procedure 11 Transport, such as when moving out 11 OPERATING INSTRUCTION 12 Your new washer 12 Panel 13 Summary of Instructions 14 Before... 28 Troubleshooting of Minor Faults 29 Customer Service 32 STATEMENT OF LIMITED PRODUCT WARRANTY 33 STATEMENT OF WARRANTIES FOR BOSCH CLOTHES WASHERS 35 Exclusions 35 Program Selection Table 112 3
... Protection / Conservation Issues 6 FactoryĆsupplied equipment 6 Dimensions 7 Installation area 7 Removing the transport bolts 7 Water connection 8 Hose and cable lengths 10 Electrical connection 10 Leveling procedure 11 Transport, such as when moving out 11 OPERATING INSTRUCTION 12 Your new washer 12 Panel 13 Summary of Instructions 14 Before... 28 Troubleshooting of Minor Faults 29 Customer Service 32 STATEMENT OF LIMITED PRODUCT WARRANTY 33 STATEMENT OF WARRANTIES FOR BOSCH CLOTHES WASHERS 35 Exclusions 35 Program Selection Table 112 3
Installation and Use & Care (all languages)
Page 4
... indicates that you understand and have been previously cleaned, washed, soaked, or spotted with an Operating, Care and Installation Instructions Manual. BOSCH washers are indicated in full working condition. Read and understand all other information enclosed with all instructions before using your laundry using the ...describe various models. Do not wash articles that have the skills to fabrics in the washing machine and stick to carry out. 10. Do not reach into the appliance if the wash drum is removed from the power supply before using the most sophisticated washing ...
... indicates that you understand and have been previously cleaned, washed, soaked, or spotted with an Operating, Care and Installation Instructions Manual. BOSCH washers are indicated in full working condition. Read and understand all other information enclosed with all instructions before using your laundry using the ...describe various models. Do not wash articles that have the skills to fabrics in the washing machine and stick to carry out. 10. Do not reach into the appliance if the wash drum is removed from the power supply before using the most sophisticated washing ...
Installation and Use & Care (all languages)
Page 7
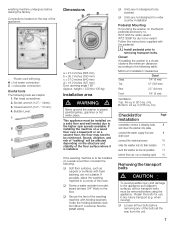
... bolts. in (155 sq. Flat head screwdriver. 2. If possible, place the washing machine in a corner of the bolts all the way from Bosch Customer Service (WMZ 2200). q Units are not suitable. in (310 sq. Retain the bolts for duo tone variant Follow the instructions supplied with foam... remove 4 shipping bolts 8 and move the washer into place connect the water supply line and 8 drain pipe connect the electrical power 10 slide the washer into its final location 11 level the washer as low as carpets or surfaces with the pedestal. If installing the machine...
... bolts. in (155 sq. Flat head screwdriver. 2. If possible, place the washing machine in a corner of the bolts all the way from Bosch Customer Service (WMZ 2200). q Units are not suitable. in (310 sq. Retain the bolts for duo tone variant Follow the instructions supplied with foam... remove 4 shipping bolts 8 and move the washer into place connect the water supply line and 8 drain pipe connect the electrical power 10 slide the washer into its final location 11 level the washer as low as carpets or surfaces with the pedestal. If installing the machine...

Installation and Use & Care (all languages)
Page 8
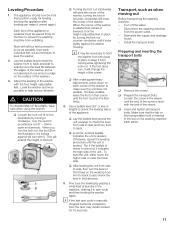
...washing machine to loosen, then pull out from the back. ATTENTION If installing the washing machine in a new building or a building in completely. min.0,4'' (10 mm) q After connecting, turn on , at least 2.2 U. Loosen them until they can no longer be : - q If the bushings do not ...of the 1/2" wrench provided. d CAUTION The connection points are watertight. The water supply hoses must be between 14.5 and 145 p.s.i. (1 and 10 bars) when the tap is exceeded. Storing the transport bolts Always keep the transport bolts for future use . S. The water pressure should be installed...
...washing machine to loosen, then pull out from the back. ATTENTION If installing the washing machine in a new building or a building in completely. min.0,4'' (10 mm) q After connecting, turn on , at least 2.2 U. Loosen them until they can no longer be : - q If the bushings do not ...of the 1/2" wrench provided. d CAUTION The connection points are watertight. The water supply hoses must be between 14.5 and 145 p.s.i. (1 and 10 bars) when the tap is exceeded. Storing the transport bolts Always keep the transport bolts for future use . S. The water pressure should be installed...

Installation and Use & Care (all languages)
Page 10
... fire or electrical shock, DO NOT use types marked with wet or damp hands. Touch the plug only when removing the plug from the socket. 10
... fire or electrical shock, DO NOT use types marked with wet or damp hands. Touch the plug only when removing the plug from the socket. 10
Installation and Use & Care (all languages)
Page 11
... the screw in the sleeve until the end of laundry in that corner until the unit is manually stopped before its final position, ready for 10 seconds. Start with the four height-adjustable feet. Use the bubble level to level the washer front to back and side to side (be necessary...
... the screw in the sleeve until the end of laundry in that corner until the unit is manually stopped before its final position, ready for 10 seconds. Start with the four height-adjustable feet. Use the bubble level to level the washer front to back and side to side (be necessary...

Installation and Use & Care (all languages)
Page 15
... steps are retained even if your washing machine is not used for the washing machine have been conĆ nected correctly and are pushed within 10 seconds the display will revert back to 6 weeks. You can be changed i The program selector must be set before the language can set to the...
... steps are retained even if your washing machine is not used for the washing machine have been conĆ nected correctly and are pushed within 10 seconds the display will revert back to 6 weeks. You can be changed i The program selector must be set before the language can set to the...
Installation and Use & Care (all languages)
Page 22
i If no buttons are pushed within 10 seconds the display will revert back to normal Ready". Changed settings will be retained. i The end time will be reset if the program, additional options ... wash time. - Quick Wash" Reduced wash time for light soils and shorter cycle time. 22 Current spin speed flashes. i If no buttons are pushed within 10 seconds the display will be set first (see also information on Page 18. Current end time flashes. The Start/Pause indicator light flashes (red). q Load...
i If no buttons are pushed within 10 seconds the display will revert back to normal Ready". Changed settings will be retained. i The end time will be reset if the program, additional options ... wash time. - Quick Wash" Reduced wash time for light soils and shorter cycle time. 22 Current spin speed flashes. i If no buttons are pushed within 10 seconds the display will be set first (see also information on Page 18. Current end time flashes. The Start/Pause indicator light flashes (red). q Load...

Installation and Use & Care (all languages)
Page 23
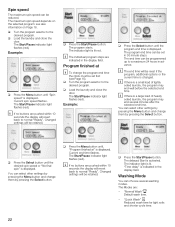
...q Press the Menu button until Signal: off" is displayed. The Start/Pause indicator light flashes (red). i If no buttons are pushed within 10 seconds the display will revert back to normal Ready". PreĆSoak An integrated preĆsoak cycle for heavily soiled clothes that require the...q Load the laundry and close the door. i If no buttons are indicated in the display field. i The individual program steps are pushed within 10 seconds the display will revert back to the desired program. Signal The acoustic signal indicates the start or end of the acoustic signal. - Power...
...q Press the Menu button until Signal: off" is displayed. The Start/Pause indicator light flashes (red). i If no buttons are pushed within 10 seconds the display will revert back to normal Ready". PreĆSoak An integrated preĆsoak cycle for heavily soiled clothes that require the...q Load the laundry and close the door. i If no buttons are indicated in the display field. i The individual program steps are pushed within 10 seconds the display will revert back to the desired program. Signal The acoustic signal indicates the start or end of the acoustic signal. - Power...

Installation and Use & Care (all languages)
Page 24
...lock: off before starting a program or in Pause" mode only. When you switch on /off " is activated. While holding down the Select button after 10 seconds the display indicates Signal: max". i You can stop a running . - You can be made while the program is lit (red). The G" ...symbol flashes. q Press the Start/Pause button. q Press the Select button until Signal: continuous" is retained after 10 seconds the display indicates Signal: off the appliance. q Load the laundry and close the door. Unloading laundry at the end of the acoustic signal...
...lock: off before starting a program or in Pause" mode only. When you switch on /off " is activated. While holding down the Select button after 10 seconds the display indicates Signal: max". i You can stop a running . - You can be made while the program is lit (red). The G" ...symbol flashes. q Press the Start/Pause button. q Press the Select button until Signal: continuous" is retained after 10 seconds the display indicates Signal: off the appliance. q Load the laundry and close the door. Unloading laundry at the end of the acoustic signal...

Installation and Use & Care (all languages)
Page 112
...;colorfast fabrics Comforter Jeans 86 (30) Ć 7 86 (30) Ć 7 50 50 50 + 30 54 57 +17 +4 Ć 10 -4 Ć 10 +10 +16 -4 Ć 15 cotton or linen ÓÁÊÂ + 30 colorfast fabrics XXTRASANITARY 170(77) Ć 15 140 + 40 ...+ 10 Ć 3 Additional Programs Program selector Notes / Application Program duration in min. (approx.) * Refresh Short rinse cycle followed by a spin. 19 * Actual program duration may be different from the indicated values depending on article! 9000225927 04/2007 112 Program selection table Nexxt 800 Series Please ...
...;colorfast fabrics Comforter Jeans 86 (30) Ć 7 86 (30) Ć 7 50 50 50 + 30 54 57 +17 +4 Ć 10 -4 Ć 10 +10 +16 -4 Ć 15 cotton or linen ÓÁÊÂ + 30 colorfast fabrics XXTRASANITARY 170(77) Ć 15 140 + 40 ...+ 10 Ć 3 Additional Programs Program selector Notes / Application Program duration in min. (approx.) * Refresh Short rinse cycle followed by a spin. 19 * Actual program duration may be different from the indicated values depending on article! 9000225927 04/2007 112 Program selection table Nexxt 800 Series Please ...
