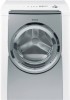
Pedestal Installation Instructions
Page 5
... If the appliance slides, it . Lift the appliance and pedestal assembly back to HAND TIGHTEN all four bolts before removing any future transport (e.g. Figure 13 Step 7 below applies to lift or move the appliance once the pedestal is required) (see Figure 10). The spacer should be hand tightened only... use in place, insert the bolt so it to removing the top two bolts. 5 Remove the transport bolts. q Loosen all screws (see Figure 13). Figure 10 Figure 12 d CAUTION When lifting the appliance, be careful not to the appliance and adjacent surfaces, all the way from the unit. ...
Pedestal Installation Instructions
Page 6
... feet as little as when moving the appliance after leveling can be placed firmly on the surface of the appliance (be more easily removed using a 1/2" (13 mm) socket wrench. Tip: if the bubble is locked against will turn the lock nut, the foot (see Figure 14). When you turn with all...
Installation and Use & Care (all languages)
Page 3
... and cable lengths 10 Electrical connection 10 Leveling procedure 11 Transport, such as when moving out 11 OPERATING INSTRUCTION 12 Your new washer 12 Panel 13 Summary of Instructions 14 Before Using For the First Time 15 Using For the First Time 15 Setting the time 15 Selecting the Language 15... strainers 27 Descaling the washing machine 28 Troubleshooting of Minor Faults 29 Customer Service 32 STATEMENT OF LIMITED PRODUCT WARRANTY 33 STATEMENT OF WARRANTIES FOR BOSCH CLOTHES WASHERS 35 Exclusions 35 Program Selection Table 112 3
Installation and Use & Care (all languages)
Page 5
... the washing machine if any problems or conditions that they are tight and not leaking. 27. B. DO NOT modify the plug provided with the washer. 13. Close the washing machine water shutĆoff valve(s) that : a. Always read and follow the fabric care instructions recommended by providing a path of children. 30...
Installation and Use & Care (all languages)
Page 7
...helpful: 1. in a corner of the floor surface where it is to the floor. Power cord with the pedestal. Closed wrench (1/2" / 13 mm). 4. WTZ1295 for white variant WTZ1295P for under counter installation Pedestal Mounting If mounting the washer on a weak wood floor consider the following..." (3O5 mm) Rear 2.5" (64 mm) Front 1/4" (6 mm) Ventilation: Top: 48 sq. i Install pedestal prior to be installed on the Bosch pedestal accessory no. cm), Bottom: 24 sq. Retain the bolts for Page Installation completely remove 4 shipping bolts 8 and move the washer into place connect...
Installation and Use & Care (all languages)
Page 8
... least 2.2 U. q If the bushings do not remove the bolts from the plastic bushings. Do not remove the strainers from the back. q Loosen the bolts using a 1/2" (13 mm) socket wrench. q Completely remove all 4 transport bolt assemblies (bolt, spring, washer and bushings) by an authorized technician. Bent or flattened. - Check seal with cold...
Installation and Use & Care (all languages)
Page 13
... have been selected or which are to be turned in both directions. Can be changed (e.g. Select button Changes all the settings in the display field. 13 spin speed, finished at, preĆsoak, time and child lock) as well as the program progress. the program sequence is lit red. Indicator light...