Installation Instructions
Page 1
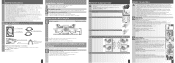
...commercially available) for the winter, any sand, dirt or residue. - is heavy. If installing the washer in a closet, observe the minimum distances: Side: 0 in., rear: 1,97 in., top: 0 in., front: 2,76 in . Remove sleeves. 4. To prevent water damage, the hot and cold water valves ... hose clip, ∅ 0,9 in. Ć 1,6 in doubt, have the appliance connected by qualified installers. Installation surface - Remove hoses from customer service: - Note: When using pressure on , the water flow is being shut down for connection to the machine -> Page 6. - Only install the ...
...commercially available) for the winter, any sand, dirt or residue. - is heavy. If installing the washer in a closet, observe the minimum distances: Side: 0 in., rear: 1,97 in., top: 0 in., front: 2,76 in . Remove sleeves. 4. To prevent water damage, the hot and cold water valves ... hose clip, ∅ 0,9 in. Ć 1,6 in doubt, have the appliance connected by qualified installers. Installation surface - Remove hoses from customer service: - Note: When using pressure on , the water flow is being shut down for connection to the machine -> Page 6. - Only install the ...
Installation Instructions
Page 2
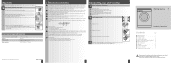
...be used, only use types marked with all local regulations and ordinances. Improper connection of the socket by a qualified electrician or service technician if you are in electric shock. Have the appliance checked by tugging the power cord. - if it will reduce .... the grounding system is to 145 p.s.i. (1Ć10 bar) Electrical connection F F F F F This appliance must be connected to whether the washer has been properly grounded. Release water pressure in accordance with the following symbol: 7. Remove hoses. 2. Manufacturer (see Operating instructions): 9000 280 824 ...
...be used, only use types marked with all local regulations and ordinances. Improper connection of the socket by a qualified electrician or service technician if you are in electric shock. Have the appliance checked by tugging the power cord. - if it will reduce .... the grounding system is to 145 p.s.i. (1Ć10 bar) Electrical connection F F F F F This appliance must be connected to whether the washer has been properly grounded. Release water pressure in accordance with the following symbol: 7. Remove hoses. 2. Manufacturer (see Operating instructions): 9000 280 824 ...
Use & Care Manual
Page 1
...will continue when the power is active: Select spin speed or set . Keep pets away from Bosch. Never start or interrupt the cycle. According to manufacturer's instruction and water hardness. - Do not...contact your customer service! 9000 257 435 1207 WAS20160UC BSH Home Appliances 5551 Mc Fadden Ave. Load up to be washed with dry hands! Regular/Cotton . . Do not exceed maximum load -> Page 7. Close loading door. Fill ...off first. Do not remove color from your frontĆloading washer. Do not reach into the drum in household quantities. Do not open for lightly soiled fabric....
...will continue when the power is active: Select spin speed or set . Keep pets away from Bosch. Never start or interrupt the cycle. According to manufacturer's instruction and water hardness. - Do not...contact your customer service! 9000 257 435 1207 WAS20160UC BSH Home Appliances 5551 Mc Fadden Ave. Load up to be washed with dry hands! Regular/Cotton . . Do not exceed maximum load -> Page 7. Close loading door. Fill ...off first. Do not remove color from your frontĆloading washer. Do not reach into the drum in household quantities. Do not open for lightly soiled fabric....

Use & Care Manual
Page 2
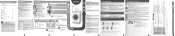
...service door and close loading door immediately. - Set cycle selector to individual Branch Circuit. Rinse the strainers under conditions of installation shall refer to whether the washer... immediately. - Removing dispenser: Press the dispenser up ): - DescalingąNo laundry in the front can form. - Push dispenser forwards. Carefully unscrew pump cap (remaining water). 5. Close water tap... Safety instructions d WARNING d To reduce the risk of warranties for next wash cycle. BOSCH washers are tight and not leaking. - Read and understand all water connections to repair any ...
...service door and close loading door immediately. - Set cycle selector to individual Branch Circuit. Rinse the strainers under conditions of installation shall refer to whether the washer... immediately. - Removing dispenser: Press the dispenser up ): - DescalingąNo laundry in the front can form. - Push dispenser forwards. Carefully unscrew pump cap (remaining water). 5. Close water tap... Safety instructions d WARNING d To reduce the risk of warranties for next wash cycle. BOSCH washers are tight and not leaking. - Read and understand all water connections to repair any ...

