
Installation Instructions
Page 11
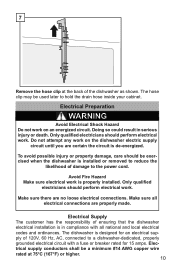
... exercised when the dishwasher is de-energized. The hose clip may be a minimum #14 AWG copper wire rated at the back of damage to the power cord. Do not attempt any work on an energized circuit. Make sure there are properly made. Only qualified electricians should perform electrical work is properly installed...
... exercised when the dishwasher is de-energized. The hose clip may be a minimum #14 AWG copper wire rated at the back of damage to the power cord. Do not attempt any work on an energized circuit. Make sure there are properly made. Only qualified electricians should perform electrical work is properly installed...
Installation Instructions
Page 12
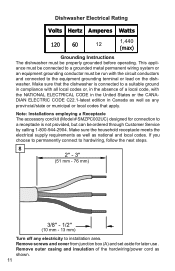
... is not provided, but can be ordered through Customer Service by calling 1-800-944-2904. Note: Installations employing a Receptacle The accessory cord kit (Model # SMZPC002UC) designed for later use . Remove screws and cover from junction box (A) and set aside for connection to a... receptacle is connected to a suitable ground in compliance with all local codes or, in the absence of the hardwiring/power cord as national and local codes. Dishwasher Electrical Rating Volts Hertz Amperes Watts 120 60 1125 1,4450 (max) Grounding Instructions The dishwasher...
... is not provided, but can be ordered through Customer Service by calling 1-800-944-2904. Note: Installations employing a Receptacle The accessory cord kit (Model # SMZPC002UC) designed for later use . Remove screws and cover from junction box (A) and set aside for connection to a... receptacle is connected to a suitable ground in compliance with all local codes or, in the absence of the hardwiring/power cord as national and local codes. Dishwasher Electrical Rating Volts Hertz Amperes Watts 120 60 1125 1,4450 (max) Grounding Instructions The dishwasher...
Installation Instructions
Page 19
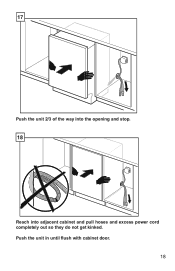
17 Push the unit 2/3 of the way into the opening and stop. 18 Reach into adjacent cabinet and pull hoses and excess power cord completely out so they do not get kinked. Push the unit in until flush with cabinet door. 18
17 Push the unit 2/3 of the way into the opening and stop. 18 Reach into adjacent cabinet and pull hoses and excess power cord completely out so they do not get kinked. Push the unit in until flush with cabinet door. 18
