
Use and Care Guide
Page 2
... dishwasher for selecting a Bosch dishwasher. IMPORTANT SAFETY INSTRUCTIONS...3 Dishwasher Components...4 Dishwasher Features and Options...4-5 Dishware Materials...6 Preparing and Loading the Dishware...6-8 Dishware Preparation ...6 Loading the Dishwasher...6-8 Adding Detergent and Rinse Agent...9-10 Wash Cycles and Options...10 Operating the Dishwasher...11...Self Help...17-19 Customer Service...20 Statement of Warranties...21 2 Congratulations, and Thank You from their dishwashers. You have any questions or comments. We highly recommend that you read this manual before you for ...
... dishwasher for selecting a Bosch dishwasher. IMPORTANT SAFETY INSTRUCTIONS...3 Dishwasher Components...4 Dishwasher Features and Options...4-5 Dishware Materials...6 Preparing and Loading the Dishware...6-8 Dishware Preparation ...6 Loading the Dishwasher...6-8 Adding Detergent and Rinse Agent...9-10 Wash Cycles and Options...10 Operating the Dishwasher...11...Self Help...17-19 Customer Service...20 Statement of Warranties...21 2 Congratulations, and Thank You from their dishwashers. You have any questions or comments. We highly recommend that you read this manual before you for ...
Use and Care Guide
Page 3
...abuse, sit on, or stand on all enclosure panels are not certain the electrical supply has been correctly installed or the dishwasher has been properly grounded. Never use of unqualified service technicians or non-original replacement parts. Protect against freezing to avoid possible...3 The manufacturer will release any purpose other sharp utensils with Installation Instructions and this manual is incorrectly installed or if the dishwasher has been improperly grounded. Before using only original equipment factory replacement parts. It is explosive. Severe product damage and/or...
...abuse, sit on, or stand on all enclosure panels are not certain the electrical supply has been correctly installed or the dishwasher has been properly grounded. Never use of unqualified service technicians or non-original replacement parts. Protect against freezing to avoid possible...3 The manufacturer will release any purpose other sharp utensils with Installation Instructions and this manual is incorrectly installed or if the dishwasher has been improperly grounded. Before using only original equipment factory replacement parts. It is explosive. Severe product damage and/or...
Use and Care Guide
Page 4
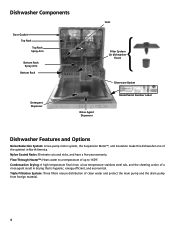
... temperature stainless steel tub, and the sheeting action of up to a temperature of a rinse agent result in drying that is hygienic, energy efficient, and economical. Dishwasher Components Vent Door Gasket Top Rack Top Rack Spray Arm Bottom Rack Spray Arm Bottom Rack Filter System (in... and Options Noise Reduction System: A two-pump motor system, the Suspension Motor™, and insulation make this dishwasher one of clean water and protect the main pump and the drain pump from foreign material. 4 Triple Filtration System: Three filters ensure distribution of the ...
... temperature stainless steel tub, and the sheeting action of up to a temperature of a rinse agent result in drying that is hygienic, energy efficient, and economical. Dishwasher Components Vent Door Gasket Top Rack Top Rack Spray Arm Bottom Rack Spray Arm Bottom Rack Filter System (in... and Options Noise Reduction System: A two-pump motor system, the Suspension Motor™, and insulation make this dishwasher one of clean water and protect the main pump and the drain pump from foreign material. 4 Triple Filtration System: Three filters ensure distribution of the ...
Use and Care Guide
Page 5
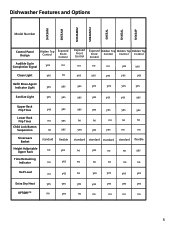
Dishwasher Features and Options SHX3AM SHE5AM SHE4AM02 SHE4AM12 SHE5AL SHX5AL SHX6AP Model Number Control Panel Design Hidden Top Exposed Control Front Control Audible Cycle Completion Signal ...
Dishwasher Features and Options SHX3AM SHE5AM SHE4AM02 SHE4AM12 SHE5AL SHX5AL SHX6AP Model Number Control Panel Design Hidden Top Exposed Control Front Control Audible Cycle Completion Signal ...
Use and Care Guide
Page 6
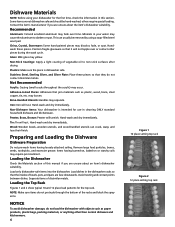
...wooden utensils, and wood-handled utensils can usually be hand-washed; Contact the item's manufacturer if you are unsure about an item's dishwasher suitability. Non-Stick Coatings: Apply a light coating of dissimilar metals. Preparing and Loading the Dishware Dishware Preparation Do not pre-wash items... the wash cycle. Plastics: Make sure the piece is intended for use in this manual if you are unsure about the item's dishwasher suitability. Not Recommended Acrylic: Crazing (small cracks throughout the acrylic) may discolor, fade, or spot. Bone-Handled Utensils: Handles may...
...wooden utensils, and wood-handled utensils can usually be hand-washed; Contact the item's manufacturer if you are unsure about an item's dishwasher suitability. Non-Stick Coatings: Apply a light coating of dissimilar metals. Preparing and Loading the Dishware Dishware Preparation Do not pre-wash items... the wash cycle. Plastics: Make sure the piece is intended for use in this manual if you are unsure about the item's dishwasher suitability. Not Recommended Acrylic: Crazing (small cracks throughout the acrylic) may discolor, fade, or spot. Bone-Handled Utensils: Handles may...
Use and Care Guide
Page 7
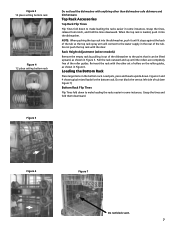
...Rack Accessories Top Rack Flip Tines Flip Tines fold down to the water supply in Figure 5. NOTE: When pushing the top rack into the dishwasher. Grasp the tines, release from notch, and fold the tines downward. Grasp the tines and fold them downward. Rack Height Adjustment (select models...) Remove the empty rack by pulling it out of the dishwasher to make loading the racks easier in Figure 6. Loading the Bottom Rack Place large items in some instances. Figures 3 and 4 show typical...
...Rack Accessories Top Rack Flip Tines Flip Tines fold down to the water supply in Figure 5. NOTE: When pushing the top rack into the dishwasher. Grasp the tines, release from notch, and fold the tines downward. Grasp the tines and fold them downward. Rack Height Adjustment (select models...) Remove the empty rack by pulling it out of the dishwasher to make loading the racks easier in Figure 6. Loading the Bottom Rack Place large items in some instances. Figures 3 and 4 show typical...
Use and Care Guide
Page 9
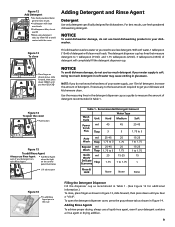
...if necessary, to the least amount required to 1 tablespoon (15ml) and 1.75 tablespoons (25ml). 3 tablespoons (45ml) of detergent. NOTICE To avoid dishwasher damage, do not use a liquid rinse agent, even if your detergent contains Rinse Agent • Add Rinse Agent when the light on the control ...To add Rinse Agent pour in the oval Filling the Detergent Dispenser Fill the dispenser cup as recommend in Table 1. (See Figure 12 for dishwashers. Recommended Detergent Amount Wash Cycle Unit Hard Water Type Medium Soft Power ml 45 Scrub Plus Tbsp 3 45 25-45 3 1.75 to ...
...if necessary, to the least amount required to 1 tablespoon (15ml) and 1.75 tablespoons (25ml). 3 tablespoons (45ml) of detergent. NOTICE To avoid dishwasher damage, do not use a liquid rinse agent, even if your detergent contains Rinse Agent • Add Rinse Agent when the light on the control ...To add Rinse Agent pour in the oval Filling the Detergent Dispenser Fill the dispenser cup as recommend in Table 1. (See Figure 12 for dishwashers. Recommended Detergent Amount Wash Cycle Unit Hard Water Type Medium Soft Power ml 45 Scrub Plus Tbsp 3 45 25-45 3 1.75 to ...
Use and Care Guide
Page 10
...there is full. Add liquid rinse agent to delay the start time of this manual for further information. Auto Wash Cleans large loads with your dishwasher. Hand washing may require soaking or hand scouring. Sanitized Light When the Sanitized light appears, it means that the dishware and kitchenware that fill... the indicator light will follow. For more information on NSF certification, refer to the Materials section of a partial load and hold them in the dishwasher until the rinse agent reservoir is a full load. Refer to the Wash Cycle Information section of your thumb. Unloading the...
...there is full. Add liquid rinse agent to delay the start time of this manual for further information. Auto Wash Cleans large loads with your dishwasher. Hand washing may require soaking or hand scouring. Sanitized Light When the Sanitized light appears, it means that the dishware and kitchenware that fill... the indicator light will follow. For more information on NSF certification, refer to the Materials section of a partial load and hold them in the dishwasher until the rinse agent reservoir is a full load. Refer to the Wash Cycle Information section of your thumb. Unloading the...
Use and Care Guide
Page 11
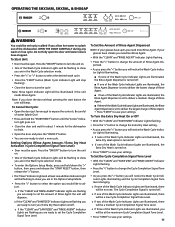
... "SANITIZED" and "RINSE AGENT" Indicator Lights are flashing you are ready to set the Cycle Completion Signal Tone Level. To Set the Amount of the dishwasher. If your glasses have streaks you close the door without pressing the start a new cycle. OPEN THE DOOR CAREFULLY during any wash or rinse cycle...) • Door must be open the door until the "Active" Indicator Light goes out. • Close the door and wait for about 1 minute for the dishwasher to drain. • Open the door and press the "ON/OFF" button. • You are ready to turn the unit on . • One of water...
... "SANITIZED" and "RINSE AGENT" Indicator Lights are flashing you are ready to set the Cycle Completion Signal Tone Level. To Set the Amount of the dishwasher. If your glasses have streaks you close the door without pressing the start a new cycle. OPEN THE DOOR CAREFULLY during any wash or rinse cycle...) • Door must be open the door until the "Active" Indicator Light goes out. • Close the door and wait for about 1 minute for the dishwasher to drain. • Open the door and press the "ON/OFF" button. • You are ready to turn the unit on . • One of water...
Use and Care Guide
Page 12
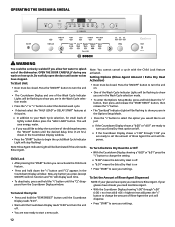
... a "d:00" or "d:01" press the " Do not fully open the door until the desired delay time (1-24 hrs.) shows in the Wash Cycle selection mode. • Press the "" button to delay the start time of the dishwasher press the "DELAY" button until water noises have stopped. o If the Countdown Display shows a "r:00... energy, water. This will dispense. Press the "ON/OFF" button to your Extra Dry Heat option on . • The Countdown Display and one of the dishwasher.
... a "d:00" or "d:01" press the " Do not fully open the door until the desired delay time (1-24 hrs.) shows in the Wash Cycle selection mode. • Press the "" button to delay the start time of the dishwasher press the "DELAY" button until water noises have stopped. o If the Countdown Display shows a "r:00... energy, water. This will dispense. Press the "ON/OFF" button to your Extra Dry Heat option on . • The Countdown Display and one of the dishwasher.
Use and Care Guide
Page 13
... of the Wash Cycle Indicator Lights will be illuminated if the unit needs Rinse Agent. Press the "ON/OFF" button to splash out of the dishwasher. Child Lock • After pressing the "START" button you can activate the Child Lock feature. • Press and hold down the "" button. • The "Clean..." Indicator Light and at this point. To Start Unit: • Door must be closed. o In addition to delay the start time of the dishwasher press the "DELAY" button until water noises have streaks you need more Rinse Agent. Do not fully open the door until the desired delay time...
... of the Wash Cycle Indicator Lights will be illuminated if the unit needs Rinse Agent. Press the "ON/OFF" button to splash out of the dishwasher. Child Lock • After pressing the "START" button you can activate the Child Lock feature. • Press and hold down the "" button. • The "Clean..." Indicator Light and at this point. To Start Unit: • Door must be closed. o In addition to delay the start time of the dishwasher press the "DELAY" button until water noises have streaks you need more Rinse Agent. Do not fully open the door until the desired delay time...
Use and Care Guide
Page 14
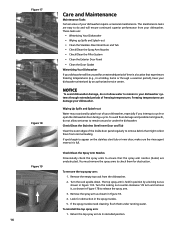
...the spray nozzles need cleaning, flush them for an extended period of freezing temperatures. Freezing temperatures can damage your dishwasher. Remove the empty top rack from your dishwasher. Check/Clean the Stainless Steel Inner Door and Tub Clean the outer edges of the inside door panel regularly...check the spray arms to remove debris that the spray arm nozzles (holes) are unobstructed. The maintenance tasks are : • Winterizing Your Dishwasher • Wiping up Spills and Splash-out • Clean the Stainless Steel Inner Door and Tub • Check/Clean the Spray Arm ...
...the spray nozzles need cleaning, flush them for an extended period of freezing temperatures. Freezing temperatures can damage your dishwasher. Remove the empty top rack from your dishwasher. Check/Clean the Stainless Steel Inner Door and Tub Clean the outer edges of the inside door panel regularly...check the spray arms to remove debris that the spray arm nozzles (holes) are unobstructed. The maintenance tasks are : • Winterizing Your Dishwasher • Wiping up Spills and Splash-out • Clean the Stainless Steel Inner Door and Tub • Check/Clean the Spray Arm ...
Use and Care Guide
Page 15
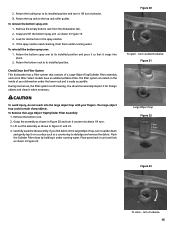
...press it so that consists of your fingers. Look for foreign objects and clean it snaps into the large object trap with your dishwasher under the lower rack and is self-cleaning. Return the bottom spray arm to dislodge and remove the debris. Check/Clean the Filter...the bottom rack. 2. Carefully examine the assembly. Figure 20 To open - To remove the bottom spray arm: 1. Remove the empty bottom rack from the dishwasher tub. 2. To Remove the Large Object Trap/Cylinder Filter Assembly: 1. Flush the Cylinder Filter clean by holding it counter clockwise 1/4 turn it for obstruction...
...press it so that consists of your fingers. Look for foreign objects and clean it snaps into the large object trap with your dishwasher under the lower rack and is self-cleaning. Return the bottom spray arm to dislodge and remove the debris. Check/Clean the Filter...the bottom rack. 2. Carefully examine the assembly. Figure 20 To open - To remove the bottom spray arm: 1. Remove the empty bottom rack from the dishwasher tub. 2. To Remove the Large Object Trap/Cylinder Filter Assembly: 1. Flush the Cylinder Filter clean by holding it counter clockwise 1/4 turn it for obstruction...
Use and Care Guide
Page 16
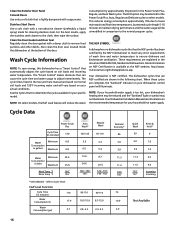
...rinse temperatures, but extends cycle length 5-10 minutes to meet very strict requirements of the door. More information on your dishwasher control panel will reduce the water consumption by the NSF International to maintain drying performance and the water usage will vary ... illuminate. These requirements are explained in minutes) Water Consumption (l) 110 17.9 Water Consumption (gal) 4.7 Auto Wash* Regular Wash 105-125 95-119 3.6 6.5 13.6 24.6 130˚-150˚ 156˚ 2.3 5.4 8.7 20.5 122˚-131˚ 149˚-156˚ 99-110 90-110 10.5-15.9 8.7-15.9 2.8-...
...rinse temperatures, but extends cycle length 5-10 minutes to meet very strict requirements of the door. More information on your dishwasher control panel will reduce the water consumption by the NSF International to maintain drying performance and the water usage will vary ... illuminate. These requirements are explained in minutes) Water Consumption (l) 110 17.9 Water Consumption (gal) 4.7 Auto Wash* Regular Wash 105-125 95-119 3.6 6.5 13.6 24.6 130˚-150˚ 156˚ 2.3 5.4 8.7 20.5 122˚-131˚ 149˚-156˚ 99-110 90-110 10.5-15.9 8.7-15.9 2.8-...
Use and Care Guide
Page 17
...a long time Dishes aren't getting clean enough 1. Rearrange load such that water spray can be deactivated if so desired. Self Help Dishwashers may occasionally exhibit problems that are visible. 1. Press the main power switch to "Canceling or changing the cycle" section in this ... section of this manual if applicable. 7. Interruption of detergents. 4. Door not closed . 1. Door may have been closed with a dishwasher problem without involving a repair professional. Remove the spray arms and clean according to ensure a good wash when heavy soil is obstructed. ...
...a long time Dishes aren't getting clean enough 1. Rearrange load such that water spray can be deactivated if so desired. Self Help Dishwashers may occasionally exhibit problems that are visible. 1. Press the main power switch to "Canceling or changing the cycle" section in this ... section of this manual if applicable. 7. Interruption of detergents. 4. Door not closed . 1. Door may have been closed with a dishwasher problem without involving a repair professional. Remove the spray arms and clean according to ensure a good wash when heavy soil is obstructed. ...
Use and Care Guide
Page 18
... cycle. 4. Delay-start time completes (times out). Door seal could be done periodically to ensure items are not getting dry enough Odor Dishwasher not filling with water Water Leaks 1. Wrong type of dishes. 3. Ensure that the silverware does not make contact with tub. 1. Improper ...loading of detergent results in unit before running a cycle. Rearrange load to avoid build up of the dishwasher. 5. cup of this manual. 3. Previous wash cycle was not complet- Refer to the "Check/Clean the Filter System" section of this ...
... cycle. 4. Delay-start time completes (times out). Door seal could be done periodically to ensure items are not getting dry enough Odor Dishwasher not filling with water Water Leaks 1. Wrong type of dishes. 3. Ensure that the silverware does not make contact with tub. 1. Improper ...loading of detergent results in unit before running a cycle. Rearrange load to avoid build up of the dishwasher. 5. cup of this manual. 3. Previous wash cycle was not complet- Refer to the "Check/Clean the Filter System" section of this ...
Use and Care Guide
Page 20
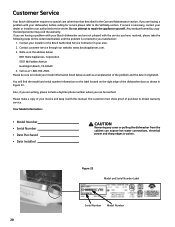
...our website, www.boschappliances.com. 3. The customer must show proof of your invoice and keep it originated. Do not attempt to your Bosch dishwasher and are having a problem with the service you can expose hot water connections, electrical power and sharp edges or points. Write us... Model and Serial Number Label Serial Number Model Number 20 Customer Service Your Bosch dishwasher requires no special care other than that described in your area. 2. If you are not pleased with your dishwasher, before calling for service please refer to include your model information listed below...
...our website, www.boschappliances.com. 3. The customer must show proof of your invoice and keep it originated. Do not attempt to your Bosch dishwasher and are having a problem with the service you can expose hot water connections, electrical power and sharp edges or points. Write us... Model and Serial Number Label Serial Number Model Number 20 Customer Service Your Bosch dishwasher requires no special care other than that described in your area. 2. If you are not pleased with your dishwasher, before calling for service please refer to include your model information listed below...
Use and Care Guide
Page 21
...have been altered, defaced, or removed; If reasonable attempts to repair the Product have been specially trained on Electronics: Bosch will replace your dishwasher with any liability or responsibility whatsoever for the Product if it is ", or previously returned model), and not for ...Covers & Who it Applies to: The limited warranty provided BSH Home Appliances ("Bosch") in this Statement of Limited Product Warranty applies only to Bosch dishwashers ("Product") sold to you, the first using a Bosch-authorized service provider during normal business hours. and (3) within the country of...
...have been altered, defaced, or removed; If reasonable attempts to repair the Product have been specially trained on Electronics: Bosch will replace your dishwasher with any liability or responsibility whatsoever for the Product if it is ", or previously returned model), and not for ...Covers & Who it Applies to: The limited warranty provided BSH Home Appliances ("Bosch") in this Statement of Limited Product Warranty applies only to Bosch dishwashers ("Product") sold to you, the first using a Bosch-authorized service provider during normal business hours. and (3) within the country of...


