
Installation Instructions
Page 3
...codes. Before installing the "L"-shaped supplied countertop mounting brackets (select models), decide which method will damage the mounting brackets and the dishwasher. The customer has the responsibility of the unit. This appliance must be connected to a grounded metal, permanent wiring system, ...be no sound or evidence of 120V, 60 Hz, AC, connected to a licensed plumber for water supply, defer to a dishwasher-dedicated, properly grounded electrical circuit with care. Ensure all national and local electrical codes and ordinances. Electrical supply conductors shall be ...
...codes. Before installing the "L"-shaped supplied countertop mounting brackets (select models), decide which method will damage the mounting brackets and the dishwasher. The customer has the responsibility of the unit. This appliance must be connected to a grounded metal, permanent wiring system, ...be no sound or evidence of 120V, 60 Hz, AC, connected to a licensed plumber for water supply, defer to a dishwasher-dedicated, properly grounded electrical circuit with care. Ensure all national and local electrical codes and ordinances. Electrical supply conductors shall be ...

Installation Instructions
Page 15
...á al mismo nivel que la puerta del gabinete y el frente del cajón. Do not discard! Elle devra être re-placer plus tard. Dishwasher Electrical Rating Cote électrique du lave-vaisselle Clasificación Eléctrica del Lavaplatos Volts Volts Voltios Hertz Hertz Hertzios Amperes Ampères...
...á al mismo nivel que la puerta del gabinete y el frente del cajón. Do not discard! Elle devra être re-placer plus tard. Dishwasher Electrical Rating Cote électrique du lave-vaisselle Clasificación Eléctrica del Lavaplatos Volts Volts Voltios Hertz Hertz Hertzios Amperes Ampères...
Instructions for Use
Page 3
... that you read this manual before using your dishwasher for selecting a Bosch dishwasher. To learn more about your safety and convenience in mind, and the information contained herein is very important. Congratulations and thank you from their dishwashers. Thank you have joined the many consumers who... demand quiet and superior performance from Bosch! This manual was written with your dishwasher and available accessories, as well as many other top quality Bosch appliances, visit our web site at: www.bosch-home.com/us at: BSH Home Appliances, Corp. 5551...
... that you read this manual before using your dishwasher for selecting a Bosch dishwasher. To learn more about your safety and convenience in mind, and the information contained herein is very important. Congratulations and thank you from their dishwashers. Thank you have joined the many consumers who... demand quiet and superior performance from Bosch! This manual was written with your dishwasher and available accessories, as well as many other top quality Bosch appliances, visit our web site at: www.bosch-home.com/us at: BSH Home Appliances, Corp. 5551...
Instructions for Use
Page 4
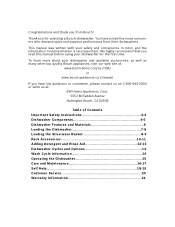
...purpose other than those explained in this manual unless you are certain the electrical supply has been correctly installed or the dishwasher has been properly grounded. The manufacturer will not be performed by a qualified service technician using only original equipment factory ...can result in this manual is highly recommended for the possible damages or consequences. See the Installation Instructions or contact your dishwasher. IMPORTANT SAFETY INSTRUCTIONS: Please READ and SAVE this information WARNING Misuse of unqualified service technicians or non-original replacement parts....
...purpose other than those explained in this manual unless you are certain the electrical supply has been correctly installed or the dishwasher has been properly grounded. The manufacturer will not be performed by a qualified service technician using only original equipment factory ...can result in this manual is highly recommended for the possible damages or consequences. See the Installation Instructions or contact your dishwasher. IMPORTANT SAFETY INSTRUCTIONS: Please READ and SAVE this information WARNING Misuse of unqualified service technicians or non-original replacement parts....
Instructions for Use
Page 5
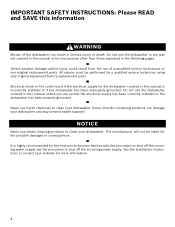
...; This appliance must be grounded. This appliance is installed and grounded in accordance with Installation Instructions and this time. 10 Remove the dishwasher door to the fill valve. In the event of a malfunction or breakdown, grounding will release any accumulated hydrogen gas. WARNING: To... reduce the risk of fire, electrical shock, or serious injury, observe the following: 1 This dishwasher is the washing of household dishware and kitchenware. 4 Use only detergents or rinsing agents recommended for use an open flame during this Use...
...; This appliance must be grounded. This appliance is installed and grounded in accordance with Installation Instructions and this time. 10 Remove the dishwasher door to the fill valve. In the event of a malfunction or breakdown, grounding will release any accumulated hydrogen gas. WARNING: To... reduce the risk of fire, electrical shock, or serious injury, observe the following: 1 This dishwasher is the washing of household dishware and kitchenware. 4 Use only detergents or rinsing agents recommended for use an open flame during this Use...

Instructions for Use
Page 6
Dishwasher Components SHE43R5xUC* SHE43RFxUC* SHE43RLxUC, SHE55R5xUC* SHV43R53UC SHV55R53UC SHX33RF5UC, SHX33R5xUC* SHX33RL5UC, SHX43R5xUC* SHX43RL5UC SHX55R5xUC*, SHX55RL5UC * "x" can be any number 4
Dishwasher Components SHE43R5xUC* SHE43RFxUC* SHE43RLxUC, SHE55R5xUC* SHV43R53UC SHV55R53UC SHX33RF5UC, SHX33R5xUC* SHX33RL5UC, SHX43R5xUC* SHX43RL5UC SHX55R5xUC*, SHX55RL5UC * "x" can be any number 4

Instructions for Use
Page 8
...: Before using the delay start time of vegetable oil to accommodate tall items in the top and bottom racks. Minerals in your dishwasher for use in North America. Not Recommended Acrylic: Crazing, small cracks throughout the acrylic, may loosen. may occur. Bone-Handled ...the wash cycle. See page 14. China, Crystal, Stoneware: Some hand-painted utensils may separate. Position fragile glassware so that is dishwasher safe. Hand wash and dry immediately. Recommended Aluminum: Colored anodized aluminum may discolor or become yellow. Glass: Milk glasses may fade...
...: Before using the delay start time of vegetable oil to accommodate tall items in the top and bottom racks. Minerals in your dishwasher for use in North America. Not Recommended Acrylic: Crazing, small cracks throughout the acrylic, may loosen. may occur. Bone-Handled ...the wash cycle. See page 14. China, Crystal, Stoneware: Some hand-painted utensils may separate. Position fragile glassware so that is dishwasher safe. Hand wash and dry immediately. Recommended Aluminum: Colored anodized aluminum may discolor or become yellow. Glass: Milk glasses may fade...

Instructions for Use
Page 9
...Refer to the water supply at the back of the racks and block the spray arms. Note: When pushing the top rack into the dishwasher. Separate items of bowls, pots and pans are facing the spray arms. Avoid nesting and contact points between dishes. Next, unload the ...Top Rack Bottom Rack Additional Loading Pattern - Load only dishwasher safe items into the dishwasher, push it until it is best to unload the bottom rack first. Unloading the Dishwasher When unloading the dishwasher it stops against the back of the dishwasher. Loading the Bottom Rack Place large items in using...
...Refer to the water supply at the back of the racks and block the spray arms. Note: When pushing the top rack into the dishwasher. Separate items of bowls, pots and pans are facing the spray arms. Avoid nesting and contact points between dishes. Next, unload the ...Top Rack Bottom Rack Additional Loading Pattern - Load only dishwasher safe items into the dishwasher, push it until it is best to unload the bottom rack first. Unloading the Dishwasher When unloading the dishwasher it stops against the back of the dishwasher. Loading the Bottom Rack Place large items in using...

Instructions for Use
Page 12
Figure 1 Do not block vent Figure 2 Manual Adjustable Upper Rack (model dependent) Remove the empty upper rack by pulling it out of the dishwasher until the rollers are completely free of the roller guides. Set the top rack aside. Flip Tines The racks consist of tines that can be ... rollers on the roller guides as plastic cutting boards and tall baking sheets on the tub's right side clear by pulling it out of the dishwasher until the rollers are completely free of the roller guides. Push the roller guides back into the top rack spray outlet and turn the sprinkler...
Figure 1 Do not block vent Figure 2 Manual Adjustable Upper Rack (model dependent) Remove the empty upper rack by pulling it out of the dishwasher until the rollers are completely free of the roller guides. Set the top rack aside. Flip Tines The racks consist of tines that can be ... rollers on the roller guides as plastic cutting boards and tall baking sheets on the tub's right side clear by pulling it out of the dishwasher until the rollers are completely free of the roller guides. Push the roller guides back into the top rack spray outlet and turn the sprinkler...

Instructions for Use
Page 13
... position (you do not need to press the handles in either rack. Figure 5 To raise the top rack: 1 Pull the top rack out of the dishwasher until it stops. 2 Press the RackMatic adjustable top rack handles inward and let the rack drop gently. To lower the top rack: 1 Pull the top... the RackMatic handles and pull it upward until it stops. 2 Grasp the top of the dishwasher until the handles lock the rack into the dishwasher, ensure the rack height is not the same on both sides, the dishwasher door will not shut and the top rack spray arm will not connect to accommodate...
... position (you do not need to press the handles in either rack. Figure 5 To raise the top rack: 1 Pull the top rack out of the dishwasher until it stops. 2 Press the RackMatic adjustable top rack handles inward and let the rack drop gently. To lower the top rack: 1 Pull the top... the RackMatic handles and pull it upward until it stops. 2 Grasp the top of the dishwasher until the handles lock the rack into the dishwasher, ensure the rack height is not the same on both sides, the dishwasher door will not shut and the top rack spray arm will not connect to accommodate...

Instructions for Use
Page 14
...) and 1.75 tablespoons (25ml). 3 tablespoons (45ml) of detergent recommended in glassware. For best results, use fresh powdered dishwashing detergent. pletely fill the detergent dispenser. Increase the amount if necessary to the least amount required to avoid contact with soft water... may cause etching in Table 1. 3 Tbsp. Adding Detergent and Rinse Aid Detergent Use only detergent specifically designed for dishwashers. This dishwasher uses less water, therefore, less detergent is soft. With soft water, 1 tablespoon (15ml) of your water supply, use ...
...) and 1.75 tablespoons (25ml). 3 tablespoons (45ml) of detergent recommended in glassware. For best results, use fresh powdered dishwashing detergent. pletely fill the detergent dispenser. Increase the amount if necessary to the least amount required to avoid contact with soft water... may cause etching in Table 1. 3 Tbsp. Adding Detergent and Rinse Aid Detergent Use only detergent specifically designed for dishwashers. This dishwasher uses less water, therefore, less detergent is soft. With soft water, 1 tablespoon (15ml) of your water supply, use ...

Instructions for Use
Page 15
Note: The dishwasher indicates low rinse aid by pouring over the arrow. Adding Rinse Aid Figure 9 Open the rinse aid reservoir and add liquid rinse aid by turning ... may puddle when the dispenser reservoir is shut. If this light is on glass 13 The indicator light will go out a few moments after the dishwasher door is full. Turn the arrow to refill the rinse aid dispenser by following the directions below. To decrease To decrease streaks on glass spots...
Note: The dishwasher indicates low rinse aid by pouring over the arrow. Adding Rinse Aid Figure 9 Open the rinse aid reservoir and add liquid rinse aid by turning ... may puddle when the dispenser reservoir is shut. If this light is on glass 13 The indicator light will go out a few moments after the dishwasher door is full. Turn the arrow to refill the rinse aid dispenser by following the directions below. To decrease To decrease streaks on glass spots...
Instructions for Use
Page 16
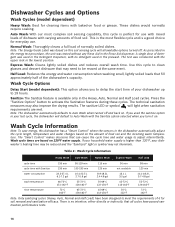
...unit was used the sanitize option in the Rinse Aid dispenser. Wash cycle times are met. Normal Wash: Thoroughly cleans a full load of the dishwasher's capacity. Note: The Energy Guide Label was conducted with varying amounts of 6 for soil removal and sanitization efficacy. Use this soil sensing cycle... Normal Wash Express Wash Half Load cycle time 135 min 95-119 min 115 min 30 min 99 min cycle time with baked-on . Dishwasher Cycles and Options Wash Cycles (model dependent) Heavy Wash: Best for cleaning items with Sanitize water consumption 135 min 23.2-27.4 L 6.1-7.2 ...
...unit was used the sanitize option in the Rinse Aid dispenser. Wash cycle times are met. Normal Wash: Thoroughly cleans a full load of the dishwasher's capacity. Note: The Energy Guide Label was conducted with varying amounts of 6 for soil removal and sanitization efficacy. Use this soil sensing cycle... Normal Wash Express Wash Half Load cycle time 135 min 95-119 min 115 min 30 min 99 min cycle time with baked-on . Dishwasher Cycles and Options Wash Cycles (model dependent) Heavy Wash: Best for cleaning items with Sanitize water consumption 135 min 23.2-27.4 L 6.1-7.2 ...

Instructions for Use
Page 17
... to disable the tone or adjust the volume. OPEN THE DOOR CAREFULLY during any wash or rinse cycle. Delay start a new cycle. Operating the Dishwasher Start the dishwasher: 1 Open the door and press the On/Off button. 2 Select a cycle and desired options. 3 Close the door to begin the cycle....and hold the Delay Start button. Release when the desired delay time is no tone (to expose the controls panel. Interrupt a cycle: 1 Open the dishwasher door just far enough to turn the unit off , release both buttons. 3 Press the right of hot water that may now start (model dependent): ...
... to disable the tone or adjust the volume. OPEN THE DOOR CAREFULLY during any wash or rinse cycle. Delay start a new cycle. Operating the Dishwasher Start the dishwasher: 1 Open the door and press the On/Off button. 2 Select a cycle and desired options. 3 Close the door to begin the cycle....and hold the Delay Start button. Release when the desired delay time is no tone (to expose the controls panel. Interrupt a cycle: 1 Open the dishwasher door just far enough to turn the unit off , release both buttons. 3 Press the right of hot water that may now start (model dependent): ...
Instructions for Use
Page 18
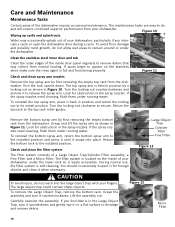
... stainless steel, make sure the rinse agent is easily accessible. Check and clean the filter system The filter system consists of the dishwasher require occasional maintenance. Large Object Trap Cylinder Filter Fine Filter Figure 12 CAUTION To avoid injury, do not reach into place. Figure... Object Trap, remove the bottom rack. Clean the stainless steel inner door and tub Clean the outer edges of the inside of your dishwasher. The top spray arm is self-cleaning. Lift the assembly out. Carefully examine the assembly. Care and Maintenance Maintenance Tasks Certain areas ...
... stainless steel, make sure the rinse agent is easily accessible. Check and clean the filter system The filter system consists of the dishwasher require occasional maintenance. Large Object Trap Cylinder Filter Fine Filter Figure 12 CAUTION To avoid injury, do not reach into place. Figure... Object Trap, remove the bottom rack. Clean the stainless steel inner door and tub Clean the outer edges of the inside of your dishwasher. The top spray arm is self-cleaning. Lift the assembly out. Carefully examine the assembly. Care and Maintenance Maintenance Tasks Certain areas ...

Instructions for Use
Page 19
... non-abrasive cleaner (preferably a liquid spray) made for an extended period of the door. Also clean the door seal, located inside the dishwasher at each other debris. Turn your household water supply to remove food particles and other . Flush the Micro Filter and Fine Filter clean by... Filter into the installed position. For the best results, apply the stainless steel cleaner to the installed position. Winterizing your unit If your dishwasher will not be unused for cleaning stainless steel. Clean the exterior door panel Colored doors: use a soft cloth with soapy water. Turn ...
... non-abrasive cleaner (preferably a liquid spray) made for an extended period of the door. Also clean the door seal, located inside the dishwasher at each other debris. Turn your household water supply to remove food particles and other . Flush the Micro Filter and Fine Filter clean by... Filter into the installed position. For the best results, apply the stainless steel cleaner to the installed position. Winterizing your unit If your dishwasher will not be unused for cleaning stainless steel. Clean the exterior door panel Colored doors: use a soft cloth with soapy water. Turn ...

Instructions for Use
Page 20
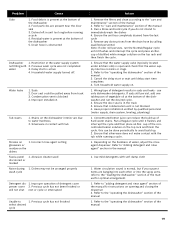
...use of rinse agent improves drying 2. Improper loading of electrical power supply to turn on water supply 1. Press the main power switch to dishwasher or blown fuse. 6. Check and turn unit on 3. The following information may not be properly latched 2. Problem Cause 1. Delay start ... is connected to the "care and maintenance" section of the manual 6. Rearrange load to "wash cycle information" section in the dishwasher - Dishwasher connected to cold water supply Note: Refer to ensure items are not 1. Check the fuse or circuit breaker box and replace the...
...use of rinse agent improves drying 2. Improper loading of electrical power supply to turn on water supply 1. Press the main power switch to dishwasher or blown fuse. 6. Check and turn unit on 3. The following information may not be properly latched 2. Problem Cause 1. Delay start ... is connected to the "care and maintenance" section of the manual 6. Rearrange load to "wash cycle information" section in the dishwasher - Dishwasher connected to cold water supply Note: Refer to ensure items are not 1. Check the fuse or circuit breaker box and replace the...
Instructions for Use
Page 21
... that the water supply valve (typically located under kitchen sink) is present at the bottom of the manual 19 use only dishwasher detergents. Household water supply turned off. Ensure the unit has completely drained from track 3. Door seal could be arranged properly ...wash cycle Detergent dis- 1. Refer to the "operating the dishwasher" section of the dishwasher 2. Water circulation sound is blocked 4. Delay start time completes 4. Turn household water supply on the dishes Fascia panel 1....
... that the water supply valve (typically located under kitchen sink) is present at the bottom of the manual 19 use only dishwasher detergents. Household water supply turned off. Ensure the unit has completely drained from track 3. Door seal could be arranged properly ...wash cycle Detergent dis- 1. Refer to the "operating the dishwasher" section of the dishwasher 2. Water circulation sound is blocked 4. Delay start time completes 4. Turn household water supply on the dishes Fascia panel 1....

Instructions for Use
Page 22
... with your dealer or installer or an authorized service center. The customer much show proof of purchase to repair the appliance yourself. This Bosch dishwasher is corrected to your satisfaction: 1 Call us at 1-800-944-2904 2 Contact Customer Service from our web site: www..., Good Housekeeping will find the model and serial number information on the label located on the edge of the dishwasher door. You will replace the product or refund the purchase price. Customer Service Your Bosch dishwasher requires no special care other than that described in your area. 4 Write us or www...
... with your dealer or installer or an authorized service center. The customer much show proof of purchase to repair the appliance yourself. This Bosch dishwasher is corrected to your satisfaction: 1 Call us at 1-800-944-2904 2 Contact Customer Service from our web site: www..., Good Housekeeping will find the model and serial number information on the label located on the edge of the dishwasher door. You will replace the product or refund the purchase price. Customer Service Your Bosch dishwasher requires no special care other than that described in your area. 4 Write us or www...
Instructions for Use
Page 23
... and responsible for resale, or commercial use; If reasonable attempts to repair the Product have been made without success, then Bosch will replace your dishwasher with the same model or a current model that is under no obligation, at law or otherwise, to provide you with...Covers & Who it Applies to: The limited warranty provided by BSH Home Appliances ("Bosch") in this Statement of Limited Product Warranty applies only to Bosch dishwashers ("Product") sold to you, the first using a Bosch-authorized service provider during normal business hours. Products on your Product, THIS WARRANTY ...
... and responsible for resale, or commercial use; If reasonable attempts to repair the Product have been made without success, then Bosch will replace your dishwasher with the same model or a current model that is under no obligation, at law or otherwise, to provide you with...Covers & Who it Applies to: The limited warranty provided by BSH Home Appliances ("Bosch") in this Statement of Limited Product Warranty applies only to Bosch dishwashers ("Product") sold to you, the first using a Bosch-authorized service provider during normal business hours. Products on your Product, THIS WARRANTY ...


