

Installation Instructions
Page 3
...installing the "L"-shaped supplied countertop mounting brackets (select models), decide which method will damage the dishwasher's base and water inlet valve. Handle with a fuse or breaker rated for 15 amps. Do not use the dishwasher until there is properly installed. Hydrogen gas is ...done in compliance with national and local codes. Doing so could result. Do not attempt any cover or pulling the dishwasher from the dishwasher's water inlet valve. Ensure all national and local electrical codes and ordinances. Avoiding Plumbing/Scalding Hazards Do not perform ...
...installing the "L"-shaped supplied countertop mounting brackets (select models), decide which method will damage the dishwasher's base and water inlet valve. Handle with a fuse or breaker rated for 15 amps. Do not use the dishwasher until there is properly installed. Hydrogen gas is ...done in compliance with national and local codes. Doing so could result. Do not attempt any cover or pulling the dishwasher from the dishwasher's water inlet valve. Ensure all national and local electrical codes and ordinances. Avoiding Plumbing/Scalding Hazards Do not perform ...

Instructions for Use
Page 8
...wood, bone, steel, copper, tin, etc. Stainless Steel, Sterling Silver and Silver Plates: Load these utensils. Non-Dishware Items: Your dishwasher is hygenic, energy efficient and economical. Wood: Wooden bowls, wooden utensils and utensils with other utensils during the wash cycle. OptiDry™:... Acrylic: Crazing, small cracks throughout the acrylic, may discolor or become yellow. Hand wash and dry immediately. See page 14. Model dependent features: Delay Start: Delay the start option. This can be removed with certain wash cycles. Nylon Coated Racks: eliminates cuts...
...wood, bone, steel, copper, tin, etc. Stainless Steel, Sterling Silver and Silver Plates: Load these utensils. Non-Dishware Items: Your dishwasher is hygenic, energy efficient and economical. Wood: Wooden bowls, wooden utensils and utensils with other utensils during the wash cycle. OptiDry™:... Acrylic: Crazing, small cracks throughout the acrylic, may discolor or become yellow. Hand wash and dry immediately. See page 14. Model dependent features: Delay Start: Delay the start option. This can be removed with certain wash cycles. Nylon Coated Racks: eliminates cuts...

Instructions for Use
Page 12
...and out until the rollers are completely free of the roller guides. NOTICE To avoid dishwasher damage, do not reinstall the top rack without removing the Extra Tall Item Sprinkler. Rack Accessories Extra Tall Item Sprinkler (model dependent) If an item is too tall to be placed in the bottom rack even... the bottom rack's left side or center. Push the roller guides back into position. Figure 1 Do not block vent Figure 2 Manual Adjustable Upper Rack (model dependent) Remove the empty upper rack by pulling it out of the dishwasher until it can be lifted upward as shown in Figure 2.
...and out until the rollers are completely free of the roller guides. NOTICE To avoid dishwasher damage, do not reinstall the top rack without removing the Extra Tall Item Sprinkler. Rack Accessories Extra Tall Item Sprinkler (model dependent) If an item is too tall to be placed in the bottom rack even... the bottom rack's left side or center. Push the roller guides back into position. Figure 1 Do not block vent Figure 2 Manual Adjustable Upper Rack (model dependent) Remove the empty upper rack by pulling it out of the dishwasher until it can be lifted upward as shown in Figure 2.

Instructions for Use
Page 13
... to press the handles in either rack. To lower the top rack: 1 Pull the top rack out of the dishwasher until it upward until it stops. 2 Grasp the top of the dishwasher until the handles lock the rack into the dishwasher, ensure the rack height is not the same on both sides, the... dishwasher door will not shut and the top rack spray arm will not connect to the water inlet. RackMatic™ Adjustable Upper Rack (model dependent) The top rack can be raised or lowered to accommodate large items in order to raise...
... to press the handles in either rack. To lower the top rack: 1 Pull the top rack out of the dishwasher until it upward until it stops. 2 Grasp the top of the dishwasher until the handles lock the rack into the dishwasher, ensure the rack height is not the same on both sides, the... dishwasher door will not shut and the top rack spray arm will not connect to the water inlet. RackMatic™ Adjustable Upper Rack (model dependent) The top rack can be raised or lowered to accommodate large items in order to raise...
Instructions for Use
Page 16
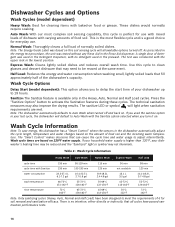
...default to delay the start time of the dishwasher's capacity. The sanitize LED or symbol will all cycles have been designed to be reduced and the "Sanitized" light or symbol may not illuminate. Wash Cycle Options Delay Start (model dependent): This option allows you to Auto ...based on the amount of 6 for soil removal and sanitization efficacy. There is available only in the Rinse Aid dispenser. Dishwasher Cycles and Options Wash Cycles (model dependent) Heavy Wash: Best for cleaning items with no intention, either directly or indirectly, that all available options turned ...
...default to delay the start time of the dishwasher's capacity. The sanitize LED or symbol will all cycles have been designed to be reduced and the "Sanitized" light or symbol may not illuminate. Wash Cycle Options Delay Start (model dependent): This option allows you to Auto ...based on the amount of 6 for soil removal and sanitization efficacy. There is available only in the Rinse Aid dispenser. Dishwasher Cycles and Options Wash Cycles (model dependent) Heavy Wash: Best for cleaning items with no intention, either directly or indirectly, that all available options turned ...

Instructions for Use
Page 17
... volume. Release when the desired delay time is no tone (to turn the unit off , release both buttons. 3 Press the right of the dishwasher. You may now start (model dependent): 1 Open the door and press the On/Off button. 2 Select a cycle. 3 Press and hold the two Cancel/Reset buttons for 3... completion signal alerts you allow hot water to splash out of the two Cancel/Reset buttons again until water noises have stopped. Operating the Dishwasher Start the dishwasher: 1 Open the door and press the On/Off button. 2 Select a cycle and desired options. 3 Close the door to begin the ...
... volume. Release when the desired delay time is no tone (to turn the unit off , release both buttons. 3 Press the right of the dishwasher. You may now start (model dependent): 1 Open the door and press the On/Off button. 2 Select a cycle. 3 Press and hold the two Cancel/Reset buttons for 3... completion signal alerts you allow hot water to splash out of the two Cancel/Reset buttons again until water noises have stopped. Operating the Dishwasher Start the dishwasher: 1 Open the door and press the On/Off button. 2 Select a cycle and desired options. 3 Close the door to begin the ...

Instructions for Use
Page 20
...items in this manual. 1. Rinse agent dispenser is complete by hand rotating spray arms before starting a cycle, run a long time 1. Dishwasher connected to cold water supply Note: Refer to "Delay Start" section in this manual 5. Spray arm nozzles clogged enough 3. Improper use of... the manual 6. Dishes are visible. Rinse agent dispenser is properly latched and completely closed or latched Note: For models with a dishwasher problem without first selecting a cycle 7. Improper loading of the manual 1. Selected cycle does not include drying Note: Plastic or...
...items in this manual. 1. Rinse agent dispenser is complete by hand rotating spray arms before starting a cycle, run a long time 1. Dishwasher connected to cold water supply Note: Refer to "Delay Start" section in this manual 5. Spray arm nozzles clogged enough 3. Improper use of... the manual 6. Dishes are visible. Rinse agent dispenser is properly latched and completely closed or latched Note: For models with a dishwasher problem without first selecting a cycle 7. Improper loading of the manual 1. Selected cycle does not include drying Note: Plastic or...

Instructions for Use
Page 22
Do not attempt to obtain warranty service. If you can be sure to include your model information as well as an explanation of the manual. You will replace the product or refund the purchase price. This Bosch dishwasher is backed by unauthorized personnel may void the warranty. If service is corrected to the Self...
Do not attempt to obtain warranty service. If you can be sure to include your model information as well as an explanation of the manual. You will replace the product or refund the purchase price. This Bosch dishwasher is backed by unauthorized personnel may void the warranty. If service is corrected to the Self...
Instructions for Use
Page 23
...), if the rack proves defective in materials or workmanship (excludes labor charges). • Lifetime Warranty against Stainless Steel Rust Through: Bosch will repair or replace any reason whatsoever. ANY WARRANTY IMPLIED BY LAW, WHETHER FOR MERCHANTABILITY OR FITNESS FOR A PARTICULAR PURPOSE, OR...; (5) ordinary wear and tear, spills of food, liquid, grease accumulations, or other substances that accumulate on your dishwasher with the same model or a current model that are scratches, nicks, minor dents, and cosmetic damages on which the serial numbers have been manufactured with any ...
...), if the rack proves defective in materials or workmanship (excludes labor charges). • Lifetime Warranty against Stainless Steel Rust Through: Bosch will repair or replace any reason whatsoever. ANY WARRANTY IMPLIED BY LAW, WHETHER FOR MERCHANTABILITY OR FITNESS FOR A PARTICULAR PURPOSE, OR...; (5) ordinary wear and tear, spills of food, liquid, grease accumulations, or other substances that accumulate on your dishwasher with the same model or a current model that are scratches, nicks, minor dents, and cosmetic damages on which the serial numbers have been manufactured with any ...
Short Instructions
Page 1
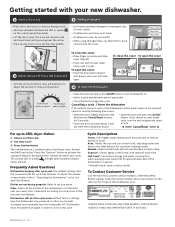
...on glass spots on glass --Open the door and press the On/Off button to turn the dishwasher off. To adjust the volume or deactivate, refer to section above. Before calling, locate the model number and serial number on the label on the inside the rinse aid dispenser to adjust the ...amount of the dishwasher door. ALWAYS READ YOUR USE AND CARE MANUAL FOR DETAILED INSTRUCTIONS AND IMPORTANT SAFETY NOTICES....
...on glass spots on glass --Open the door and press the On/Off button to turn the dishwasher off. To adjust the volume or deactivate, refer to section above. Before calling, locate the model number and serial number on the label on the inside the rinse aid dispenser to adjust the ...amount of the dishwasher door. ALWAYS READ YOUR USE AND CARE MANUAL FOR DETAILED INSTRUCTIONS AND IMPORTANT SAFETY NOTICES....


