
Instructions for Use
Page 1
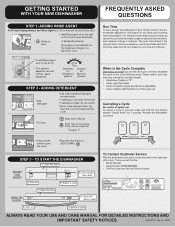
...side of the following ways. There you should need to start 2) Turn on 3) Select a cycle To Contact Customer Service With the dishwasher door open or (Model Dependent) Rinse Agent Level indicator on the dispenser changes to your actual conditions. • To add Rinse Agent... Customer Service Phone Number ALWAYS READ YOUR USE AND CARE MANUAL FOR DETAILED INSTRUCTIONS AND IMPORTANT SAFETY NOTICES. 9000121317 Rev. GETTING STARTED WITH YOUR NEW DISHWASHER FREQUENTLY ASKED QUESTIONS STEP 1- To cancel a cycle in one of the door. ADDING DETERGENT 3 TBS MAX 2 TBS (25 ML) 1 TBS...
...side of the following ways. There you should need to start 2) Turn on 3) Select a cycle To Contact Customer Service With the dishwasher door open or (Model Dependent) Rinse Agent Level indicator on the dispenser changes to your actual conditions. • To add Rinse Agent... Customer Service Phone Number ALWAYS READ YOUR USE AND CARE MANUAL FOR DETAILED INSTRUCTIONS AND IMPORTANT SAFETY NOTICES. 9000121317 Rev. GETTING STARTED WITH YOUR NEW DISHWASHER FREQUENTLY ASKED QUESTIONS STEP 1- To cancel a cycle in one of the door. ADDING DETERGENT 3 TBS MAX 2 TBS (25 ML) 1 TBS...
Instructions for Use
Page 2
....ca (Canada) If you for the first time. We highly recommend that you read this manual before you from their dishwashers. Congratulations and Thank you use your dishwasher for selecting a Bosch dishwasher.You have any questions or comments, please contact us at: 1-800-944-2904 or write to us at: BSH Home Appliances, Corp...
....ca (Canada) If you for the first time. We highly recommend that you read this manual before you from their dishwashers. Congratulations and Thank you use your dishwasher for selecting a Bosch dishwasher.You have any questions or comments, please contact us at: 1-800-944-2904 or write to us at: BSH Home Appliances, Corp...
Instructions for Use
Page 3
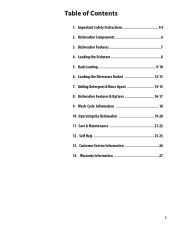
Important Safety Instructions 4-5 2. Dishwasher Components 6 3. Wash Cycle Information 18 10. Dishwasher Features 7 4. Adding Detergent & Rinse Agent 14-15 8. Dishwasher Features & Options 16-17 9. Care & Maintenance 21-22 12. Warranty Information 27 3 Operating the Dishwasher 19-20 11. Customer Service Information 26 14. Loading the Silverware Basket 12-13 7. Rack Loading 9-10 6. Self Help 23-25 13. Table of Contents 1. Loading the Dishware 8 5.
Important Safety Instructions 4-5 2. Dishwasher Components 6 3. Wash Cycle Information 18 10. Dishwasher Features 7 4. Adding Detergent & Rinse Agent 14-15 8. Dishwasher Features & Options 16-17 9. Care & Maintenance 21-22 12. Warranty Information 27 3 Operating the Dishwasher 19-20 11. Customer Service Information 26 14. Loading the Silverware Basket 12-13 7. Rack Loading 9-10 6. Self Help 23-25 13. Table of Contents 1. Loading the Dishware 8 5.

Instructions for Use
Page 4
...the following pages. ■ Severe product damage and/or injury could result from the use the dishwasher in any way not covered in this manual or for the dishwasher covered in this Information WARNING Misuse of unqualified service technicians or non-original replacement parts. Do not...if you are certain the electrical supply has been correctly installed or the dishwasher has been properly grounded. ■ Never use harsh chemicals to clean your dishwasher. Do not use of the dishwasher can damage your dishwasher and may present health hazards! All repairs must be liable for more ...
...the following pages. ■ Severe product damage and/or injury could result from the use the dishwasher in any way not covered in this manual or for the dishwasher covered in this Information WARNING Misuse of unqualified service technicians or non-original replacement parts. Do not...if you are certain the electrical supply has been correctly installed or the dishwasher has been properly grounded. ■ Never use harsh chemicals to clean your dishwasher. Do not use of the dishwasher can damage your dishwasher and may present health hazards! All repairs must be liable for more ...

Instructions for Use
Page 5
...9. See the Installation Instructions included with Installation Instructions and this Use and Care Manual. Locate sharp items so that they are in a dishwasher, and keep them out of the reach of children. 5. c. d. Do not tamper with the circuit conductors and connected to be produced...of household dishware and kitchenware. 4. This will release any accumulated hydrogen gas. Read and understand all instructions before installing or using a dishwasher that is connected to play in a hot water system that has been unused for several minutes, open windows to operate the appliance,...
...9. See the Installation Instructions included with Installation Instructions and this Use and Care Manual. Locate sharp items so that they are in a dishwasher, and keep them out of the reach of children. 5. c. d. Do not tamper with the circuit conductors and connected to be produced...of household dishware and kitchenware. 4. This will release any accumulated hydrogen gas. Read and understand all instructions before installing or using a dishwasher that is connected to play in a hot water system that has been unused for several minutes, open windows to operate the appliance,...
Instructions for Use
Page 7
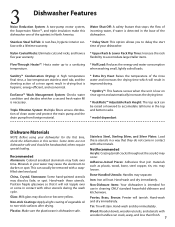
...intended for the first time, check the information in cleaning ONLY standard household dishware and kitchenware. Non-Dishware Items: Your dishwasher is low on rinse agent and automatically increases the drying time. * RackMatic™ Adjustable Rack Height: The top ...wooden utensils, and utensils with a soapfilled steel wool pad. Pewter, Brass, Bronze: Pewter will stain. others require special loading. 3 Dishwasher Features Noise Reduction System: A two-pump motor system, the Suspension Motor™, and triple insulation make this section. Position fragile glassware so...
...intended for the first time, check the information in cleaning ONLY standard household dishware and kitchenware. Non-Dishware Items: Your dishwasher is low on rinse agent and automatically increases the drying time. * RackMatic™ Adjustable Rack Height: The top ...wooden utensils, and utensils with a soapfilled steel wool pad. Pewter, Brass, Bronze: Pewter will stain. others require special loading. 3 Dishwasher Features Noise Reduction System: A two-pump motor system, the Suspension Motor™, and triple insulation make this section. Position fragile glassware so...
Instructions for Use
Page 8
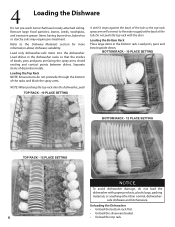
...suitability. Separate items of the tub. Do not push the top rack with paper products, plastic bags, packing materials, or anything other than normal, dishwasher- 4 Loading the Dishware Do not pre-wash items that the insides of bowls, pots and pans are facing the spray arms. Avoid nesting and contact... rack. Items having burned-on, baked-on or starchy soils may require pre-treatment. Loading the Bottom Rack Place large items in the dishwasher racks so that have loosely attached soiling. safe dishware and kitchenware. Loading the Top Rack NOTE: Ensure items do not load the...
...suitability. Separate items of the tub. Do not push the top rack with paper products, plastic bags, packing materials, or anything other than normal, dishwasher- 4 Loading the Dishware Do not pre-wash items that the insides of bowls, pots and pans are facing the spray arms. Avoid nesting and contact... rack. Items having burned-on, baked-on or starchy soils may require pre-treatment. Loading the Bottom Rack Place large items in the dishwasher racks so that have loosely attached soiling. safe dishware and kitchenware. Loading the Top Rack NOTE: Ensure items do not load the...
Instructions for Use
Page 9
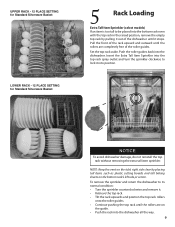
... spray outlet and turn the sprinkler clockwise to its normal condition: • Turn the sprinkler counterclockwise and remove it stops. NOTICE To avoid dishwasher damage, do not reinstall the top rack without removing the extra tall item sprinkler. UPPER RACK - 12 PLACE SETTING for Standard Silverware Basket ...SETTING for Standard Silverware Basket 5 Rack Loading Extra Tall Item Sprinkler (select models) If an item is too tall to be placed into the dishwasher. Pull the front of the rack upward and outward until it . • Retrieve the top rack • Tilt the rack upwards and position...
... spray outlet and turn the sprinkler clockwise to its normal condition: • Turn the sprinkler counterclockwise and remove it stops. NOTICE To avoid dishwasher damage, do not reinstall the top rack without removing the extra tall item sprinkler. UPPER RACK - 12 PLACE SETTING for Standard Silverware Basket ...SETTING for Standard Silverware Basket 5 Rack Loading Extra Tall Item Sprinkler (select models) If an item is too tall to be placed into the dishwasher. Pull the front of the rack upward and outward until it . • Retrieve the top rack • Tilt the rack upwards and position...
Instructions for Use
Page 10
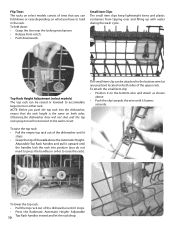
... water during the wash cycle. Small Item Clips The small item clips keep lightweight items and plastic containers from notch. • Push downwards. Otherwise,the dishwasher door will not shut and the top rack spray arm will not connect to accomodate large items in the rack. To raise the top rack...: • Pull the empty top rack out of the dishwasher until it stops. • Press the Rackmatic Automatic Height- To lower the top rack: • Pull the top rack out of the upper rack. Adjustable...
... water during the wash cycle. Small Item Clips The small item clips keep lightweight items and plastic containers from notch. • Push downwards. Otherwise,the dishwasher door will not shut and the top rack spray arm will not connect to accomodate large items in the rack. To raise the top rack...: • Pull the empty top rack out of the dishwasher until it stops. • Press the Rackmatic Automatic Height- To lower the top rack: • Pull the top rack out of the upper rack. Adjustable...
Instructions for Use
Page 11
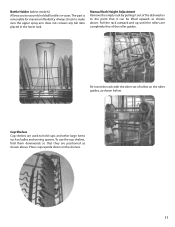
... shelves, fold them downwards so that it out of rollers on the shelves. 11 Always check to securely hold cups and other set of the dishwasher to hold tall bottles or vases. Pull the rack outward and up until the rollers are positioned as ladles and serving spoons. Bottle Holder (select...
... shelves, fold them downwards so that it out of rollers on the shelves. 11 Always check to securely hold cups and other set of the dishwasher to hold tall bottles or vases. Pull the rack outward and up until the rollers are positioned as ladles and serving spoons. Bottle Holder (select...
Instructions for Use
Page 14
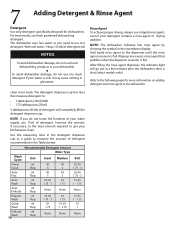
... • 1.75 tablespoons (25ml) 3 tablespoons (45ml) of detergent. Increase the amount, if necessary, to the least amount required to the dishwasher. Use the measuring lines in the Tables below. After filling the rinse agent dispenser, the indicator light will completely fill the detergent dispenser cup.... detergent dispenser cup has lines that puddles when the dispenser reservoir is soft, it may cause etching in your dishwasher. ■ To avoid dishwasher damage, do not know the hardness of your detergent contains a rinse agent or drying additive. Recommended Detergent Amount...
... • 1.75 tablespoons (25ml) 3 tablespoons (45ml) of detergent. Increase the amount, if necessary, to the least amount required to the dishwasher. Use the measuring lines in the Tables below. After filling the rinse agent dispenser, the indicator light will completely fill the detergent dispenser cup.... detergent dispenser cup has lines that puddles when the dispenser reservoir is soft, it may cause etching in your dishwasher. ■ To avoid dishwasher damage, do not know the hardness of your detergent contains a rinse agent or drying additive. Recommended Detergent Amount...
Instructions for Use
Page 16
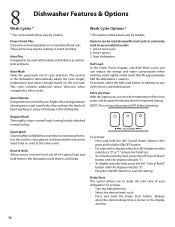
...load. Select wash cycle 2. Rinse & Hold Allows you to get it perfectly clean without the hassle of hand washing or worry of damage in the dishwasher. These items may need to rinse the food soil off of the rinse water and increase the drying time for personalized results: 1. Extra Dry Heat... used at the same event. Cancel DRreasient To activate: • Press and hold the left "Cancel Reset" button until there is shown in the dishwasher automatically adjust the cycle length, temperature and water changes based on the soil load. To activate, select the Half Load button in the...
...load. Select wash cycle 2. Rinse & Hold Allows you to get it perfectly clean without the hassle of hand washing or worry of damage in the dishwasher. These items may need to rinse the food soil off of the rinse water and increase the drying time for personalized results: 1. Extra Dry Heat... used at the same event. Cancel DRreasient To activate: • Press and hold the left "Cancel Reset" button until there is shown in the dishwasher automatically adjust the cycle length, temperature and water changes based on the soil load. To activate, select the Half Load button in the...
Instructions for Use
Page 17
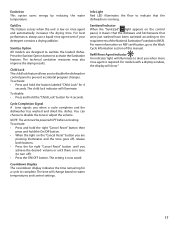
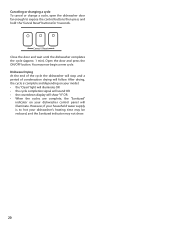
...contains a drying additive. Cycle Completion Signal A tone signals you achieve the desired volume or until you when a cycle completes and the dishwasher has washed and dried the dishes. Countdown Display The countdown display indicates the time remaining for a cycle to activate the Sanitation features. ...Lock The child lock feature allows you when more information on the control panel, it means that the dishware and kitchenware that the dishwasher is running. You can choose to prevent accidental program changes. To activate: • Press and hold the right "Cancel Reset" ...
...contains a drying additive. Cycle Completion Signal A tone signals you achieve the desired volume or until you when a cycle completes and the dishwasher has washed and dried the dishes. Countdown Display The countdown display indicates the time remaining for a cycle to activate the Sanitation features. ...Lock The child lock feature allows you when more information on the control panel, it means that the dishware and kitchenware that the dishwasher is running. You can choose to prevent accidental program changes. To activate: • Press and hold the right "Cancel Reset" ...

Instructions for Use
Page 18
...13.1 4.7 3.5 1.2 45 113 50 122 NOTE: On select models, the Half Load feature will vary based on soil loads and incoming water temperature. Your dishwasher is available at the NSF website, http://www.nsfconsumer.org/home/appliances.asp. When these cycles are based on normal soil loads and 120°...lSpHanXe6l8wPil)l illuminate. See the Cycles and Options Charts to a stronger cycle that meets the NSF requirements, the NSF light may not show. The dishwasher cycles that has the NSF symbol has been certifi ed by approximately 30 percent in the document NSF/ANSI 184, Residential...
...13.1 4.7 3.5 1.2 45 113 50 122 NOTE: On select models, the Half Load feature will vary based on soil loads and incoming water temperature. Your dishwasher is available at the NSF website, http://www.nsfconsumer.org/home/appliances.asp. When these cycles are based on normal soil loads and 120°...lSpHanXe6l8wPil)l illuminate. See the Cycles and Options Charts to a stronger cycle that meets the NSF requirements, the NSF light may not show. The dishwasher cycles that has the NSF symbol has been certifi ed by approximately 30 percent in the document NSF/ANSI 184, Residential...
Instructions for Use
Page 19
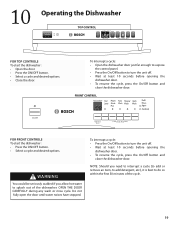
... rinse cycle. FRONT CONTROL Half Power Auto Regular Quick Load Scrub Wash Wash Wash Plus Refill Rinse Agent Sanitized For FRONT Controls To start the dishwasher: • Open the door. • Press the ON/OFF button. • Select a cycle and desired options. • Close the door. To Interrupt a cycle:... • Open the dishwasher door just far enough to expose the control panel. • Press the On/Off button to do so within the first 30 minutes of the...
... rinse cycle. FRONT CONTROL Half Power Auto Regular Quick Load Scrub Wash Wash Wash Plus Refill Rinse Agent Sanitized For FRONT Controls To start the dishwasher: • Open the door. • Press the ON/OFF button. • Select a cycle and desired options. • Close the door. To Interrupt a cycle:... • Open the dishwasher door just far enough to expose the control panel. • Press the On/Off button to do so within the first 30 minutes of the...
Instructions for Use
Page 20
... sound OR • the countdown display will show . 20 You may not show "0" OR • When the cycles are complete, the "Sanitized" indicator on your dishwasher's heating time may be reduced, and the Sanitized indicator may now begin a new cycle. Dishware Drying At the end of the cycle the... dishwasher will stop and a period of condensation drying will illuminate. After drying, the cycle is to expose the control buttons then press and hold the "Cancel ...
... sound OR • the countdown display will show . 20 You may not show "0" OR • When the cycles are complete, the "Sanitized" indicator on your dishwasher's heating time may be reduced, and the Sanitized indicator may now begin a new cycle. Dishware Drying At the end of the cycle the... dishwasher will stop and a period of condensation drying will illuminate. After drying, the cycle is to expose the control buttons then press and hold the "Cancel ...
Instructions for Use
Page 21
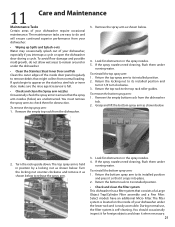
... the bottom spray arm as shown below . • Wiping up Spills and Splash-outs Water may occasionally splash out of your dishwasher require occasional maintenance. Select models have an additional Micro Filter. Return the top rack to its installed position and turn clockwise. 3.... arm: 1. Look for obstruction in the spray nozzles. 4. 11 Care and Maintenance Maintenance Tasks Certain areas of your dishwasher, especially if you interrupt a cycle or open the dishwasher door during a cycle. During normal use, the filter system is full. • Check and clean the Spray arm...
... the bottom spray arm as shown below . • Wiping up Spills and Splash-outs Water may occasionally splash out of your dishwasher require occasional maintenance. Select models have an additional Micro Filter. Return the top rack to its installed position and turn clockwise. 3.... arm: 1. Look for obstruction in the spray nozzles. 4. 11 Care and Maintenance Maintenance Tasks Certain areas of your dishwasher, especially if you interrupt a cycle or open the dishwasher door during a cycle. During normal use, the filter system is full. • Check and clean the Spray arm...
Instructions for Use
Page 22
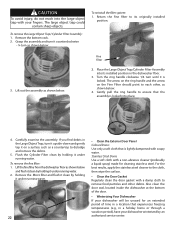
...Panel Colored Doors Use only a soft cloth that the assembly is locked into place. 4. Also clean the door seal, located inside the dishwasher at the bottom of time in a location that experiences freezing temperatures (e.g., in a holiday home or through a vacation period), have your... cloth with a non-abrasive cleaner (preferably a liquid spray) made for an extended period of the door. • Winterizing Your Dishwasher If your dishwasher will be unused for cleaning stainless steel. Place the Large Object Trap/Cylinder Filter Assembly into its originally installed position. 3. If you...
...Panel Colored Doors Use only a soft cloth that the assembly is locked into place. 4. Also clean the door seal, located inside the dishwasher at the bottom of time in a location that experiences freezing temperatures (e.g., in a holiday home or through a vacation period), have your... cloth with a non-abrasive cleaner (preferably a liquid spray) made for an extended period of the door. • Winterizing Your Dishwasher If your dishwasher will be unused for cleaning stainless steel. Place the Large Object Trap/Cylinder Filter Assembly into its originally installed position. 3. If you...
Instructions for Use
Page 23
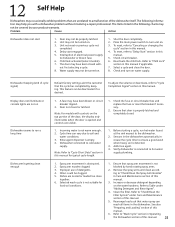
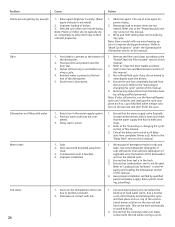
...may have been closed . 1. Ensure that door is properly latched and completely closed with- Rinse agent dispenser is obstructed. 2. Sensors in the dishwasher automatically increase the cycle time to "Child Lock" section in this manual if applicable. 7. Spray arm movement is empty. 4. Clean the filter... 1. Deactivate the child lock. ing to "Check/Clean the Spray Arm Nozzles" in this manual. 6. Press the main power switch to dishwasher or blown fuse. 6. Cycle time can vary due to hot water supply plumbing. Spray arm nozzles clogged. 3. See also "Preparing and...
...may have been closed . 1. Ensure that door is properly latched and completely closed with- Rinse agent dispenser is obstructed. 2. Sensors in the dishwasher automatically increase the cycle time to "Child Lock" section in this manual if applicable. 7. Spray arm movement is empty. 4. Clean the filter... 1. Deactivate the child lock. ing to "Check/Clean the Spray Arm Nozzles" in this manual. 6. Press the main power switch to dishwasher or blown fuse. 6. Cycle time can vary due to hot water supply plumbing. Spray arm nozzles clogged. 3. See also "Preparing and...
Instructions for Use
Page 24
...Drain hose is blocked. 4. Refer to their inherent properties. 1. Ensure that the water supply line has no kinks and clogs. 2. Tub stains 24 1. Ensure that condensation vent is present at the bottom of this manual. 3. Food particles are not nested. Run a Rinse/Hold cycle if you...other items due to the "Delay Start" section of detergent results in contact with tub. 1. Improper installation. 1. Stains on the dishwasher interior are due to improve drying performance. Rinse agent dispenser is empty. (Rinse agent indicator is in the Care and Maintenance section of the...
...Drain hose is blocked. 4. Refer to their inherent properties. 1. Ensure that the water supply line has no kinks and clogs. 2. Tub stains 24 1. Ensure that condensation vent is present at the bottom of this manual. 3. Food particles are not nested. Run a Rinse/Hold cycle if you...other items due to the "Delay Start" section of detergent results in contact with tub. 1. Improper installation. 1. Stains on the dishwasher interior are due to improve drying performance. Rinse agent dispenser is empty. (Rinse agent indicator is in the Care and Maintenance section of the...


