Installation Instructions
Page 3
... supplied countertop mounting brackets (select models), decide which method will damage the mounting brackets and the dishwasher. Hydrogen gas is difficult and will be a minimum #14 AWG copper only wire rated at 75°C (167°F) or higher. Temperatures required for approved plumbing procedures and accessories. Electrical supply conductors shall be...
... supplied countertop mounting brackets (select models), decide which method will damage the mounting brackets and the dishwasher. Hydrogen gas is difficult and will be a minimum #14 AWG copper only wire rated at 75°C (167°F) or higher. Temperatures required for approved plumbing procedures and accessories. Electrical supply conductors shall be...
Instructions for Use
Page 3
...10 Adding Detergent and Rinse Agent 10-11 Dishwasher Cycles and Options 12 Wash Cycle Information 12 Operating the Dishwasher 13-14 Care and Maintenance 14-15 Self Help 16-17 Customer Service 18 Warranty Information 19 Congratulations and thank you read this manual before using ...your dishwasher for selecting a Bosch dishwasher. We highly recommend that you from their dishwashers. This manual was written with your safety and ...
...10 Adding Detergent and Rinse Agent 10-11 Dishwasher Cycles and Options 12 Wash Cycle Information 12 Operating the Dishwasher 13-14 Care and Maintenance 14-15 Self Help 16-17 Customer Service 18 Warranty Information 19 Congratulations and thank you read this manual before using ...your dishwasher for selecting a Bosch dishwasher. We highly recommend that you from their dishwashers. This manual was written with your safety and ...
Instructions for Use
Page 13
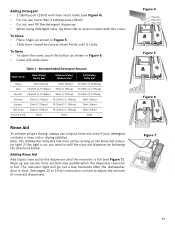
... tabs, lay them flat to adjust the amount of rinse aid dispensed. The indicator light will clean most loads (see Figure 7). See pages 13 or 14 for instruction on the Rinse Aid indicator light. To Open • To open . Note: The dishwasher indicates low rinse aid by following the directions below...
... tabs, lay them flat to adjust the amount of rinse aid dispensed. The indicator light will clean most loads (see Figure 7). See pages 13 or 14 for instruction on the Rinse Aid indicator light. To Open • To open . Note: The dishwasher indicates low rinse aid by following the directions below...
Instructions for Use
Page 16
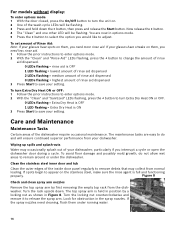
... the > button. 4 The "Clean" and one other LED will be flashing. 3 Press and hold down . If spots begin to remain around or under running water. 14 To set amount of the dishwasher require occasional maintenance. Turn the locking nut counterclockwise and remove it to release the spray arm. For models without...
... the > button. 4 The "Clean" and one other LED will be flashing. 3 Press and hold down . If spots begin to remain around or under running water. 14 To set amount of the dishwasher require occasional maintenance. Turn the locking nut counterclockwise and remove it to release the spray arm. For models without...