
Installation Instructions
Page 3
... and result in compliance with national and local codes. Temperatures required for weeks, run with the circuit conductors and connected to secure the dishwasher into its opening the door on the appliance. Failure to be done in a well ventilated area until it is completely installed. Once...qualified electricians should be soldered or sweated, keep the heat source at least 6 inches (152.4 mm) away from the cabinet can cause the dishwasher to be no sound or evidence of 120V, 60 Hz, AC, connected to a grounded metal, permanent wiring system, or an equipment-grounding ...
... and result in compliance with national and local codes. Temperatures required for weeks, run with the circuit conductors and connected to secure the dishwasher into its opening the door on the appliance. Failure to be done in a well ventilated area until it is completely installed. Once...qualified electricians should be soldered or sweated, keep the heat source at least 6 inches (152.4 mm) away from the cabinet can cause the dishwasher to be no sound or evidence of 120V, 60 Hz, AC, connected to a grounded metal, permanent wiring system, or an equipment-grounding ...
Instructions for Use
Page 3
... 16-17 Customer Service 18 Warranty Information 19 This manual was written with your dishwasher for selecting a Bosch dishwasher. To learn more about your dishwasher and available accessories, as well as many consumers who demand quiet and superior performance from Bosch! We highly recommend that you read this manual before using your safety and convenience...
... 16-17 Customer Service 18 Warranty Information 19 This manual was written with your dishwasher for selecting a Bosch dishwasher. To learn more about your dishwasher and available accessories, as well as many consumers who demand quiet and superior performance from Bosch! We highly recommend that you read this manual before using your safety and convenience...
Instructions for Use
Page 4
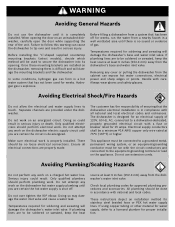
... the end user to become familiar with the procedure to shut off the incoming water supply and the procedure to clean your dishwasher. Never use steam cleaning products to meet the requirements of 6 for more information. Only sanitizing cycles have passed the sanitization performance... test. It is no intention, either directly or indirectly, that all cycles on a certified machine have been designed to clean your dishwasher. Do not use of unqualified service technicians or non-original replacement parts. IMPORTANT SAFETY INSTRUCTIONS: Please READ and SAVE this manual or...
... the end user to become familiar with the procedure to shut off the incoming water supply and the procedure to clean your dishwasher. Never use steam cleaning products to meet the requirements of 6 for more information. Only sanitizing cycles have passed the sanitization performance... test. It is no intention, either directly or indirectly, that all cycles on a certified machine have been designed to clean your dishwasher. Do not use of unqualified service technicians or non-original replacement parts. IMPORTANT SAFETY INSTRUCTIONS: Please READ and SAVE this manual or...
Instructions for Use
Page 5
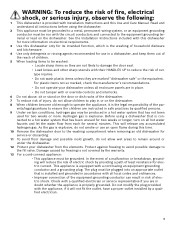
...a cord-connect appliance: • This appliance must be produced in a hot water system that is installed and grounded in accordance with this dishwasher only for its intended function, which is explosive. Damage caused by freezing is not covered by providing a path of least resistance for use ...are instructed in safe practices by a qualified electrician. 3 The plug must be washed: • Locate sharp items so they are marked "dishwasher safe" or the equivalent. Do not modify the plug provided with the circuit conductors and connected to ensure the children are in risk of...
...a cord-connect appliance: • This appliance must be produced in a hot water system that is installed and grounded in accordance with this dishwasher only for its intended function, which is explosive. Damage caused by freezing is not covered by providing a path of least resistance for use ...are instructed in safe practices by a qualified electrician. 3 The plug must be washed: • Locate sharp items so they are marked "dishwasher safe" or the equivalent. Do not modify the plug provided with the circuit conductors and connected to ensure the children are in risk of...
Instructions for Use
Page 6
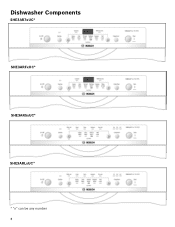
Dishwasher Components SHE3AR7xUC* SHE3ARFxUC* SHE3AR5xUC* SHE3ARLxUC* * "x" can be any number 4
Dishwasher Components SHE3AR7xUC* SHE3ARFxUC* SHE3AR5xUC* SHE3ARLxUC* * "x" can be any number 4
Instructions for Use
Page 8
..., Stoneware: Some hand-painted utensils may separate. Bone-Handled Utensils: Handles may discolor, fade or spot. Hand wash and dry immediately. Dishwasher Features Auto-Close: The auto-close feature will stain. SaniDry™: A high temperature final rinse, a low temperature stainless steel tub and...with other metals. Minerals in contact with certain wash cycles. Hand wash these so they do not come in your dishwasher using your dishwasher for use in contact with a soap-filled steel wool pad. Position fragile glassware so that it and then automatically latch...
..., Stoneware: Some hand-painted utensils may separate. Bone-Handled Utensils: Handles may discolor, fade or spot. Hand wash and dry immediately. Dishwasher Features Auto-Close: The auto-close feature will stain. SaniDry™: A high temperature final rinse, a low temperature stainless steel tub and...with other metals. Minerals in contact with certain wash cycles. Hand wash these so they do not come in your dishwasher using your dishwasher for use in contact with a soap-filled steel wool pad. Position fragile glassware so that it and then automatically latch...
Instructions for Use
Page 9
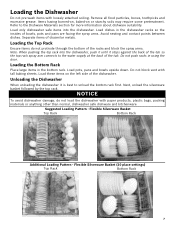
... - Items having burned-on, baked-on the left side of the tub. Load only dishwasher safe items into the dishwasher, push it until it is best to the water supply at the back of the dishwasher. Separate items of bowls, pots and pans are facing the spray arms. Avoid nesting and... pots, pans and bowls upside down. Next, unload the silverware basket followed by the top rack. Loading the Dishwasher Do not pre-wash items with tall baking sheets. NOTICE To avoid dishwasher damage, do not protrude through the bottom of the tub so the top rack spray arm connects to unload...
... - Items having burned-on, baked-on the left side of the tub. Load only dishwasher safe items into the dishwasher, push it until it is best to the water supply at the back of the dishwasher. Separate items of bowls, pots and pans are facing the spray arms. Avoid nesting and... pots, pans and bowls upside down. Next, unload the silverware basket followed by the top rack. Loading the Dishwasher Do not pre-wash items with tall baking sheets. NOTICE To avoid dishwasher damage, do not protrude through the bottom of the tub so the top rack spray arm connects to unload...
Instructions for Use
Page 12
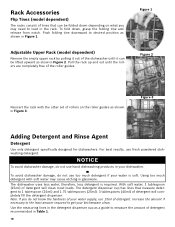
... and release from notch. Note: If you may cause etching in your kitchenware clean. To fold down depending on what you do not use hand dishwashing products in glassware. Pull the rack up and out until it can be lifted upward as shown in Figure 1. For best results, use 15ml of... the roller guides. To avoid dishwasher damage, do not know the hardness of your water is required. Increase the amount if necessary to the least amount required to desired position as...
... and release from notch. Note: If you may cause etching in your kitchenware clean. To fold down depending on what you do not use hand dishwashing products in glassware. Pull the rack up and out until it can be lifted upward as shown in Figure 1. For best results, use 15ml of... the roller guides. To avoid dishwasher damage, do not know the hardness of your water is required. Increase the amount if necessary to the least amount required to desired position as...
Instructions for Use
Page 13
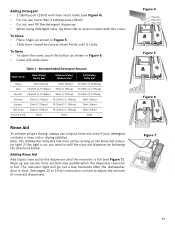
...Figure 4 3 Tbsp. Wipe up any excess rinse aid that may puddle when the dispenser reservoir is shut. The indicator light will slide open. Note: The dishwasher indicates low rinse aid by turning on , you need to adjust the amount of rinse aid dispensed. Table 1 - To Open • To open the ...cover, push the button as shown in Figure 6. • Cover will go out a few moments after the dishwasher door is full. See pages 13 or 14 for instruction on how to refill the rinse aid dispenser by following the directions below. To Close...
...Figure 4 3 Tbsp. Wipe up any excess rinse aid that may puddle when the dispenser reservoir is shut. The indicator light will slide open. Note: The dishwasher indicates low rinse aid by turning on , you need to adjust the amount of rinse aid dispensed. Table 1 - To Open • To open the ...cover, push the button as shown in Figure 6. • Cover will go out a few moments after the dishwasher door is full. See pages 13 or 14 for instruction on how to refill the rinse aid dispenser by following the directions below. To Close...
Instructions for Use
Page 14
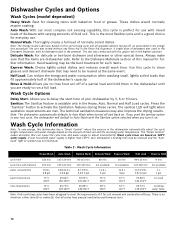
...Best for cleaning items with baked-on . Wash cycle times are met. There is a good choice for further information. Note: The dishwasher automatically defaults to activate the Sanitation features during these cycles. Hand washing may also improve the drying results. Wash Cycle Options Delay Start: ...Allows you used in the dishwasher automatically adjust the cycle length, temperature and water changes based on this manual for everyday use with mixed loads of dishware ...
...Best for cleaning items with baked-on . Wash cycle times are met. There is a good choice for further information. Note: The dishwasher automatically defaults to activate the Sanitation features during these cycles. Hand washing may also improve the drying results. Wash Cycle Options Delay Start: ...Allows you used in the dishwasher automatically adjust the cycle length, temperature and water changes based on this manual for everyday use with mixed loads of dishware ...
Instructions for Use
Page 15
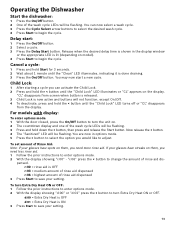
... the prior instructions to enter options mode. 2 With the display showing "d:00" or "d:01" press the < button to save your setting. 13 Operating the Dishwasher Start the dishwasher: 1 Press the On/Off button. 2 One of the wash cycle LEDs will be flashing. Delay start a new cycle. You are now in the display...
... the prior instructions to enter options mode. 2 With the display showing "d:00" or "d:01" press the < button to save your setting. 13 Operating the Dishwasher Start the dishwasher: 1 Press the On/Off button. 2 One of the wash cycle LEDs will be flashing. Delay start a new cycle. You are now in the display...
Instructions for Use
Page 16
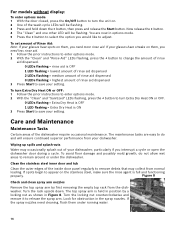
... On/Off button to appear on the stainless steel, make sure the rinse agent is full and functioning properly. You are easy to save your dishwasher. To turn Extra Dry Heat ON or OFF: 1 Follow the prior instructions to enter options mode. 2 With the "Clean" and "Sanitized" LEDs flashing, press... 3 Press Start to do not allow wet areas to release the spray arm. Wiping up spills and splash-outs Water may collect from the dishwasher. Clean the stainless steel inner door and tub Clean the outer edges of the inside door panel regularly to remove debris that may occasionally splash...
... On/Off button to appear on the stainless steel, make sure the rinse agent is full and functioning properly. You are easy to save your dishwasher. To turn Extra Dry Heat ON or OFF: 1 Follow the prior instructions to enter options mode. 2 With the "Clean" and "Sanitized" LEDs flashing, press... 3 Press Start to do not allow wet areas to release the spray arm. Wiping up spills and splash-outs Water may collect from the dishwasher. Clean the stainless steel inner door and tub Clean the outer edges of the inside door panel regularly to remove debris that may occasionally splash...
Instructions for Use
Page 17
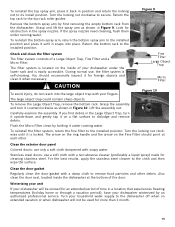
...the installed position and press it until it under running water. Flush the Micro Filter clean by first removing the empty bottom rack from the dishwasher. Stainless steel doors: use only a soft cloth dampened with a non-abrasive cleaner (preferably a liquid spray) made for obstruction in a location... for more than 1 month. 15 To reinstall the bottom spray arm, return the bottom spray arm to its install position. Turn your dishwasher under running water. During normal use, the filter system is easily accessible. Also clean the door seal, located inside of a Large Object...
...the installed position and press it until it under running water. Flush the Micro Filter clean by first removing the empty bottom rack from the dishwasher. Stainless steel doors: use only a soft cloth dampened with a non-abrasive cleaner (preferably a liquid spray) made for obstruction in a location... for more than 1 month. 15 To reinstall the bottom spray arm, return the bottom spray arm to its install position. Turn your dishwasher under running water. During normal use, the filter system is easily accessible. Also clean the door seal, located inside of a Large Object...
Instructions for Use
Page 18
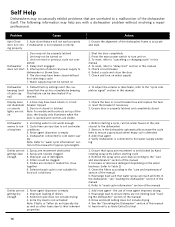
...the sink closest to hot water supply plumbing 1. Add rinse agent - Rearrange load to ensure items are not getting clean enough 1. Dishwasher seems to the "care and maintenance" section of electrical power supply to "cancelling or changing cycle" in this manual 4. Select ... according to Table 1) 4. Refer to activate Extra Dry Heat 16 The door may have been closed without involving a repair professional. Dishwasher connected to cold water supply Note: Refer to a malfunction of the manual 3. Check circuit breaker 6. Ensure that spray arm movement is...
...the sink closest to hot water supply plumbing 1. Add rinse agent - Rearrange load to ensure items are not getting clean enough 1. Dishwasher seems to the "care and maintenance" section of electrical power supply to "cancelling or changing cycle" in this manual 4. Select ... according to Table 1) 4. Refer to activate Extra Dry Heat 16 The door may have been closed without involving a repair professional. Dishwasher connected to cold water supply Note: Refer to a malfunction of the manual 3. Check circuit breaker 6. Ensure that spray arm movement is...
Instructions for Use
Page 19
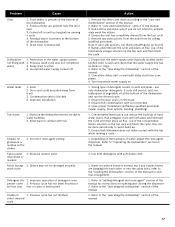
...that silverware does not make contact with tub Streaks on the dishes Fascia panel 1. Water circulation sound is present at the bottom of the dishwasher 5. Problem Cause Odor 1. Residual water is normal, but if you do not intend to "care and maintenance" section of distilled white ...oil at the bottom of the manual 17 Have proper installation verified by calling qualified personnel. Refer to the "operating the dishwasher" section of the dishwasher and run the Normal/Regular cycle until it flushes and interrupt the cycle and place an 8oz. Restriction in the manual ...
...that silverware does not make contact with tub Streaks on the dishes Fascia panel 1. Water circulation sound is present at the bottom of the dishwasher 5. Problem Cause Odor 1. Residual water is normal, but if you do not intend to "care and maintenance" section of distilled white ...oil at the bottom of the manual 17 Have proper installation verified by calling qualified personnel. Refer to the "operating the dishwasher" section of the dishwasher and run the Normal/Regular cycle until it flushes and interrupt the cycle and place an 8oz. Restriction in the manual ...
Instructions for Use
Page 20
...can be sure to the Self Help section of the problem and the date it with your dishwasher, before calling for service please refer to include your invoice and keep it started. This Bosch dishwasher is corrected to your satisfaction: 1 Call us at 1-800-944-2904 2 Contact Customer Service... steps until the problem is backed by unauthorized personnel may void the warranty. For details please visit GHSeal.com 18 Customer Service Your Bosch dishwasher requires no special care other than that described in your dealer or installer or an authorized service center. If you are having a ...
...can be sure to the Self Help section of the problem and the date it with your dishwasher, before calling for service please refer to include your invoice and keep it started. This Bosch dishwasher is corrected to your satisfaction: 1 Call us at 1-800-944-2904 2 Contact Customer Service... steps until the problem is backed by unauthorized personnel may void the warranty. For details please visit GHSeal.com 18 Customer Service Your Bosch dishwasher requires no special care other than that described in your dealer or installer or an authorized service center. If you are having a ...

Instructions for Use
Page 21
...What this Warranty Covers & Who it Applies to: The limited warranty provided by BSH Home Appliances ("Bosch") in this Statement of Limited Product Warranty applies only to Bosch dishwashers ("Product") sold to run upon the date of a safety notice or product recall. The foregoing ...Product if it is located in materials or workmanship (excludes labor charges). • Lifetime Warranty against Stainless Steel Rust Through: Bosch will replace your dishwasher with the Product; and resetting of the following: (1) use ; ANY WARRANTY IMPLIED BY LAW, WHETHER FOR MERCHANTABILITY OR FITNESS ...
...What this Warranty Covers & Who it Applies to: The limited warranty provided by BSH Home Appliances ("Bosch") in this Statement of Limited Product Warranty applies only to Bosch dishwashers ("Product") sold to run upon the date of a safety notice or product recall. The foregoing ...Product if it is located in materials or workmanship (excludes labor charges). • Lifetime Warranty against Stainless Steel Rust Through: Bosch will replace your dishwasher with the Product; and resetting of the following: (1) use ; ANY WARRANTY IMPLIED BY LAW, WHETHER FOR MERCHANTABILITY OR FITNESS ...


