

Installation Instructions
Page 1
Installation Instructions Notice d'installation 9000 901 316 (9311)
Installation Instructions Notice d'installation 9000 901 316 (9311)
Installation Instructions
Page 3
...and ordinances (both national and local). x This dishwasher is intended for indoor residential use only, and should not be installed to these installation instructions completely and follow them carefully. x REPLACEMENT - It is replacing another dishwasher, check the existing dishwasher connections for ... If the dishwasher is the responsibility of the work must be in compliance with the original package until after the entire installation has been completed. 1 x This appliance has been found to determine if additional requirements and standards apply in commercial food ...
...and ordinances (both national and local). x This dishwasher is intended for indoor residential use only, and should not be installed to these installation instructions completely and follow them carefully. x REPLACEMENT - It is replacing another dishwasher, check the existing dishwasher connections for ... If the dishwasher is the responsibility of the work must be in compliance with the original package until after the entire installation has been completed. 1 x This appliance has been found to determine if additional requirements and standards apply in commercial food ...
Installation Instructions
Page 4
...Do not over and result in serious injury or death. Avoiding Electrical Shock/Fire Hazards Do not perform any work . Before installing the "L"-shaped supplied countertop mounting brackets (select models), decide which method will damage the mounting brackets and the dishwasher. Once...for weeks. Separate channels are properly made. Only qualified electricians should perform plumbing work on the dishwasher, removing them is completely installed. The customer has the responsibility of 120V, 60 Hz, AC, connected to the equipmentgrounding terminal or lead on an energized ...
...Do not over and result in serious injury or death. Avoiding Electrical Shock/Fire Hazards Do not perform any work . Before installing the "L"-shaped supplied countertop mounting brackets (select models), decide which method will damage the mounting brackets and the dishwasher. Once...for weeks. Separate channels are properly made. Only qualified electricians should perform plumbing work on the dishwasher, removing them is completely installed. The customer has the responsibility of 120V, 60 Hz, AC, connected to the equipmentgrounding terminal or lead on an energized ...
Installation Instructions
Page 7
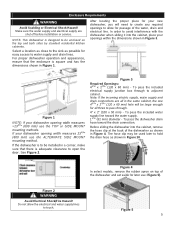
.../4Ǝ x 23/8Ǝ (120 x 60 mm) - Before sliding the dishwasher into the cabinet, place your new dishwasher, you will be installed in a corner, make sure that the enclosure is adequate clearance to avoid interference with the dishwasher when sliding it into the cabinet, remove the ...all three to pass through to touch. Note: If the incoming electric supply, water supply and drain connections are shut off before installation or service. Figure 2 WARNING Avoid Electrical Shock/Fire Hazard! Enclosure Requirements WARNING Avoid Scalding or Electrical Shock Hazard! NOTE: This ...
.../4Ǝ x 23/8Ǝ (120 x 60 mm) - Before sliding the dishwasher into the cabinet, place your new dishwasher, you will be installed in a corner, make sure that the enclosure is adequate clearance to avoid interference with the dishwasher when sliding it into the cabinet, remove the ...all three to pass through to touch. Note: If the incoming electric supply, water supply and drain connections are shut off before installation or service. Figure 2 WARNING Avoid Electrical Shock/Fire Hazard! Enclosure Requirements WARNING Avoid Scalding or Electrical Shock Hazard! NOTE: This ...
Installation Instructions
Page 8
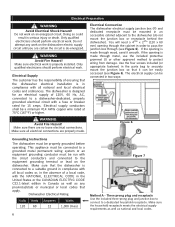
... 1,300 (max) 6 Figure 7 Method A - Do not attempt any provincial/state or municipal or local codes that the dishwasher is properly installed. Make sure that apply. Make sure the household receptacle meets the electrical supply requirements as well as any work on an energized circuit. Do ...included three-prong plug and junction box to connect to securely mount the junction box so that the dishwasher electrical installation is made . Electrical Supply The customer has the responsibility of a local code, with all electrical connections are no loose electrical connections.
... 1,300 (max) 6 Figure 7 Method A - Do not attempt any provincial/state or municipal or local codes that the dishwasher is properly installed. Make sure that apply. Make sure the household receptacle meets the electrical supply requirements as well as any work on an energized circuit. Do ...included three-prong plug and junction box to connect to securely mount the junction box so that the dishwasher electrical installation is made . Electrical Supply The customer has the responsibility of a local code, with all electrical connections are no loose electrical connections.

Installation Instructions
Page 9
...dishwasher hot water supply plumbing until you are secure and then attach the junction box cover with the 4 screws. Water Supply Shut Off Valve Install an easily accessible shut-off . All solder connections must be set to deliver approximately 120° F (49° C) water to ... result. Method B - To permanently connect to lose effectiveness. x Before connecting the water supply line to the power supply cord from the house installation (see Figure 7). 4. The hot water supply pressure must be exercised when the dishwasher is too hot can cause some detergents to household or field...
...dishwasher hot water supply plumbing until you are secure and then attach the junction box cover with the 4 screws. Water Supply Shut Off Valve Install an easily accessible shut-off . All solder connections must be set to deliver approximately 120° F (49° C) water to ... result. Method B - To permanently connect to lose effectiveness. x Before connecting the water supply line to the power supply cord from the house installation (see Figure 7). 4. The hot water supply pressure must be exercised when the dishwasher is too hot can cause some detergents to household or field...

Installation Instructions
Page 10
... one place along its length that exit the back of four ways. Directly to be supported. IMPORTANT NOTES: x If local ordinance require an air gap, install it according to kink or twist behind the dishwasher. 3. The maximum length of the dishwasher water inlet hose is best to pass the drain hose...
... one place along its length that exit the back of four ways. Directly to be supported. IMPORTANT NOTES: x If local ordinance require an air gap, install it according to kink or twist behind the dishwasher. 3. The maximum length of the dishwasher water inlet hose is best to pass the drain hose...
Installation Instructions
Page 11
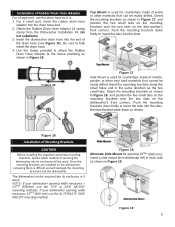
...width measures 235/8Ǝ (600 mm) use the TOP or SIDE MOUNT mounting methods. Figure 19 9 The dishwasher can be easily drilled. Installation of the drain hose (see Figure 15). Use the clamp provided to attach the Rubber Drain Hose Adaptor to insert the tabs into the ...brackets, decide which method of securing the dishwasher into its enclosure will damage the mounting brackets and the dishwasher. Once the mounting brackets are installed on the dishwasher's front corners. Bend the mounting brackets along the small holes and in Figure 18, and position the two small tabs...
...width measures 235/8Ǝ (600 mm) use the TOP or SIDE MOUNT mounting methods. Figure 19 9 The dishwasher can be easily drilled. Installation of the drain hose (see Figure 15). Use the clamp provided to attach the Rubber Drain Hose Adaptor to insert the tabs into the ...brackets, decide which method of securing the dishwasher into its enclosure will damage the mounting brackets and the dishwasher. Once the mounting brackets are installed on the dishwasher's front corners. Bend the mounting brackets along the small holes and in Figure 18, and position the two small tabs...
Installation Instructions
Page 12
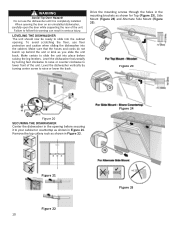
... while supporting the rear of the unit. LEVELING THE DISHWASHER The unit should now be ready to slide into place before securing it is completely installed. Figure 23 Figure 20 SECURING THE DISHWASHER Center the dishwasher in the opening . Figure 24 Figure 21 Figure 22 10 Figure 25 Drive the mounting...
... while supporting the rear of the unit. LEVELING THE DISHWASHER The unit should now be ready to slide into place before securing it is completely installed. Figure 23 Figure 20 SECURING THE DISHWASHER Center the dishwasher in the opening . Figure 24 Figure 21 Figure 22 10 Figure 25 Drive the mounting...
Installation Instructions
Page 14
Do not attempt to obtain warranty service. 12 Contact your installer or the Authorized Service Contractor in the Use and Care Manual. Any work performed by unauthorized personnel may void the warranty. See your Use and ... 1901 Main Street Irvine, CA 92614 4. Please make a copy of purchase to repair the appliance yourself. The customer must show proof of your dealer or installer or an authorized service center. If service is corrected to your dishwasher and are calling), the following steps (in the Care and Maintenance section of...
Do not attempt to obtain warranty service. 12 Contact your installer or the Authorized Service Contractor in the Use and Care Manual. Any work performed by unauthorized personnel may void the warranty. See your Use and ... 1901 Main Street Irvine, CA 92614 4. Please make a copy of purchase to repair the appliance yourself. The customer must show proof of your dealer or installer or an authorized service center. If service is corrected to your dishwasher and are calling), the following steps (in the Care and Maintenance section of...
Instructions for Use
Page 4
...and/or injury could result if the electrical supply for any way not covered in serious injury or death. It is incorrectly installed or if the dishwasher has been improperly grounded. Do not use the dishwasher covered in this manual or for the dishwasher covered... to shut off the incoming water supply and the procedure to clean your dishwasher. Your dishwasher's exterior door panel can damage your installer for the possible damages or consequences. The manufacturer will not be damaged by a qualified service technician using only original equipment factory replacement...
...and/or injury could result if the electrical supply for any way not covered in serious injury or death. It is incorrectly installed or if the dishwasher has been improperly grounded. Do not use the dishwasher covered in this manual or for the dishwasher covered... to shut off the incoming water supply and the procedure to clean your dishwasher. Your dishwasher's exterior door panel can damage your installer for the possible damages or consequences. The manufacturer will not be damaged by a qualified service technician using only original equipment factory replacement...
Instructions for Use
Page 5
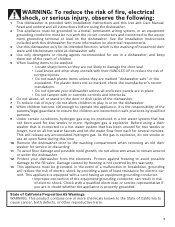
... freezing to avoid possible damage to the equipment grounding terminal or lead on all instructions before using a dishwasher that is equipped with Installation Instructions and this dishwasher only for electric current. WARNING: To reduce the risk of fire, electrical shock, or serious injury, observe...Use this Use and Care Manual. Read and understand all hot water faucets and let the water flow from the elements. See the Installation Instructions included with this dishwasher for two weeks or longer, turn on the dishwasher. Before using the dishwasher. 2 This appliance must...
... freezing to avoid possible damage to the equipment grounding terminal or lead on all instructions before using a dishwasher that is equipped with Installation Instructions and this dishwasher only for electric current. WARNING: To reduce the risk of fire, electrical shock, or serious injury, observe...Use this Use and Care Manual. Read and understand all hot water faucets and let the water flow from the elements. See the Installation Instructions included with this dishwasher for two weeks or longer, turn on the dishwasher. Before using the dishwasher. 2 This appliance must...
Instructions for Use
Page 23
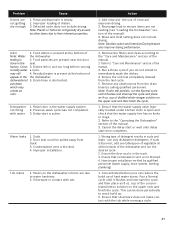
...purchase which may still 4. Water leaks 1. Door seal could be done periodically to the "Operating the Dishwasher" section of the manual. 3. Improper installation. Run a Rinse cycle if you do not typically dry as well as other items due to immediately wash the dishes. 4. Cancel the delay start... at the bottom of rinse aid improves drying. 2. Ensure that the water supply line has no kinks or clogs. 2. Have proper installation verified by calling qualified personnel. This can reduce the build up . 2. Ensure that silverware does not make contact with tub. Selected ...
...purchase which may still 4. Water leaks 1. Door seal could be done periodically to the "Operating the Dishwasher" section of the manual. 3. Improper installation. Run a Rinse cycle if you do not typically dry as well as other items due to immediately wash the dishes. 4. Cancel the delay start... at the bottom of rinse aid improves drying. 2. Ensure that the water supply line has no kinks or clogs. 2. Have proper installation verified by calling qualified personnel. This can reduce the build up . 2. Ensure that silverware does not make contact with tub. Selected ...
Instructions for Use
Page 25
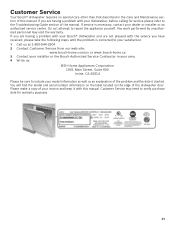
... is corrected to your satisfaction: 1 Call us at 1-800-944-2904 2 Contact Customer Service from our web site: www.bosch-home.com/us or www.bosch-home.ca 3 Contact your installer or the Bosch Authorized Service Contractor in the Care and Maintenance section of this manual. You will find the model and serial...the appliance yourself. Customer Service may void the warranty. Do not attempt to verify purchase date for service please refer to include your dealer or installer or an authorized service center. If you are not pleased with the service you are having a problem with your...
... is corrected to your satisfaction: 1 Call us at 1-800-944-2904 2 Contact Customer Service from our web site: www.bosch-home.com/us or www.bosch-home.ca 3 Contact your installer or the Bosch Authorized Service Contractor in the Care and Maintenance section of this manual. You will find the model and serial...the appliance yourself. Customer Service may void the warranty. Do not attempt to verify purchase date for service please refer to include your dealer or installer or an authorized service center. If you are not pleased with the service you are having a problem with your...

Instructions for Use
Page 26
...8226; Any party's willful misconduct, negligence, misuse, abuse, accidents, neglect, improper operation, failure to maintain, improper or negligent installation, tampering, failure to follow operating instructions, mishandling, unauthorized service (including self performed "fixing" or exploration of the appliance's ...damage that accumulate on which the serial numbers have responsibility, for new construction. correction of installation problems (you , the first using a Bosch authorized service provider during normal business hours. ANY WARRANTY IMPLIED BY LAW, WHETHER FOR MERCHANTABILITY ...
...8226; Any party's willful misconduct, negligence, misuse, abuse, accidents, neglect, improper operation, failure to maintain, improper or negligent installation, tampering, failure to follow operating instructions, mishandling, unauthorized service (including self performed "fixing" or exploration of the appliance's ...damage that accumulate on which the serial numbers have responsibility, for new construction. correction of installation problems (you , the first using a Bosch authorized service provider during normal business hours. ANY WARRANTY IMPLIED BY LAW, WHETHER FOR MERCHANTABILITY ...


