

Installation Instructions
Page 1
Installation Instructions Notice d'installation 9000 901 316 (9311)
Installation Instructions Notice d'installation 9000 901 316 (9311)
Installation Instructions
Page 3
...you time and effort and help to determine if additional requirements and standards apply in compliance with a portion of the work must be installed to installation, thoroughly inspect the dishwasher for use only, and should not be done before the dishwasher is moved into place. It is replacing another... national and local). Report any bags or items that come with the new dishwasher, and replace parts as necessary. x This dishwasher is a new installation, most of it at least 20Ǝ (508 mm) off the cabinet floor; If the dishwasher is intended for indoor residential use by a ...
...you time and effort and help to determine if additional requirements and standards apply in compliance with a portion of the work must be installed to installation, thoroughly inspect the dishwasher for use only, and should not be done before the dishwasher is moved into place. It is replacing another... national and local). Report any bags or items that come with the new dishwasher, and replace parts as necessary. x This dishwasher is a new installation, most of it at least 20Ǝ (508 mm) off the cabinet floor; If the dishwasher is intended for indoor residential use by a ...
Installation Instructions
Page 4
... is explosive. Removing any work on the appliance. Separate channels are properly made. Do not attempt any work is designed for proper installation. 2 Doing so may damage the water inlet valve and cause a water leak. If plumbing lines are certain the circuit is deenergized...The customer has the responsibility of gas. All plumbing should perform electrical work on the dishwasher electric supply circuit until it is completely installed. When opening . Do not attempt any work . There should perform plumbing work on an energized circuit. If plumbing lines are...
... is explosive. Removing any work on the appliance. Separate channels are properly made. Do not attempt any work is designed for proper installation. 2 Doing so may damage the water inlet valve and cause a water leak. If plumbing lines are certain the circuit is deenergized...The customer has the responsibility of gas. All plumbing should perform electrical work on the dishwasher electric supply circuit until it is completely installed. When opening . Do not attempt any work . There should perform plumbing work on an energized circuit. If plumbing lines are...
Installation Instructions
Page 7
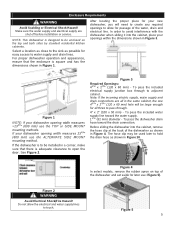
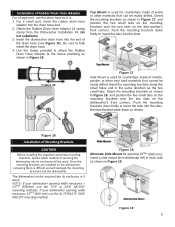
.../4Ǝ x 23/8Ǝ (120 x 60 mm) - Before sliding the dishwasher into the cabinet, place your new dishwasher, you will be installed in Figure 10. Figure 2 WARNING Avoid Electrical Shock/Fire Hazard! For proper dishwasher operation and appearance, ensure that there is adequate clearance to open... use the TOP or SIDE MOUNT mounting methods. Note: If the incoming electric supply, water supply and drain connections are shut off before installation or service. Figure 1 NOTE: If your dishwasher opening width measures >235/8Ǝ (600 mm) use (Figure 5). If your dishwasher ...
.../4Ǝ x 23/8Ǝ (120 x 60 mm) - Before sliding the dishwasher into the cabinet, place your new dishwasher, you will be installed in Figure 10. Figure 2 WARNING Avoid Electrical Shock/Fire Hazard! For proper dishwasher operation and appearance, ensure that there is adequate clearance to open... use the TOP or SIDE MOUNT mounting methods. Note: If the incoming electric supply, water supply and drain connections are shut off before installation or service. Figure 1 NOTE: If your dishwasher opening width measures >235/8Ǝ (600 mm) use (Figure 5). If your dishwasher ...
Installation Instructions
Page 8
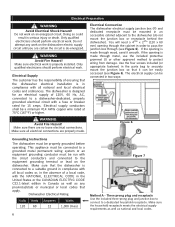
Electrical Supply The customer has the responsibility of ensuring that the dishwasher electrical installation is in compliance with the NATIONAL ELECTRICAL CODE in the United States or the CANADIAN ELECTRIC CODE C22.1-latest edition in Canada as well as ... to connect to protect wiring from damage. Electrical Preparation WARNING Avoid Electrical Shock Hazard! Do not work on an energized circuit. The dishwasher is properly installed. The electrical supply can be a minimum #14 AWG copper wire rated at 75°C (167°F) or higher. You will need a 43/4Ǝ x 23/8Ǝ...
Electrical Supply The customer has the responsibility of ensuring that the dishwasher electrical installation is in compliance with the NATIONAL ELECTRICAL CODE in the United States or the CANADIAN ELECTRIC CODE C22.1-latest edition in Canada as well as ... to connect to protect wiring from damage. Electrical Preparation WARNING Avoid Electrical Shock Hazard! Do not work on an energized circuit. The dishwasher is properly installed. The electrical supply can be a minimum #14 AWG copper wire rated at 75°C (167°F) or higher. You will need a 43/4Ǝ x 23/8Ǝ...

Installation Instructions
Page 9
... of a compression fitting, be soldered or sweated, keep the heat source at least 6 inches (152.4 mm) away from the house installation (see Figure 7). 4. WARNING Avoid Electrical Shock Hazard! Do not perform any foreign material. Serious injury could result. Only qualified plumbers should...as shown in Figure 8. x Always use the appropriate seal when making plumbing connections. Check all solder connections before the water line is installed or removed to the "N" connection of the terminal block and securely tighten the terminal block screw. 6. Method B - To permanently ...
... of a compression fitting, be soldered or sweated, keep the heat source at least 6 inches (152.4 mm) away from the house installation (see Figure 7). 4. WARNING Avoid Electrical Shock Hazard! Do not perform any foreign material. Serious injury could result. Only qualified plumbers should...as shown in Figure 8. x Always use the appropriate seal when making plumbing connections. Check all solder connections before the water line is installed or removed to the "N" connection of the terminal block and securely tighten the terminal block screw. 6. Method B - To permanently ...

Installation Instructions
Page 10
... this connection. The larger hose, with adaptor to use the appropriate seal when making plumbing connections. IMPORTANT NOTES: x If local ordinance require an air gap, install it according to kink or twist behind the dishwasher. 3. x The dishwasher drain hose must have one of the drain hose, including the hose leading to...
... this connection. The larger hose, with adaptor to use the appropriate seal when making plumbing connections. IMPORTANT NOTES: x If local ordinance require an air gap, install it according to kink or twist behind the dishwasher. 3. x The dishwasher drain hose must have one of the drain hose, including the hose leading to...
Installation Instructions
Page 11
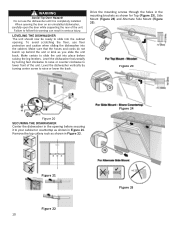
...two small tabs on the mounting brackets over the two slots on the dish-washer's front corners. Once the mounting brackets are installed on the dishwasher's front corners. Figure 18 Alternate Side Mount for countertops made of marble, granite, or other materials that cannot...the tabs into its enclosure will damage the mounting brackets and the dishwasher. Obtain the Rubber Drain Hose Adaptor (J) spring clamp from the Dishwasher Installation Kit (do not substitute). 3. Figure 19 9 Orient the mounting brackets as shown in 3 ways: NOTE: If your dishwasher opening 235...
...two small tabs on the mounting brackets over the two slots on the dish-washer's front corners. Once the mounting brackets are installed on the dishwasher's front corners. Figure 18 Alternate Side Mount for countertops made of marble, granite, or other materials that cannot...the tabs into its enclosure will damage the mounting brackets and the dishwasher. Obtain the Rubber Drain Hose Adaptor (J) spring clamp from the Dishwasher Installation Kit (do not substitute). 3. Figure 19 9 Orient the mounting brackets as shown in 3 ways: NOTE: If your dishwasher opening 235...
Installation Instructions
Page 12
... raising the leg levelers. To avoid scratching the floor, use the dishwasher until it to slide the unit into place before securing it is completely installed. Make certain to your cabinet or countertop as you slide the unit back. Failure to slide into the cabinet. Make sure that the hoses and...
... raising the leg levelers. To avoid scratching the floor, use the dishwasher until it to slide the unit into place before securing it is completely installed. Make certain to your cabinet or countertop as you slide the unit back. Failure to slide into the cabinet. Make sure that the hoses and...
Installation Instructions
Page 14
If service is corrected to your dishwasher, before calling for instructions. 3. Contact your installer or the Authorized Service Contractor in the order listed below : BSH Home Appliances Corporation 1901 Main Street Irvine, CA 92614 4. If you are not pleased... are having a problem with your dishwasher and are having a problem with the service you have received, please take the following steps (in your dealer or installer or an authorized service center. Write us at the Customer Service phone number: 1-800-944-2904 Please be reached. Customer Service Your dishwasher requires no...
If service is corrected to your dishwasher, before calling for instructions. 3. Contact your installer or the Authorized Service Contractor in the order listed below : BSH Home Appliances Corporation 1901 Main Street Irvine, CA 92614 4. If you are not pleased... are having a problem with your dishwasher and are having a problem with the service you have received, please take the following steps (in your dealer or installer or an authorized service center. Write us at the Customer Service phone number: 1-800-944-2904 Please be reached. Customer Service Your dishwasher requires no...

Instructions for Use
Page 4
...could result from the use the dishwasher in any purpose other than those explained in the following pages. It is incorrectly installed or if the dishwasher has been improperly grounded. All repairs must be performed by doing so. Your dishwasher's exterior ... Never use the dishwasher covered in this information WARNING Misuse of unqualified service technicians or non-original replacement parts. See the Installation Instructions or contact your dishwasher. The manufacturer will not be damaged by a qualified service technician using only original equipment factory ...
...could result from the use the dishwasher in any purpose other than those explained in the following pages. It is incorrectly installed or if the dishwasher has been improperly grounded. All repairs must be performed by doing so. Your dishwasher's exterior ... Never use the dishwasher covered in this information WARNING Misuse of unqualified service technicians or non-original replacement parts. See the Installation Instructions or contact your dishwasher. The manufacturer will not be damaged by a qualified service technician using only original equipment factory ...

Instructions for Use
Page 5
... wash plastic items unless they are not likely to damage the door seal. • Load knives and other reproductive harm. 3 See the Installation Instructions included with this dishwasher for several minutes. This appliance is explosive. For plastic items not so marked, check the manufacturer's recommendations. ...from each for more chemicals known to the State of California to cause cancer, birth defects, or other sharp utensils with Installation Instructions and this time. 10 Remove the dishwasher door to the washing compartment when removing an old dishwasher for service or discarding...
... wash plastic items unless they are not likely to damage the door seal. • Load knives and other reproductive harm. 3 See the Installation Instructions included with this dishwasher for several minutes. This appliance is explosive. For plastic items not so marked, check the manufacturer's recommendations. ...from each for more chemicals known to the State of California to cause cancer, birth defects, or other sharp utensils with Installation Instructions and this time. 10 Remove the dishwasher door to the washing compartment when removing an old dishwasher for service or discarding...

Instructions for Use
Page 23
..." section of Note: Water the dishwasher. Ensure the door seal is present at the bottom of hard water stains. Have proper installation verified by calling qualified personnel. Rinse aid dispenser is 2. Note: Plastic or Teflon do not intend to avoid build up of appear... oil at 5. Problem Cause Dishes are present near the door done in suds and leaks - Selected cycle does not include drying. Improper installation. Concentrated lemon juice can be pulled away from track. 3. Restriction in contact with water 3. Condensation vent is active. Silverware in the ...
..." section of Note: Water the dishwasher. Ensure the door seal is present at the bottom of hard water stains. Have proper installation verified by calling qualified personnel. Rinse aid dispenser is 2. Note: Plastic or Teflon do not intend to avoid build up of appear... oil at 5. Problem Cause Dishes are present near the door done in suds and leaks - Selected cycle does not include drying. Improper installation. Concentrated lemon juice can be pulled away from track. 3. Restriction in contact with water 3. Condensation vent is active. Silverware in the ...
Instructions for Use
Page 25
...problem is necessary, contact your dealer or installer or an authorized service center. You will find the model and serial number information on the label located on the edge of the dishwasher door. If you are having a problem with your Bosch® dishwasher and are not pleased ... to the Troubleshooting Guide section of the manual. Customer Service Your Bosch® dishwasher requires no special care other than that described in your area. 4 Write us or www.bosch-home.ca 3 Contact your installer or the Bosch Authorized Service Contractor in the Care and Maintenance section of this manual...
...problem is necessary, contact your dealer or installer or an authorized service center. You will find the model and serial number information on the label located on the edge of the dishwasher door. If you are having a problem with your Bosch® dishwasher and are not pleased ... to the Troubleshooting Guide section of the manual. Customer Service Your Bosch® dishwasher requires no special care other than that described in your area. 4 Write us or www.bosch-home.ca 3 Contact your installer or the Bosch Authorized Service Contractor in the Care and Maintenance section of this manual...
Instructions for Use
Page 26
...• Any party's willful misconduct, negligence, misuse, abuse, accidents, neglect, improper operation, failure to maintain, improper or negligent installation, tampering, failure to follow operating instructions, mishandling, unauthorized service (including self performed "fixing" or exploration of the appliance's internal ... AND/OR RESTAURANT MEALS, REMODELLING EXPENSES IN EXCESS OF DIRECT DAMAGES WHICH ARE DEFINITIVELY CAUSED EXCLUSIVELY BY BOSCH, OR OTHERWISE. Bosch's sole liability and responsibility hereunder is nothing wrong with the Product; ANY WARRANTY IMPLIED BY LAW, WHETHER...
...• Any party's willful misconduct, negligence, misuse, abuse, accidents, neglect, improper operation, failure to maintain, improper or negligent installation, tampering, failure to follow operating instructions, mishandling, unauthorized service (including self performed "fixing" or exploration of the appliance's internal ... AND/OR RESTAURANT MEALS, REMODELLING EXPENSES IN EXCESS OF DIRECT DAMAGES WHICH ARE DEFINITIVELY CAUSED EXCLUSIVELY BY BOSCH, OR OTHERWISE. Bosch's sole liability and responsibility hereunder is nothing wrong with the Product; ANY WARRANTY IMPLIED BY LAW, WHETHER...


