Use & Care Manual (all languages)
Page 3
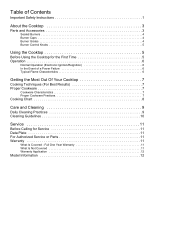
... What Is Not Covered 11 Warranty Application 12 Model Information 12 Table of Contents Important Safety Instructions 1 About the Cooktop 3 Parts and Accessories 3 Sealed Burners 4 Burner Caps 4 Burner Grates 4 Burner Control Knobs 5 Using the Cooktop 5 Before Using the Cooktop for the First Time 5 Operation 6 Normal Operation (Electronic Ignition/Reignition 6 In the Event of a Power Failure 6 Typical Flame...
... What Is Not Covered 11 Warranty Application 12 Model Information 12 Table of Contents Important Safety Instructions 1 About the Cooktop 3 Parts and Accessories 3 Sealed Burners 4 Burner Caps 4 Burner Grates 4 Burner Control Knobs 5 Using the Cooktop 5 Before Using the Cooktop for the First Time 5 Operation 6 Normal Operation (Electronic Ignition/Reignition 6 In the Event of a Power Failure 6 Typical Flame...
Use & Care Manual (all languages)
Page 5
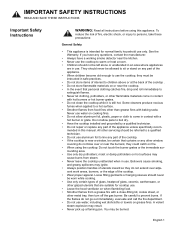
...• When children become old enough to extinguish flames. • Never let clothing, potholders, or other metal tray, then turn off the gas burner. All other servicing should never be burned. You may result. • Never pick up a flaming pan. If you have any questions,... burns. IMPORTANT SAFETY INSTRUCTIONS READ AND SAVE THESE INSTRUCTIONS Important Safety Instructions WARNING: Read all instructions before using the cooktop: Do not touch the burner grates or the immediate surrounding area. • Use only dry potholders; They should not be certain that personal ...
...• When children become old enough to extinguish flames. • Never let clothing, potholders, or other metal tray, then turn off the gas burner. All other servicing should never be burned. You may result. • Never pick up a flaming pan. If you have any questions,... burns. IMPORTANT SAFETY INSTRUCTIONS READ AND SAVE THESE INSTRUCTIONS Important Safety Instructions WARNING: Read all instructions before using the cooktop: Do not touch the burner grates or the immediate surrounding area. • Use only dry potholders; They should not be certain that personal ...

Use & Care Manual (all languages)
Page 6
...flammable material toward the flames or push the flames so that a burner goes out and gas escapes, open a window or a door. Follow the gas supplier's instructions. • If you where the gas shut-off at least 5 minutes before using the cooktop. • Do not obstruct the flow of combustion and ventilation ...exposure to cause cancer or reproductive harm. Gas Cooking Safety • During cooking, set the burner control so that the flame heats only the bottom of the pan and does not extend beyond the edges of the pan. • Have the cooktop installed and grounded by the State of...
...flammable material toward the flames or push the flames so that a burner goes out and gas escapes, open a window or a door. Follow the gas supplier's instructions. • If you where the gas shut-off at least 5 minutes before using the cooktop. • Do not obstruct the flow of combustion and ventilation ...exposure to cause cancer or reproductive harm. Gas Cooking Safety • During cooking, set the burner control so that the flame heats only the bottom of the pan and does not extend beyond the edges of the pan. • Have the cooktop installed and grounded by the State of...
Use & Care Manual (all languages)
Page 7
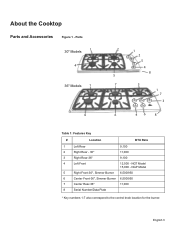
NGT Model 15,000 - NGP Model 5 Right Front-30", Simmer Burner 6,500/950 6 Center Front-36", Simmer Burner 6,500/950 7 Center Rear-36" 11,000 8 Serial Number/Data Plate * Key numbers 1-7 also correspond to the control knob location for the burner. English 3 About the Cooktop Parts and Accessories Figure 1 - Parts 30" Models 1 4 36" Models 1 4 2 1 2 5 4 8 5 7 3 1 7 3 6 46 8 Table 1: Features Key # Location BTU Rate 1 Left Rear 9,100 2 Right Rear - 30" 11,000 3 Right Rear-36" 9,100 4 Left Front 12,500 -
NGT Model 15,000 - NGP Model 5 Right Front-30", Simmer Burner 6,500/950 6 Center Front-36", Simmer Burner 6,500/950 7 Center Rear-36" 11,000 8 Serial Number/Data Plate * Key numbers 1-7 also correspond to the control knob location for the burner. English 3 About the Cooktop Parts and Accessories Figure 1 - Parts 30" Models 1 4 36" Models 1 4 2 1 2 5 4 8 5 7 3 1 7 3 6 46 8 Table 1: Features Key # Location BTU Rate 1 Left Rear 9,100 2 Right Rear - 30" 11,000 3 Right Rear-36" 9,100 4 Left Front 12,500 -
Use & Care Manual (all languages)
Page 8
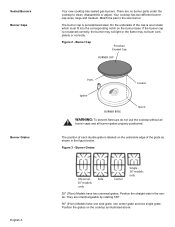
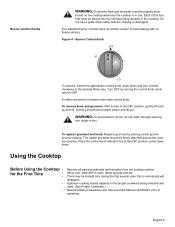
... or correctly. Burner Grates Universal - Position the straight side in the figure below. They are no burner parts under the cooktop to the size burner. Figure 3 - Side 30" models only Center Single 36" models only 30" (76cm) Models...cooktop as shown in the center. If the burner cap is porcelainized steel. On the underside of the grate as illustrated above. The position of each double grate is labeled on the underside edge of the cap is one single grate. Figure 2 - Sealed Burners Burner Caps Burner Grates English 4 Your new cooktop has sealed gas burners...
... or correctly. Burner Grates Universal - Position the straight side in the figure below. They are no burner parts under the cooktop to the size burner. Figure 3 - Side 30" models only Center Single 36" models only 30" (76cm) Models...cooktop as shown in the center. If the burner cap is porcelainized steel. On the underside of the grate as illustrated above. The position of each double grate is labeled on the underside edge of the cap is one single grate. Figure 2 - Sealed Burners Burner Caps Burner Grates English 4 Your new cooktop has sealed gas burners...
Use & Care Manual (all languages)
Page 9
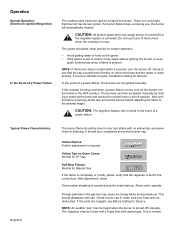
...all safety precautions and Use and Care Manual information prior to operating. The standard burner controls have an infinite number of the four feet must be placed into rough-in the cooktop. Burner Control Knob OFF HI LO To operate: Select the appropriate control knob, push down...out. There may be firmly attached around cooktop. Using the Cooktop Before Using the Cooktop • for the First Time • • • • Remove all packing materials and literature from the cooktop surface. To remove knob and grommet: With burner in use a grate if the rubber feet...
...all safety precautions and Use and Care Manual information prior to operating. The standard burner controls have an infinite number of the four feet must be placed into rough-in the cooktop. Burner Control Knob OFF HI LO To operate: Select the appropriate control knob, push down...out. There may be firmly attached around cooktop. Using the Cooktop Before Using the Cooktop • for the First Time • • • • Remove all packing materials and literature from the cooktop surface. To remove knob and grommet: With burner in use a grate if the rubber feet...
Use & Care Manual (all languages)
Page 10
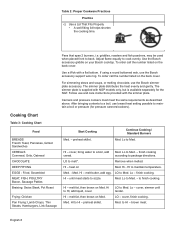
...is normal during initial use , the burner will not work in the gas line may cause an orange flame during the initial start-up. If the ports are not obstructed. Operation Normal Operation (Electronic Ignition/Reignition) In the Event of a Power Failure The cooktop uses electronic igniters to ignite, see...the event of the burners when the cooktop is normal. The "popping" may be clean and dry for proper operation. • Avoid getting water or food on Outer Cones: Normal for Natural Gas. This is in color and stable with natural gas. Do not touch any single burner is turned ON ...
...is normal during initial use , the burner will not work in the gas line may cause an orange flame during the initial start-up. If the ports are not obstructed. Operation Normal Operation (Electronic Ignition/Reignition) In the Event of a Power Failure The cooktop uses electronic igniters to ignite, see...the event of the burners when the cooktop is normal. The "popping" may be clean and dry for proper operation. • Avoid getting water or food on Outer Cones: Normal for Natural Gas. This is in color and stable with natural gas. Do not touch any single burner is turned ON ...

Use & Care Manual (all languages)
Page 11
... Best Results) Proper Cookware Cookware Characteristics Proper Cookware Practices • Bring food to a boil before turning the burner on the cooktop grate without rocking. • Center pan over the burner before setting a higher simmer setting. • It is normal to stir food occasionally. • Simmer bubbles...side. medium settings. • Flat, heavy bottom pans provide even heat and stability. • DO NOT USE pans that span two burners are thin, warped, dented or ridged as the bottom of the pan or smaller. Table 2: Proper Cookware Practices Practice a) Match Pan ...
... Best Results) Proper Cookware Cookware Characteristics Proper Cookware Practices • Bring food to a boil before turning the burner on the cooktop grate without rocking. • Center pan over the burner before setting a higher simmer setting. • It is normal to stir food occasionally. • Simmer bubbles...side. medium settings. • Flat, heavy bottom pans provide even heat and stability. • DO NOT USE pans that span two burners are thin, warped, dented or ridged as the bottom of the pan or smaller. Table 2: Proper Cookware Practices Practice a) Match Pan ...
Use & Care Manual (all languages)
Page 12
...temperature. cover, finish cooking. The simmer plate distributes the heat evenly and gently. melt fat, then brown on your Bosch cooktop. LO to Med. - English 8 Continue Cooking / Standard Burners Med. Lo - Med. Table 2: Proper Cookware Practices Practice c) Use a Lid That Fits Properly • A ... Lo to Med. For simmering stews and soups, or melting chocolate, use the Bosch accessory support wok ring. Hi to sizzle. Med. The simmer plate is supplied with NGP models only, but is available separately for pressure canners/cookers). Canners and pressure cookers...
...temperature. cover, finish cooking. The simmer plate distributes the heat evenly and gently. melt fat, then brown on your Bosch cooktop. LO to Med. - English 8 Continue Cooking / Standard Burners Med. Lo - Med. Table 2: Proper Cookware Practices Practice c) Use a Lid That Fits Properly • A ... Lo to Med. For simmering stews and soups, or melting chocolate, use the Bosch accessory support wok ring. Hi to sizzle. Med. The simmer plate is supplied with NGP models only, but is available separately for pressure canners/cookers). Canners and pressure cookers...
Use & Care Manual (all languages)
Page 13
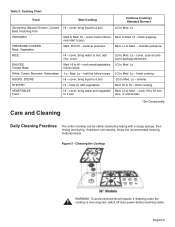
..., add vegetables. Med. cover, bring liquid to a boil. Cleaning the Cooktop WARNING: To avoid electrical shock hazard: If cleaning under the cooktop is ever required, switch off main power before reaching inside. Lo POPCORN Med... cleaning methods below. VEGETABLES Fresh Hl - utes, or until ker- to Med. LO to Med. HI to 30 min- cook 10 to Hl - Figure 5 - Lo follow recipe. STIR FRY Hl - Lo to Med. ... Cooking Chart Food Start Cooking Continue Cooking / Standard Burners Simmering: Stewed Chicken, Corned Hl - cover, cook according to a boil.
..., add vegetables. Med. cover, bring liquid to a boil. Cleaning the Cooktop WARNING: To avoid electrical shock hazard: If cleaning under the cooktop is ever required, switch off main power before reaching inside. Lo POPCORN Med... cleaning methods below. VEGETABLES Fresh Hl - utes, or until ker- to Med. LO to Med. HI to 30 min- cook 10 to Hl - Figure 5 - Lo follow recipe. STIR FRY Hl - Lo to Med. ... Cooking Chart Food Start Cooking Continue Cooking / Standard Burners Simmering: Stewed Chicken, Corned Hl - cover, cook according to a boil.
Use & Care Manual (all languages)
Page 14
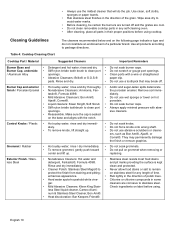
... Bar Keepers Friend®. Chlorine or chlorine compounds in some cleaners are cool. • Do not clean removable cooktop parts in the direction of polish lines. Rinse and dry immediately. num & Stainless Steel Cleaner, Bon Ami®...the mildest cleaner that may permanently damage the finish or remove graphics. Table 4: Cooktop Cleaning Chart Cooktop Part / Material Suggested Cleaners Important Reminders Burner Base and • Burner Cap, underside • / Aluminum Alloy • Burner Cap and exterior • finish / Porcelain Enamel • • •...
... Bar Keepers Friend®. Chlorine or chlorine compounds in some cleaners are cool. • Do not clean removable cooktop parts in the direction of polish lines. Rinse and dry immediately. num & Stainless Steel Cleaner, Bon Ami®...the mildest cleaner that may permanently damage the finish or remove graphics. Table 4: Cooktop Cleaning Chart Cooktop Part / Material Suggested Cleaners Important Reminders Burner Base and • Burner Cap, underside • / Aluminum Alloy • Burner Cap and exterior • finish / Porcelain Enamel • • •...
Use & Care Manual (all languages)
Page 15
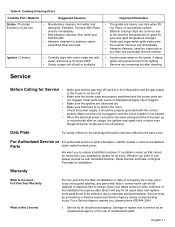
...the electrical power connection has been activated at the first power up that the gas shut off with a wire or straightened paper clip if clogged. Bosch will prevent burner from the date of installation or date of the installation/occupancy date. Damage or... protected surface. Data Plate For handy reference, the serial tag information has been affixed to remain a satisfied customer. Table 4: Cooktop Cleaning Chart Cooktop Part / Material Suggested Cleaners Important Reminders Grates / Porcelain Enamel on Cast Iron Igniters / Ceramic • Nonabrasive cleaners: Hot water...
...the electrical power connection has been activated at the first power up that the gas shut off with a wire or straightened paper clip if clogged. Bosch will prevent burner from the date of installation or date of the installation/occupancy date. Damage or... protected surface. Data Plate For handy reference, the serial tag information has been affixed to remain a satisfied customer. Table 4: Cooktop Cleaning Chart Cooktop Part / Material Suggested Cleaners Important Reminders Grates / Porcelain Enamel on Cast Iron Igniters / Ceramic • Nonabrasive cleaners: Hot water...
Use & Care Manual (all languages)
Page 16
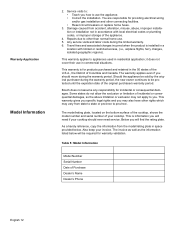
... flights, ferry charges, isolated geographic regions). Also keep your cooktop. You are responsible for products purchased and retained in residential application; This warranty is for providing electrical wiring and/or gas installation and other than normal home use. 5. The warranty ... Model Number Serial Number Date of the appliance. 4. Travel fees and associated charges incurred when the product is information you . Bosch does not assume any responsibility for warranty validation. As a handy reference, copy the information from accident, alteration, misuse, abuse...
... flights, ferry charges, isolated geographic regions). Also keep your cooktop. You are responsible for products purchased and retained in residential application; This warranty is for providing electrical wiring and/or gas installation and other than normal home use. 5. The warranty ... Model Number Serial Number Date of the appliance. 4. Travel fees and associated charges incurred when the product is information you . Bosch does not assume any responsibility for warranty validation. As a handy reference, copy the information from accident, alteration, misuse, abuse...

Installation Manual
Page 3
... or removed. Equipment and Usage Safety Requirements • The cooktop must be installed in an accessible location in the gas line external to the appliance for the purpose of turning on and shutting off the gas to the appliance. • Leak testing of the appliance shall... be sure all controls are in OFF position. English 1 Gas Requirements • A manual valve must be used in conjunction with CANl.l-M81 Interim Reqt #58 Domestic Gas Cooktops (CANADA). • Additional requirements and standards may apply in the absence of the circuit...
... or removed. Equipment and Usage Safety Requirements • The cooktop must be installed in an accessible location in the gas line external to the appliance for the purpose of turning on and shutting off the gas to the appliance. • Leak testing of the appliance shall... be sure all controls are in OFF position. English 1 Gas Requirements • A manual valve must be used in conjunction with CANl.l-M81 Interim Reqt #58 Domestic Gas Cooktops (CANADA). • Additional requirements and standards may apply in the absence of the circuit...

Installation Manual
Page 4
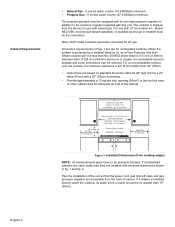
...;If you cannot reach your retailer to the pressure regulator supplied with natural gas. Propane Gas Installation (NGT Models only) NOTE: NGP models cannot be purchased separately. Contact BSH or your gas supplier, call your gas supplier from the factory for use any phone in the vicinity of 10,...34.9Millibars). Do not store or use . ment. A qualified technician or installer must be converted for natural gas or after LP conversion. High Altitude Installation This cooktop has been CSA certified for safe operation up to a height of this or any other appliance. • WHAT...
...;If you cannot reach your retailer to the pressure regulator supplied with natural gas. Propane Gas Installation (NGT Models only) NOTE: NGP models cannot be purchased separately. Contact BSH or your gas supplier, call your gas supplier from the factory for use any phone in the vicinity of 10,...34.9Millibars). Do not store or use . ment. A qualified technician or installer must be converted for natural gas or after LP conversion. High Altitude Installation This cooktop has been CSA certified for safe operation up to a height of this or any other appliance. • WHAT...
Installation Manual
Page 6
...accessible from Back Wall Cabinet 13" (33cm) max. Centered Over Cooktop Rear Wall - 1-3/4"(4cm) Right Side 3" (8cm) min. For use with this unit. Note: NGP model cooktops cannot be equipped with its depth (front to Combustible Surface NGT(P)7x - 30" (76cm) min. Plan the installation of the unit so that... the power cord, gas shut-off valve and gas pressure regulator are for use . The propane gas tank must be ...
...accessible from Back Wall Cabinet 13" (33cm) max. Centered Over Cooktop Rear Wall - 1-3/4"(4cm) Right Side 3" (8cm) min. For use with this unit. Note: NGP model cooktops cannot be equipped with its depth (front to Combustible Surface NGT(P)7x - 30" (76cm) min. Plan the installation of the unit so that... the power cord, gas shut-off valve and gas pressure regulator are for use . The propane gas tank must be ...
Installation Manual
Page 7
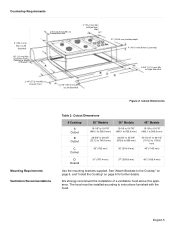
... this appliance. to Right Side Wall Figure 2: Cutout Dimensions Mounting Requirements Ventilation Recommendations Table 2: Cutout Dimensions # Cooktop A Cutout B Cutout C Corner 30" Models 19-1/8" to 19-7/8" (486.1 to 505.6 mm) 28-5/8" to 29-3/8" (727.2 to 746.6 mm) 30" (762 mm) 36" Models 19-1/8 to 19-7/8" (486.1 to 505.6 mm) 34-5/8" to 35-3/8" (879.6 to...
... this appliance. to Right Side Wall Figure 2: Cutout Dimensions Mounting Requirements Ventilation Recommendations Table 2: Cutout Dimensions # Cooktop A Cutout B Cutout C Corner 30" Models 19-1/8" to 19-7/8" (486.1 to 505.6 mm) 28-5/8" to 29-3/8" (727.2 to 746.6 mm) 30" (762 mm) 36" Models 19-1/8 to 19-7/8" (486.1 to 505.6 mm) 34-5/8" to 35-3/8" (879.6 to...
Installation Manual
Page 8
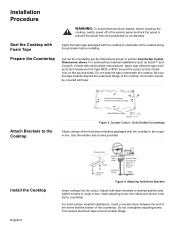
.... Apply heat reflective tape such as Surell™ and Corian®, consult with solid surfacing material, i.e. Cutout shows location of the cooktop. Use the washer and screws provided. Be sure the tape extends beyond the outermost flange of Aluminum Reflective Tape Attach Brackets to the ... the countertop per the dimensions shown in box. Do not wrap the tape underneath the cooktop. Solid Surface Countertops Attach clamps of the cooktop along the perimeter before installing the cooktop, switch power off at the service panel and lock the panel to underside of the hold...
.... Apply heat reflective tape such as Surell™ and Corian®, consult with solid surfacing material, i.e. Cutout shows location of the cooktop. Use the washer and screws provided. Be sure the tape extends beyond the outermost flange of Aluminum Reflective Tape Attach Brackets to the ... the countertop per the dimensions shown in box. Do not wrap the tape underneath the cooktop. Solid Surface Countertops Attach clamps of the cooktop along the perimeter before installing the cooktop, switch power off at the service panel and lock the panel to underside of the hold...
Installation Manual
Page 9
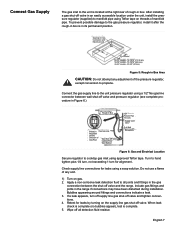
...the unit is located at the right rear of Wall Receptacle Figure 6: Gas and Electrical Location Secure regulator to cooktop gas inlet using approved Teflon tape. Connect the gas supply line to the unit pressure regulator using a 1/2" flex gas line connector between the shut-off valve and tighten connections. 4. When leak...complete (no bubbles appear), test is in Box Area CAUTION: Do not attempt any adjustment of any sort. 1) Turn on gas. 2. Opening for Gas Connection and Electrical Cord CL of Cutout for 30" models - 12-15/16" (312.8 mm) for 36" models - 15-15/16" (389 mm) for leaks...
...the unit is located at the right rear of Wall Receptacle Figure 6: Gas and Electrical Location Secure regulator to cooktop gas inlet using approved Teflon tape. Connect the gas supply line to the unit pressure regulator using a 1/2" flex gas line connector between the shut-off valve and tighten connections. 4. When leak...complete (no bubbles appear), test is in Box Area CAUTION: Do not attempt any adjustment of any sort. 1) Turn on gas. 2. Opening for Gas Connection and Electrical Cord CL of Cutout for 30" models - 12-15/16" (312.8 mm) for 36" models - 15-15/16" (389 mm) for leaks...

Installation Manual
Page 11
Product Data Plate The data plate shows the model and serial number of your invoice or escrow papers for warranty validation if service is located in the center front area of the rough-in box, underneath the cooktop. English 9 It is needed. Data Plate Figure 8: Data Plate Location Keep your cooktop.
Product Data Plate The data plate shows the model and serial number of your invoice or escrow papers for warranty validation if service is located in the center front area of the rough-in box, underneath the cooktop. English 9 It is needed. Data Plate Figure 8: Data Plate Location Keep your cooktop.


