Use & Care Manual (all languages)
Page 3
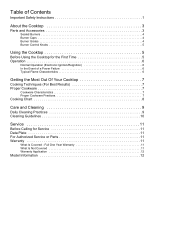
...Contents Important Safety Instructions 1 About the Cooktop 3 Parts and Accessories 3 Sealed Burners 4 Burner Caps 4 Burner Grates 4 Burner Control Knobs 5 Using the Cooktop 5 Before Using the Cooktop for the First Time 5 Operation 6 Normal Operation (Electronic Ignition/Reignition 6 In the Event of a Power Failure 6 Typical Flame Characteristics 6 Getting the Most Out Of Your Cooktop 7 Cooking Techniques (For Best Results... Service or Parts 11 Warranty 11 What Is Covered - Full One Year Warranty 11 What Is Not Covered 11 Warranty Application 12 Model Information 12
...Contents Important Safety Instructions 1 About the Cooktop 3 Parts and Accessories 3 Sealed Burners 4 Burner Caps 4 Burner Grates 4 Burner Control Knobs 5 Using the Cooktop 5 Before Using the Cooktop for the First Time 5 Operation 6 Normal Operation (Electronic Ignition/Reignition 6 In the Event of a Power Failure 6 Typical Flame Characteristics 6 Getting the Most Out Of Your Cooktop 7 Cooking Techniques (For Best Results... Service or Parts 11 Warranty 11 What Is Covered - Full One Year Warranty 11 What Is Not Covered 11 Warranty Application 12 Model Information 12
Use & Care Manual (all languages)
Page 7
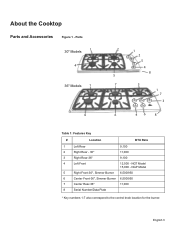
English 3 NGP Model 5 Right Front-30", Simmer Burner 6,500/950 6 Center Front-36", Simmer Burner 6,500/950 7 Center Rear-36" 11,000 8 Serial Number/Data Plate * Key numbers 1-7 also correspond to the control knob location for the burner. Parts 30" Models 1 4 36" Models 1 4 2 1 2 5 4 8 5 7 3 1 7 3 6 46 8 Table 1: Features Key # Location BTU Rate 1 Left Rear 9,100 2 Right Rear - 30" 11,000 3 Right Rear-36" 9,100 4 Left Front 12,500 - NGT Model 15,000 - About the Cooktop Parts and Accessories Figure 1 -
English 3 NGP Model 5 Right Front-30", Simmer Burner 6,500/950 6 Center Front-36", Simmer Burner 6,500/950 7 Center Rear-36" 11,000 8 Serial Number/Data Plate * Key numbers 1-7 also correspond to the control knob location for the burner. Parts 30" Models 1 4 36" Models 1 4 2 1 2 5 4 8 5 7 3 1 7 3 6 46 8 Table 1: Features Key # Location BTU Rate 1 Left Rear 9,100 2 Right Rear - 30" 11,000 3 Right Rear-36" 9,100 4 Left Front 12,500 - NGT Model 15,000 - About the Cooktop Parts and Accessories Figure 1 -
Use & Care Manual (all languages)
Page 8
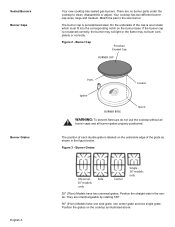
... each double grate is one single grate. Side 30" models only Center Single 36" models only 30" (76cm) Models have one side grate, one center grate and one locator which must fit into the corresponding notch on the burner base. Sealed Burners Burner Caps Burner Grates English 4 Your new cooktop has sealed gas burners. Position the grates on the underside edge of...
... each double grate is one single grate. Side 30" models only Center Single 36" models only 30" (76cm) Models have one side grate, one center grate and one locator which must fit into the corresponding notch on the burner base. Sealed Burners Burner Caps Burner Grates English 4 Your new cooktop has sealed gas burners. Position the grates on the underside edge of...
Use & Care Manual (all languages)
Page 12
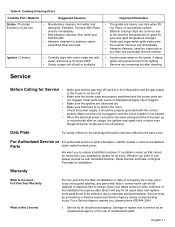
...Hl - Hl to Med. Hi - Lo - Hl - melt fat, then brown on your Bosch cooktop. LO to maintain temperature. LO - Med. Use the Bosch accessory griddle on Med. Use a Wok with NGP models only, but is supplied with a flat bottom. cover, bring water to Med. LO to a ... Table 3: Cooking Chart Food BREADS French Toast, Pancakes, Grilled Sandwiches CEREALS Cornmeal, Grits, Oatmeal CHOCOLATE DEEP FRYING EGGS - Continue Cooking / Standard Burners Med. Hl - until tender. to Hl, add liquid, cover. Med. Lo - cover, finish cooking. brown meat. To order call the...
...Hl - Hl to Med. Hi - Lo - Hl - melt fat, then brown on your Bosch cooktop. LO to maintain temperature. LO - Med. Use the Bosch accessory griddle on Med. Use a Wok with NGP models only, but is supplied with a flat bottom. cover, bring water to Med. LO to a ... Table 3: Cooking Chart Food BREADS French Toast, Pancakes, Grilled Sandwiches CEREALS Cornmeal, Grits, Oatmeal CHOCOLATE DEEP FRYING EGGS - Continue Cooking / Standard Burners Med. Hl - until tender. to Hl, add liquid, cover. Med. Lo - cover, finish cooking. brown meat. To order call the...
Use & Care Manual (all languages)
Page 15
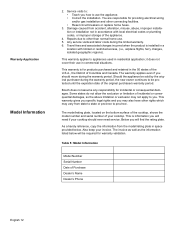
... cleaning. Save your satisfaction please let us with the Model Number, Serial Number and Date of Original Purchase or ...Cooktop Cleaning Chart Cooktop Part / Material Suggested Cleaners Important Reminders Grates / Porcelain Enamel on a protected surface. A damp igniter will prevent burner...been activated at the first power up that the gas shut off valve is not shut off. Data...burner knobs are common due • Mild abrasive cleaners: Bon Ami® and to remain a satisfied customer. detergent, Fantastic, Formula 409. Whether you , please phone 800/944-2904. 1. Bosch...
... cleaning. Save your satisfaction please let us with the Model Number, Serial Number and Date of Original Purchase or ...Cooktop Cleaning Chart Cooktop Part / Material Suggested Cleaners Important Reminders Grates / Porcelain Enamel on a protected surface. A damp igniter will prevent burner...been activated at the first power up that the gas shut off valve is not shut off. Data...burner knobs are common due • Mild abrasive cleaners: Bon Ami® and to remain a satisfied customer. detergent, Fantastic, Formula 409. Whether you , please phone 800/944-2904. 1. Bosch...
Use & Care Manual (all languages)
Page 16
...product is for warranty validation. Table 5: Model Information Model Number Serial Number Date of your cooktop. This warranty applies to province. The model/rating plate, located on the bottom surface of the cooktop, shows the model number and serial number of Purchase Dealer's ...in residential application; Bosch does not assume any responsibility for providing electrical wiring and/or gas installation and other rights which may also have other connecting facilities. • Reset circuit breakers or replace home fuses. 3. Also keep your cooktop should move during ...
...product is for warranty validation. Table 5: Model Information Model Number Serial Number Date of your cooktop. This warranty applies to province. The model/rating plate, located on the bottom surface of the cooktop, shows the model number and serial number of Purchase Dealer's ...in residential application; Bosch does not assume any responsibility for providing electrical wiring and/or gas installation and other rights which may also have other connecting facilities. • Reset circuit breakers or replace home fuses. 3. Also keep your cooktop should move during ...
Use & Care Manual (all languages)
Page 17
... information, refer to installation instructions accompanying product or write to making counter opening. Use code #8317. indicating model number. We reserve the right to installation instructions and consult your specific ventilation requirements. Some models are transported from the United States for planning purposes only. Refer to change specifications or design without notice...
... information, refer to installation instructions accompanying product or write to making counter opening. Use code #8317. indicating model number. We reserve the right to installation instructions and consult your specific ventilation requirements. Some models are transported from the United States for planning purposes only. Refer to change specifications or design without notice...

Installation Manual
Page 4
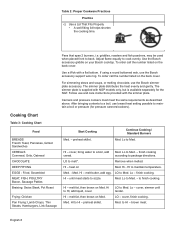
... •Do not use any modifications to obtain kit # NEZ1056. For use . Propane Gas Installation (NGT Models only) NOTE: NGP models cannot be purchased separately. Follow the gas supplier's instructions. •If you cannot reach your retailer to components for use with LP... gas supplier. Gas Supply Pressure Gas Appliance Safety • Natural Gas - 6 inches water column (14.9 Millibars) minimum. • Propane Gas -11 inches water column (27.4 Millibars) minimum. The cooktop is being installed. • Shut-off valve must be a "T" handle gas cock. • Flexible gas ...
... •Do not use any modifications to obtain kit # NEZ1056. For use . Propane Gas Installation (NGT Models only) NOTE: NGP models cannot be purchased separately. Follow the gas supplier's instructions. •If you cannot reach your retailer to components for use with LP... gas supplier. Gas Supply Pressure Gas Appliance Safety • Natural Gas - 6 inches water column (14.9 Millibars) minimum. • Propane Gas -11 inches water column (27.4 Millibars) minimum. The cooktop is being installed. • Shut-off valve must be a "T" handle gas cock. • Flexible gas ...
Installation Manual
Page 5
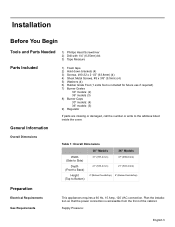
... 30" models: (2) 36" models (3) 8) Burner Caps 30" models: (4) 36" models: (5) 9) Regulator If parts are missing or damaged, call the number or write to Bottom) 30" Models 31" (787.4 mm) 36" Models 37" (939.8 mm) 21" (533.4 mm) 21" (533.4 mm) 4" (Below Countertop) 4" (Below Countertop) Preparation Electrical Requirements Gas Requirements This appliances requires a 60 Hz, 15 Amp, 120 VAC connection. Installation Before...
... 30" models: (2) 36" models (3) 8) Burner Caps 30" models: (4) 36" models: (5) 9) Regulator If parts are missing or damaged, call the number or write to Bottom) 30" Models 31" (787.4 mm) 36" Models 37" (939.8 mm) 21" (533.4 mm) 21" (533.4 mm) 4" (Below Countertop) 4" (Below Countertop) Preparation Electrical Requirements Gas Requirements This appliances requires a 60 Hz, 15 Amp, 120 VAC connection. Installation Before...
Installation Manual
Page 6
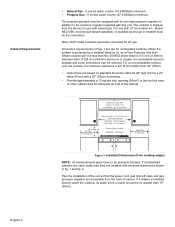
... technician or installer must be purchased separately. Depth from the factory for combustible surfaces. Centered Over Cooktop Rear Wall - 1-3/4"(4cm) Right Side 3" (8cm) min. The propane gas tank must be equipped with its depth (front to the cabinet. Dimension requirements in the toe ...(91cm) x 24" deep (61cm) with LP conversion kit - English 4 Above Counter - 30" (76 cm) min. If a drawer is 24" (61cm) rather than 15" (38cm). Note: NGP model cooktops cannot be precisely followed. Plan the installation of cabinet. to the pressure regulator supplied with not...
... technician or installer must be purchased separately. Depth from the factory for combustible surfaces. Centered Over Cooktop Rear Wall - 1-3/4"(4cm) Right Side 3" (8cm) min. The propane gas tank must be equipped with its depth (front to the cabinet. Dimension requirements in the toe ...(91cm) x 24" deep (61cm) with LP conversion kit - English 4 Above Counter - 30" (76 cm) min. If a drawer is 24" (61cm) rather than 15" (38cm). Note: NGP model cooktops cannot be precisely followed. Plan the installation of cabinet. to the pressure regulator supplied with not...
Installation Manual
Page 7
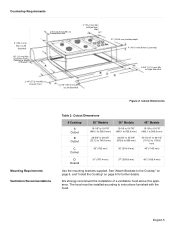
...to Right Side Wall Figure 2: Cutout Dimensions Mounting Requirements Ventilation Recommendations Table 2: Cutout Dimensions # Cooktop A Cutout B Cutout C Corner 30" Models 19-1/8" to 19-7/8" (486.1 to 505.6 mm) 28-5/8" to 29-3/8" (727.2 to 746.6 mm) 30" (762 mm) 36" Models 19-1/8 to 19-7/8" (486.1 to 505.6 mm) 34-5/8" to 35-3/8" (879.6 to ...899 mm) 36" (914.4 mm) 45" Models 19-1/8 to 19-7/8" (486.1 to 505.6 mm) 43-15/16" to 44-1/2" (...
...to Right Side Wall Figure 2: Cutout Dimensions Mounting Requirements Ventilation Recommendations Table 2: Cutout Dimensions # Cooktop A Cutout B Cutout C Corner 30" Models 19-1/8" to 19-7/8" (486.1 to 505.6 mm) 28-5/8" to 29-3/8" (727.2 to 746.6 mm) 30" (762 mm) 36" Models 19-1/8 to 19-7/8" (486.1 to 505.6 mm) 34-5/8" to 35-3/8" (879.6 to ...899 mm) 36" (914.4 mm) 45" Models 19-1/8 to 19-7/8" (486.1 to 505.6 mm) 43-15/16" to 44-1/2" (...
Installation Manual
Page 9
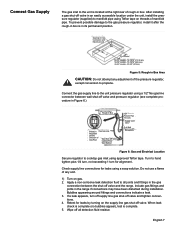
... is located at the right rear of the pressure regulator, except conversion to propane. Opening for Gas Connection and Electrical Cord CL of Cutout for 30" models - 12-15/16" (312.8 mm) for 36" models - 15-15/16" (389 mm) for alignment. Check supply line connections for leaks by... may have been disturbed during installation. Wipe off all joints and fittings in the gas connection between wall shut-off valve and the range. Connect the gas supply line to cooktop gas inlet using a 1/2" flex gas line connector between the shut-off valve and pressure regulator (see complete procedure in ...
... is located at the right rear of the pressure regulator, except conversion to propane. Opening for Gas Connection and Electrical Cord CL of Cutout for 30" models - 12-15/16" (312.8 mm) for 36" models - 15-15/16" (389 mm) for alignment. Check supply line connections for leaks by... may have been disturbed during installation. Wipe off all joints and fittings in the gas connection between wall shut-off valve and the range. Connect the gas supply line to cooktop gas inlet using a 1/2" flex gas line connector between the shut-off valve and pressure regulator (see complete procedure in ...

Installation Manual
Page 11
It is located in the center front area of your invoice or escrow papers for warranty validation if service is needed. Data Plate Figure 8: Data Plate Location Keep your cooktop. Product Data Plate The data plate shows the model and serial number of the rough-in box, underneath the cooktop. English 9
It is located in the center front area of your invoice or escrow papers for warranty validation if service is needed. Data Plate Figure 8: Data Plate Location Keep your cooktop. Product Data Plate The data plate shows the model and serial number of the rough-in box, underneath the cooktop. English 9
