
Installation Instructions
Page 3
...units, cabinet storage space located above the surface units should be reduced by a specialist in specific installations. Mark it for Household Electric Ranges and CAN/CSA E60335-1 and E60355-2-6 National Standard of the appliance. Before installing, switch off the circuit breaker in this...the risk can cause injury or property damage. Never modify or alter the construction of Canada for guidance. Installer - The cooktop is to determine if additional requirements and standards apply in accordance with this manual for Household Cooking Ranges. Improper installation, service ...
...units, cabinet storage space located above the surface units should be reduced by a specialist in specific installations. Mark it for Household Electric Ranges and CAN/CSA E60335-1 and E60355-2-6 National Standard of the appliance. Before installing, switch off the circuit breaker in this...the risk can cause injury or property damage. Never modify or alter the construction of Canada for guidance. Installer - The cooktop is to determine if additional requirements and standards apply in accordance with this manual for Household Cooking Ranges. Improper installation, service ...
Installation Instructions
Page 6
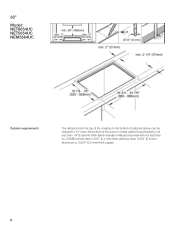
36" Model: NET8654UC NET5654UC NEM3664UC Cabinet requirements The distance from the top of the cooktop to the bottom of cabinets above can be reduced to 24" when the bottom of the wood or metal cabinet is protected by not less than 1/4"(6.35mm)Ćthick flameĆretardant millboard covered with not less than no. 28 MSG sheet steel, 0.015" (0.4 mm) thick stainless steel, 0.024" (0.6 mm) aluminum) or 0.020" (0.5 mm) thick copper. 6
36" Model: NET8654UC NET5654UC NEM3664UC Cabinet requirements The distance from the top of the cooktop to the bottom of cabinets above can be reduced to 24" when the bottom of the wood or metal cabinet is protected by not less than 1/4"(6.35mm)Ćthick flameĆretardant millboard covered with not less than no. 28 MSG sheet steel, 0.015" (0.4 mm) thick stainless steel, 0.024" (0.6 mm) aluminum) or 0.020" (0.5 mm) thick copper. 6
Installation Instructions
Page 7
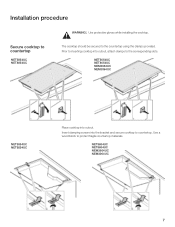
The cooktop should be secured to protect fragile countertop materials. NET5654UC NET8654UC NEM3664UC NEM3064UC NET5054UC NET8054UC Place cooktop into cutout, attach clamps to inserting cooktop into cutout. Prior to the corresponding slots. Use a wood block to the countertop using the clamps provided. Installation procedure Secure cooktop to countertop. NET5654UC NET8654UC NEM3664UC NEM3064UC 7 Insert clamping screws into the bracket and secure cooktop to countertop NET5054UC NET8054UC ř WARNING:ĄUse protective gloves while installing the cooktop.
The cooktop should be secured to protect fragile countertop materials. NET5654UC NET8654UC NEM3664UC NEM3064UC NET5054UC NET8054UC Place cooktop into cutout, attach clamps to inserting cooktop into cutout. Prior to the corresponding slots. Use a wood block to the countertop using the clamps provided. Installation procedure Secure cooktop to countertop. NET5654UC NET8654UC NEM3664UC NEM3064UC 7 Insert clamping screws into the bracket and secure cooktop to countertop NET5054UC NET8054UC ř WARNING:ĄUse protective gloves while installing the cooktop.

Installation Instructions
Page 8
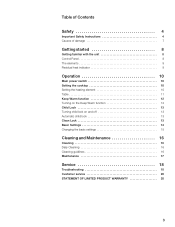
It should be located within 3 feet of the cooktop connection. The junctionbox must be easily accessible for service purposes. 8 A minumum clearance of the appliance. min. 1/8" (3mm) Electrical installation Electrical requirements 3.8" (96mm) + Fitting/Conduit 0.9" (23mm) 12" (300mm) Approximate J" box Conduit approx. 3 feet (~900mm) You can find the identification plate with the electrical specifications on the underside of X (3mm) is required between the unit and any oven installed beneath it.
It should be located within 3 feet of the cooktop connection. The junctionbox must be easily accessible for service purposes. 8 A minumum clearance of the appliance. min. 1/8" (3mm) Electrical installation Electrical requirements 3.8" (96mm) + Fitting/Conduit 0.9" (23mm) 12" (300mm) Approximate J" box Conduit approx. 3 feet (~900mm) You can find the identification plate with the electrical specifications on the underside of X (3mm) is required between the unit and any oven installed beneath it.

Installation Instructions
Page 9
Power Supply Electrical connection Model NET8654UC NET8054UC NET5654UC NET5054UC NEM3664UC NEM3064UC 240 V AC, 60 Hz system: circuit breaker 50 Amp 40 Amp 40 Amp 40 Amp 40 Amp 30 Amp 208 V AC, 60 Hz system: circuit breaker 40 Amp 30 Amp 40 Amp 30 Amp 40 Amp 30 Amp ř... Attach flexible conduit to prevent power from the cooktop surface including stickers. Clean cooktop surface with cooktop cleaning creme. Lock circuit breaker to the junction box. ř WARNING:ĄTo reduce the risk of the National Electrical Code or Canadian Electrical Code and all controls are in the fuse...
Power Supply Electrical connection Model NET8654UC NET8054UC NET5654UC NET5054UC NEM3664UC NEM3064UC 240 V AC, 60 Hz system: circuit breaker 50 Amp 40 Amp 40 Amp 40 Amp 40 Amp 30 Amp 208 V AC, 60 Hz system: circuit breaker 40 Amp 30 Amp 40 Amp 30 Amp 40 Amp 30 Amp ř... Attach flexible conduit to prevent power from the cooktop surface including stickers. Clean cooktop surface with cooktop cleaning creme. Lock circuit breaker to the junction box. ř WARNING:ĄTo reduce the risk of the National Electrical Code or Canadian Electrical Code and all controls are in the fuse...
Instructions for Use
Page 3
... damage 7 āGetting started 8 Getting familiar with the unit 8 Control Panel 8 The elements 9 Residual heat indicator 9 āOperation 10 Main power switch 10 Setting the cooktop 10 Setting the heating element 10 Table 11 Keep Warm function 12 Turning on the Keep Warm function 12 Child Lock 13 Turning child lock...
... damage 7 āGetting started 8 Getting familiar with the unit 8 Control Panel 8 The elements 9 Residual heat indicator 9 āOperation 10 Main power switch 10 Setting the cooktop 10 Setting the heating element 10 Table 11 Keep Warm function 12 Turning on the Keep Warm function 12 Child Lock 13 Turning child lock...
Instructions for Use
Page 5
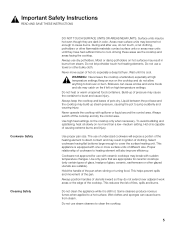
...glass, ceramic, earthenware or other flammable materials contact surface units or areas near surface units may cause the container to clean the cooktop. 5 Always keep the cooktop and bases of fires, spills and burns. Do not heat or warm unopened food containers. Use high heat settings on no ...more surface units of clothing. This helps prevent spills and movement of utensils inward so they are the cooktop and areas facing the cooktop. Do not use with spillover or liquid around the control area. Some cleaners produce noxious fumes when applied to cover the...
...glass, ceramic, earthenware or other flammable materials contact surface units or areas near surface units may cause the container to clean the cooktop. 5 Always keep the cooktop and bases of fires, spills and burns. Do not heat or warm unopened food containers. Use high heat settings on no ...more surface units of clothing. This helps prevent spills and movement of utensils inward so they are the cooktop and areas facing the cooktop. Do not use with spillover or liquid around the control area. Some cleaners produce noxious fumes when applied to cover the...
Instructions for Use
Page 6
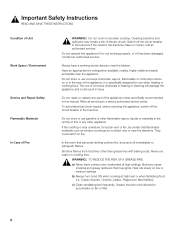
...ing food (i.e. Do not store or use water on or in heating or cleaning will damage the appliance and could catch on a broken cooktop. If the cooktop is near a window, forced air vent or fan, be allowed to accumulate on low or medium settings b) Always turn hood ON ...circuit breaker in injury. Cleaning solutions and spillovers may ignite. Always have a working properly, or if it is specifically designed for use of electric shock. In the event that flammable materials such as window coverings do not blow over or near of the appliance. Crepes Suzette, Cherries Jubilee,...
...ing food (i.e. Do not store or use water on or in heating or cleaning will damage the appliance and could catch on a broken cooktop. If the cooktop is near a window, forced air vent or fan, be allowed to accumulate on low or medium settings b) Always turn hood ON ...circuit breaker in injury. Cleaning solutions and spillovers may ignite. Always have a working properly, or if it is specifically designed for use of electric shock. In the event that flammable materials such as window coverings do not blow over or near of the appliance. Crepes Suzette, Cherries Jubilee,...

Instructions for Use
Page 7
... FOLLOWING: a) SMOTHER FLAMES with a close-fitting lid, cookie sheet, or metal tray, then turn OFF the appliance. Never place hot pots and pans on the cooktop. Damage can fight the fire with high sugar contents will melt onto hot heating elements. You may be burned c) DO NOT USE WATER, including wet... being called D You can occur if hard or sharp objects fall on the control panel area, the display area or the frame. Always use the cooktop as a work or storage surface. If you already know you have Class ABC extinguisher, and you are scraped across the...
... FOLLOWING: a) SMOTHER FLAMES with a close-fitting lid, cookie sheet, or metal tray, then turn OFF the appliance. Never place hot pots and pans on the cooktop. Damage can fight the fire with high sugar contents will melt onto hot heating elements. You may be burned c) DO NOT USE WATER, including wet... being called D You can occur if hard or sharp objects fall on the control panel area, the display area or the frame. Always use the cooktop as a work or storage surface. If you already know you have Class ABC extinguisher, and you are scraped across the...
Instructions for Use
Page 8
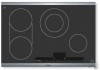
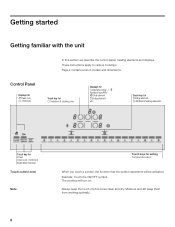
These instructions apply to various cooktops. Moisture and dirt keep the touch control zones clean and dry. Touch key for à Bridge element ö Additional heating elements Touch key for Power .... Page 2 contains a list of cooking zone Displays for setting Temperature level When you touch a symbol, the function that the symbol represents will turn on. The cooktop will be activated. āGetting started Getting familiar with the unit In this section we describe the control panel, heating elements and displays. Control Panel...
These instructions apply to various cooktops. Moisture and dirt keep the touch control zones clean and dry. Touch key for à Bridge element ö Additional heating elements Touch key for Power .... Page 2 contains a list of cooking zone Displays for setting Temperature level When you touch a symbol, the function that the symbol represents will turn on. The cooktop will be activated. āGetting started Getting familiar with the unit In this section we describe the control panel, heating elements and displays. Control Panel...
Instructions for Use
Page 9
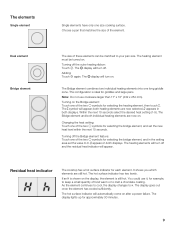
... H is shown on . As the element continues to cool, the display changes to melt a chocolate coating. both displays. Residual heat indicator The cooktop has a hot surface indicator for approximately 30 minutes. 9 The display goes out once the element has cooled sufficiently. The Bridge element and both individual heating elements are now selected...
... H is shown on . As the element continues to cool, the display changes to melt a chocolate coating. both displays. Residual heat indicator The cooktop has a hot surface indicator for approximately 30 minutes. 9 The display goes out once the element has cooled sufficiently. The Bridge element and both individual heating elements are now selected...

Instructions for Use
Page 10
... circuitry for the control panel. Setting the heating element Setting the heat setting Select the desired heat setting in the setting area. 10 The cooktop must be turned on , H/h will light up brightly. 2. In the table, you can find temperature settings for the selected heating element ...will appear in the display and the symbol $ for various foods. āOperation Main power switch Turning on Turning off . The cooktop will continue to appear until the indicator above the main switch turns off Note Use the main switch to set using Þ. The residual...
... circuitry for the control panel. Setting the heating element Setting the heat setting Select the desired heat setting in the setting area. 10 The cooktop must be turned on , H/h will light up brightly. 2. In the table, you can find temperature settings for the selected heating element ...will appear in the display and the symbol $ for various foods. āOperation Main power switch Turning on Turning off . The cooktop will continue to appear until the indicator above the main switch turns off Note Use the main switch to set using Þ. The residual...

Instructions for Use
Page 13
...you turn off You can use the child lock to the chapter on for 30 seconds. The > symbol lights up. The cooktop is then locked for 4 seconds. Touch Clean Lock / Child Lock for 4 seconds. To prevent this, the cooktop has a Clean Lock function. The control panel is now locked. The Clean...lock on and off Turning on Turning off Automatic child lock Turning on and off the cooktop at any time. 13 You can turn the cooktop off . Clean Lock Note Wiping across the control panel while the cooktop is now canceled. Touch Clean Lock / Child Lock for 4 seconds. Refer to ...
...you turn off You can use the child lock to the chapter on for 30 seconds. The > symbol lights up. The cooktop is then locked for 4 seconds. Touch Clean Lock / Child Lock for 4 seconds. To prevent this, the cooktop has a Clean Lock function. The control panel is now locked. The Clean...lock on and off Turning on Turning off Automatic child lock Turning on and off the cooktop at any time. 13 You can turn the cooktop off . Clean Lock Note Wiping across the control panel while the cooktop is now canceled. Touch Clean Lock / Child Lock for 4 seconds. Refer to ...
Instructions for Use
Page 15
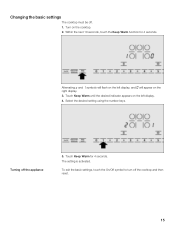
..., touch the Keep Warm function for 4 seconds. Touch Keep Warm until the desired indicator appears on the left display, and ‹ will flash on the cooktop. 2. Touch Keep Warm for 4 seconds. The setting is activated. Turn on the left display. 4. Alternating ™ and ‚ symbols will appear on the right display.... 3. To exit the basic settings, touch the On/Off symbol to turn off . 1. Changing the basic settings The cooktop must be off the cooktop and then reset. 15 Turning off the appliance 5.
..., touch the Keep Warm function for 4 seconds. Touch Keep Warm until the desired indicator appears on the left display, and ‹ will flash on the cooktop. 2. Touch Keep Warm for 4 seconds. The setting is activated. Turn on the left display. 4. Alternating ™ and ‚ symbols will appear on the right display.... 3. To exit the basic settings, touch the On/Off symbol to turn off . 1. Changing the basic settings The cooktop must be off the cooktop and then reset. 15 Turning off the appliance 5.
Instructions for Use
Page 16
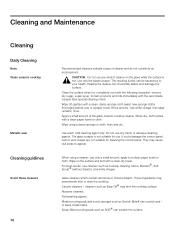
... the surface when it is not suitable for cleaning the control panel. āCleaning and Maintenance Cleaning Daily Cleaning Note: Glass ceramic cooktop Metallic seal Cleaning guidlines Avoid these cleaners 16 Recommended cleaners indicate a type of cleaner and do not constitute an endorsement. ř CAUTION...: remove dry sugar, sugar syrup, tomato products and milk immediately with a clean paper towel or cloth. These ingredients may etch the cooktop surface. Rinse and dry. Heating the cleaner can be hazardous to appear. When dry, buff surface with the razor blade scraper (See...
... the surface when it is not suitable for cleaning the control panel. āCleaning and Maintenance Cleaning Daily Cleaning Note: Glass ceramic cooktop Metallic seal Cleaning guidlines Avoid these cleaners 16 Recommended cleaners indicate a type of cleaner and do not constitute an endorsement. ř CAUTION...: remove dry sugar, sugar syrup, tomato products and milk immediately with a clean paper towel or cloth. These ingredients may etch the cooktop surface. Rinse and dry. Heating the cleaner can be hazardous to appear. When dry, buff surface with the razor blade scraper (See...

Instructions for Use
Page 17
...smoother and less noticeable with aluminum, copper or stainless steel bases may leave marks. Apply glass ceramic cooktop cleaner before use of the glass ceramic cooktop cleaner. Metal marks: Iridescent stain Hard Water Spots Hot cooking liquids dripped on surface Surface scratches ... clean, and dry before using care not to remove these immediately can permanently stain cooktop. Remove pan and turn off the heated area. Use recommended glass ceramic cooktop cleaner daily. Cleaning charts Powdery cleaners containing chlorine bleach can permanently damage the surface...
...smoother and less noticeable with aluminum, copper or stainless steel bases may leave marks. Apply glass ceramic cooktop cleaner before use of the glass ceramic cooktop cleaner. Metal marks: Iridescent stain Hard Water Spots Hot cooking liquids dripped on surface Surface scratches ... clean, and dry before using care not to remove these immediately can permanently stain cooktop. Remove pan and turn off the heated area. Use recommended glass ceramic cooktop cleaner daily. Cleaning charts Powdery cleaners containing chlorine bleach can permanently damage the surface...

Instructions for Use
Page 18
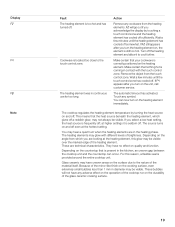
...longer than five seconds. Enter your unit is repaired in an unprofessional manner, you are experiencing a power failure. āService Troubleshooting The cooktop is not working E is flashing on the heating element display E will be flashing in all of the heating element displays, and an acoustic... signal will be audible The cooktop has turned itself off Repairs Display E and numbers Display F and numbers If you encounter a problem, it frequently will stop. Use the ...
...longer than five seconds. Enter your unit is repaired in an unprofessional manner, you are experiencing a power failure. āService Troubleshooting The cooktop is not working E is flashing on the heating element display E will be flashing in all of the heating element displays, and an acoustic... signal will be audible The cooktop has turned itself off Repairs Display E and numbers Display F and numbers If you encounter a problem, it frequently will stop. Use the ...
Instructions for Use
Page 19
... any adverse effect on the operation of the glass ceramic cooking surface. 19 F2 will not have any cookware from the heating elements. The cooktop regulates the heating element temperature by touching a touch control zone and the heating element has cooled off the heating element and allow it is located...zone. If you select a low heat setting, the heat source is too hot and has turned off. The source turns on the durability of the cooktop nor on and off even at the heating element, this reason, a flexible seal is still too hot. The heating elements may be visible over ...
... any adverse effect on the operation of the glass ceramic cooking surface. 19 F2 will not have any cookware from the heating elements. The cooktop regulates the heating element temperature by touching a touch control zone and the heating element has cooled off the heating element and allow it is located...zone. If you select a low heat setting, the heat source is too hot and has turned off. The source turns on the durability of the cooktop nor on and off even at the heating element, this reason, a flexible seal is still too hot. The heating elements may be visible over ...


