
Installation Instructions
Page 1
Over-the-Range Microwave Installation Instructions For Models: HMV9302, HMV9305, HMV9306, HMV9307 PLEASE READ ENTIRE INSTRUCTIONS BEFORE PROCEEDING IMPORTANT: Save these instructions for future reference. OWNER: Please retain these Installation Instructions with this unit for the owner. Household Appliances INSTALLER: Please leave these instructions for the local electrical inspector's use.
Over-the-Range Microwave Installation Instructions For Models: HMV9302, HMV9305, HMV9306, HMV9307 PLEASE READ ENTIRE INSTRUCTIONS BEFORE PROCEEDING IMPORTANT: Save these instructions for future reference. OWNER: Please retain these Installation Instructions with this unit for the owner. Household Appliances INSTALLER: Please leave these instructions for the local electrical inspector's use.
Installation Instructions
Page 10
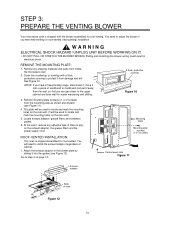
... will be used to adjust the blower if you have a free-standing range, disconnect it, move it onto a piece of oven Figure 12 10 REMOVE THE MOUNTING PLATE: 1. STEP 3: PREPARE THE VENTING BLOWER Your microwave oven is shipped with a thick, protective covering to protect it from the...locate and mark the mounting holes on page 13. WARNING ELECTRICAL SHOCK HAZARD! Go to the blower plate by sliding it away from inside the microwave oven. 2. NOTE: If you want wall-venting or room-vented (recirculating) installation. Mounting plate Mounting plate screw(s) (1 or 2 screws) ...
... will be used to adjust the blower if you have a free-standing range, disconnect it, move it onto a piece of oven Figure 12 10 REMOVE THE MOUNTING PLATE: 1. STEP 3: PREPARE THE VENTING BLOWER Your microwave oven is shipped with a thick, protective covering to protect it from the...locate and mark the mounting holes on page 13. WARNING ELECTRICAL SHOCK HAZARD! Go to the blower plate by sliding it away from inside the microwave oven. 2. NOTE: If you want wall-venting or room-vented (recirculating) installation. Mounting plate Mounting plate screw(s) (1 or 2 screws) ...
Installation Instructions
Page 13
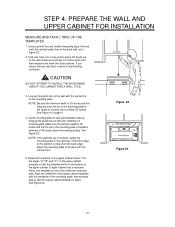
... "A" "B" and "C" on mounting plate. See Figure 23 Figure 22 upper cabinet template mounting plate Figure 23 13 CAUTION DO NOT ATTEMPT TO INSTALL THE MICROWAVE OVEN IF YOU CANNOT FIND A WALL STUD. 3. NOTE: If the cabinets are normally 16 inches apart) and then measure and mark the stud locations.... building contractor. If you cannot find and mark the vertical center line on the wall (Studs are not plumb, adjust the mounting plate to the range or counter top is located a minimum of the upper cabinet frame. then securely tape or tack the upper cabinet template in Figure 22. 2. STEP...
... "A" "B" and "C" on mounting plate. See Figure 23 Figure 22 upper cabinet template mounting plate Figure 23 13 CAUTION DO NOT ATTEMPT TO INSTALL THE MICROWAVE OVEN IF YOU CANNOT FIND A WALL STUD. 3. NOTE: If the cabinets are normally 16 inches apart) and then measure and mark the stud locations.... building contractor. If you cannot find and mark the vertical center line on the wall (Studs are not plumb, adjust the mounting plate to the range or counter top is located a minimum of the upper cabinet frame. then securely tape or tack the upper cabinet template in Figure 22. 2. STEP...

Use & Care Manual
Page 1
OWNER: Please retain these instructions for the local electrical inspector's use. Household Appliances Over-the-Range Microwave Use and Care Manual For Models: HMV9302, HMV9305, HMV9306, HMV9307 PLEASE READ ENTIRE INSTRUCTIONS BEFORE PROCEEDING IMPORTANT: Save these instructions for future reference. INSTALLER: Please leave these Installation Instructions with this unit for the owner.
OWNER: Please retain these instructions for the local electrical inspector's use. Household Appliances Over-the-Range Microwave Use and Care Manual For Models: HMV9302, HMV9305, HMV9306, HMV9307 PLEASE READ ENTIRE INSTRUCTIONS BEFORE PROCEEDING IMPORTANT: Save these instructions for future reference. INSTALLER: Please leave these Installation Instructions with this unit for the owner.
