Installation Instructions
Page 2
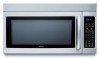
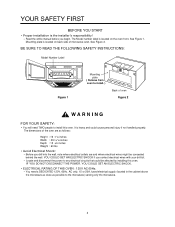
...that could cause personal injury if not handled properly. It is the installer's responsibility! - Locate and disconnect the power to the microwave) serving only the microwave. 2 See Figure 1. The Model number label is located on the oven front. YOU COULD GET AN ELECTRIC SHOCK if you ...120V, 60Hz, AC only, 15 or 20A, fused electrical supply (located in the cabinet above the microwave as close as follows: Height : 16 7/16 inches Width : 29 15/16 inches Depth : 15 5/8 inches Weight : 60 lbs. • Avoid Electrical Shock! - BE SURE TO READ THE FOLLOWING SAFETY INSTRUCTIONS...
...that could cause personal injury if not handled properly. It is the installer's responsibility! - Locate and disconnect the power to the microwave) serving only the microwave. 2 See Figure 1. The Model number label is located on the oven front. YOU COULD GET AN ELECTRIC SHOCK if you ...120V, 60Hz, AC only, 15 or 20A, fused electrical supply (located in the cabinet above the microwave as close as follows: Height : 16 7/16 inches Width : 29 15/16 inches Depth : 15 5/8 inches Weight : 60 lbs. • Avoid Electrical Shock! - BE SURE TO READ THE FOLLOWING SAFETY INSTRUCTIONS...
Installation Instructions
Page 4
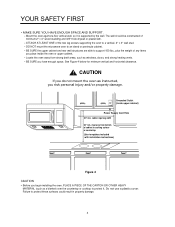
... a flat, vertical wall, so it . BE SURE the upper cabinet and rear wall structures are able to support 150 lbs., plus the weight of cabinet to cooking surface or countertop (Use templates included with installation instructions) Figure 4 CAUTION • Before you place inside upper cabinet) ...The wall should be constructed of the two lag screws supporting the oven to protect it is supported by the wall. DO NOT mount the microwave oven to protect these surfaces could result in property damage. 4 cabinet opening width 30" min. CAUTION If you have enough space. Failure...
... a flat, vertical wall, so it . BE SURE the upper cabinet and rear wall structures are able to support 150 lbs., plus the weight of cabinet to cooking surface or countertop (Use templates included with installation instructions) Figure 4 CAUTION • Before you place inside upper cabinet) ...The wall should be constructed of the two lag screws supporting the oven to protect it is supported by the wall. DO NOT mount the microwave oven to protect these surfaces could result in property damage. 4 cabinet opening width 30" min. CAUTION If you have enough space. Failure...

Installation Instructions
Page 5
... to install at least one lag screw into a 2" x 4" stud and four anchor bolts into the wall, and the mounting area must meet the 150 lbs. weight requirement. 5 Left side Right side NOTE: You need to the upper cabinet) OR Four spring toggle heads - Actual Size (for the toggle bolts) Four 1/4" x 3" toggle...
... to install at least one lag screw into a 2" x 4" stud and four anchor bolts into the wall, and the mounting area must meet the 150 lbs. weight requirement. 5 Left side Right side NOTE: You need to the upper cabinet) OR Four spring toggle heads - Actual Size (for the toggle bolts) Four 1/4" x 3" toggle...
Use & Care Manual
Page 2
... Precautions To Avoid Possible Exposure To Excessive Microwave Energy 3 Important Safety Instructions 4-5 Grounding Instructions 5 UNDERSTANDING YOUR MICROWAVE OVEN 6-9 Cookware Guide 6 Tips For Microwave Cooking 7 Parts And Accessories 8 Control Panel 8-9 USING YOUR MICROWAVE OVEN 10-29 Learn About Your Microwave Oven 10 Help 10 Clock 10 Kitchen ... Or Subtracting Cook Time 15 Popcorn 15 Pizza 16 Potato 16 Vegetable 16 Cook 17 Reheat 17 Auto Defrost 18 Weight Conversion Chart 18 Defrosting Tips 18 Auto Defrost Chart 19-20 Time Defrost 21 Quick Defrost 21 Use Of The ...
... Precautions To Avoid Possible Exposure To Excessive Microwave Energy 3 Important Safety Instructions 4-5 Grounding Instructions 5 UNDERSTANDING YOUR MICROWAVE OVEN 6-9 Cookware Guide 6 Tips For Microwave Cooking 7 Parts And Accessories 8 Control Panel 8-9 USING YOUR MICROWAVE OVEN 10-29 Learn About Your Microwave Oven 10 Help 10 Clock 10 Kitchen ... Or Subtracting Cook Time 15 Popcorn 15 Pizza 16 Potato 16 Vegetable 16 Cook 17 Reheat 17 Auto Defrost 18 Weight Conversion Chart 18 Defrosting Tips 18 Auto Defrost Chart 19-20 Time Defrost 21 Quick Defrost 21 Use Of The ...
Use & Care Manual
Page 8
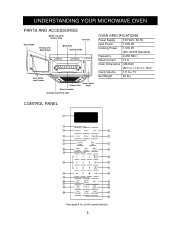
Net Weight 60 lbs. CONTROL PANEL 1 3 2 4 5 7 6 8 9 10 12 11 14 13 15 16 17 19 18 20 21 25 23 22 24 27 28 26 • See page 9 for control panel features. 8 UNDERSTANDING YOUR MICROWAVE OVEN PARTS AND ACCESSORIES Model and Serial Number Plate Vent Grill Door Handle Window with Metal Shield Metal... W Cooking Power 1,000 W (IEC 60705 Standard) Frequency 2,450 MHz Rated Current 13 A Outer Dimensions (WxHxD) Cavity Volume 2915⁄16" x 167⁄16"x 155⁄8" 1.8 Cu. Ft.
Net Weight 60 lbs. CONTROL PANEL 1 3 2 4 5 7 6 8 9 10 12 11 14 13 15 16 17 19 18 20 21 25 23 22 24 27 28 26 • See page 9 for control panel features. 8 UNDERSTANDING YOUR MICROWAVE OVEN PARTS AND ACCESSORIES Model and Serial Number Plate Vent Grill Door Handle Window with Metal Shield Metal... W Cooking Power 1,000 W (IEC 60705 Standard) Frequency 2,450 MHz Rated Current 13 A Outer Dimensions (WxHxD) Cavity Volume 2915⁄16" x 167⁄16"x 155⁄8" 1.8 Cu. Ft.
Use & Care Manual
Page 9
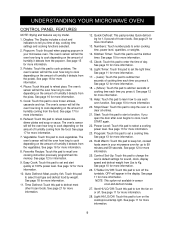
...for more information. 10. See page 10 for more information. 28. Help: Touch this pad to keep hot, cooked foods warm in your microwave oven for up to use each time you time of humidity coming from the food. If you press it detects from the pizza. Hold ...information. 20. See page 10 for more information. 26. NOTE: This option not available in the display. UNDERSTANDING YOUR MICROWAVE OVEN CONTROL PANEL FEATURES NOTE: Styling and features vary by weight. Display: The Display includes a clock and indicators to cook potatoes. The oven's sensor will tell the oven how ...
...for more information. 10. See page 10 for more information. 28. Help: Touch this pad to keep hot, cooked foods warm in your microwave oven for up to use each time you time of humidity coming from the food. If you press it detects from the pizza. Hold ...information. 20. See page 10 for more information. 26. NOTE: This option not available in the display. UNDERSTANDING YOUR MICROWAVE OVEN CONTROL PANEL FEATURES NOTE: Styling and features vary by weight. Display: The Display includes a clock and indicators to cook potatoes. The oven's sensor will tell the oven how ...
Use & Care Manual
Page 10
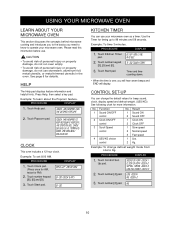
... 1. Example: To set 8:00 AM. Timer and time counting down. • When the time is over, you need to know to pop microwave popcorn the display will display. PROCEDURE DISPLAY 1. HELP The Help pad displays feature information and helpful hints. Touch Popcorn pad. Touch Clock pad. (...or metal trimmed utensils in min pad. Up pad. Touch number [2] pad. Touch Start pad. 8 : 00 KITCHEN TIMER You can change defrost weight mode from Lbs to 99 minutes and 59 seconds. Example: To time 3 minutes. Touch Kitchen Timer enter time in the oven. Function No....
... 1. Example: To set 8:00 AM. Timer and time counting down. • When the time is over, you need to know to pop microwave popcorn the display will display. PROCEDURE DISPLAY 1. HELP The Help pad displays feature information and helpful hints. Touch Popcorn pad. Touch Clock pad. (...or metal trimmed utensils in min pad. Up pad. Touch number [2] pad. Touch Start pad. 8 : 00 KITCHEN TIMER You can change defrost weight mode from Lbs to 99 minutes and 59 seconds. Example: To time 3 minutes. Touch Kitchen Timer enter time in the oven. Function No....
Use & Care Manual
Page 18
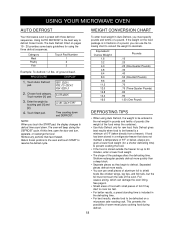
... package is included in the defrosting time. • For best results, elevate food to 20 minutes, enter a lower food weight. • The shape of foil if they begin to be defrosted on a microwave safe roasting rack. meat touch 1 poultry touch 2 fish touch 3 2. NOTE: When you touch the START pad, the display changes...
... package is included in the defrosting time. • For best results, elevate food to 20 minutes, enter a lower food weight. • The shape of foil if they begin to be defrosted on a microwave safe roasting rack. meat touch 1 poultry touch 2 fish touch 3 2. NOTE: When you touch the START pad, the display changes...
Use & Care Manual
Page 20
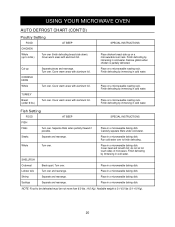
... Separate and rearrange. Cover warm areas with aluminum foil. Place on a microwavable roasting rack. Run cold water over to 6 lbs.) Turn over and rearrange. Place in a microwavable baking dish. Available weight is partially defrosted. Cover warm areas with aluminum foil. Place on a microwavable roasting rack. Whole Turn over . Turn over . Cover warm areas with...
... Separate and rearrange. Cover warm areas with aluminum foil. Place on a microwavable roasting rack. Run cold water over to 6 lbs.) Turn over and rearrange. Place in a microwavable baking dish. Available weight is partially defrosted. Cover warm areas with aluminum foil. Place on a microwavable roasting rack. Whole Turn over . Turn over . Cover warm areas with...