Installation Instructions
Page 4
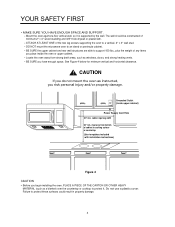
ATTACH AT LEAST ONE of any items you place inside upper cabinet) Power Supply Cord Hole 30" min. DO NOT mount the microwave oven to a vertical, 2" x 4" wall stud. - Grounded Outlet (inside the oven or upper cabinet. - Mount the oven against a flat, vertical wall, so it .... SURE YOU HAVE ENOUGH SPACE AND SUPPORT. - BE SURE you risk personal injury and/or property damage. Failure to cooking surface or countertop (Use templates included with installation instructions) Figure 4 CAUTION • Before you begin installing the oven, PLACE A PIECE OF THE CARTON OR OTHER HEAVY MATERIAL (such...
ATTACH AT LEAST ONE of any items you place inside upper cabinet) Power Supply Cord Hole 30" min. DO NOT mount the microwave oven to a vertical, 2" x 4" wall stud. - Grounded Outlet (inside the oven or upper cabinet. - Mount the oven against a flat, vertical wall, so it .... SURE YOU HAVE ENOUGH SPACE AND SUPPORT. - BE SURE you risk personal injury and/or property damage. Failure to cooking surface or countertop (Use templates included with installation instructions) Figure 4 CAUTION • Before you begin installing the oven, PLACE A PIECE OF THE CARTON OR OTHER HEAVY MATERIAL (such...

Installation Instructions
Page 5
... upper cabinet) OR Four spring toggle heads - Actual Size (for attaching the damper duct connector) One upper cabinet template - Actual Size (for wall stud holes) Two 1/4" x 3" bolts - Not Actual Size 10- 8" Upper-cabinet template Roof-venting installation B C D centerline 12" 6" 11 4" 10- 3 16 8- Actual Size (for the toggle bolts) Four 1/4" x 3" toggle bolts - PARTS...
... upper cabinet) OR Four spring toggle heads - Actual Size (for attaching the damper duct connector) One upper cabinet template - Actual Size (for wall stud holes) Two 1/4" x 3" bolts - Not Actual Size 10- 8" Upper-cabinet template Roof-venting installation B C D centerline 12" 6" 11 4" 10- 3 16 8- Actual Size (for the toggle bolts) Four 1/4" x 3" toggle bolts - PARTS...
Installation Instructions
Page 6
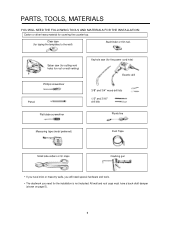
... the counter top. PARTS, TOOLS, MATERIALS YOU WILL NEED THE FOLLOWING TOOLS AND MATERIALS FOR THE INSTALLATION: Carton or other heavy material for taping the templates to the wall) Stud finder or thin nail. Saber saw (for cutting vent holes for roof or wall venting) Phillips screwdriver Pencil Flat blade screwdriver...
... the counter top. PARTS, TOOLS, MATERIALS YOU WILL NEED THE FOLLOWING TOOLS AND MATERIALS FOR THE INSTALLATION: Carton or other heavy material for taping the templates to the wall) Stud finder or thin nail. Saber saw (for cutting vent holes for roof or wall venting) Phillips screwdriver Pencil Flat blade screwdriver...
Installation Instructions
Page 13
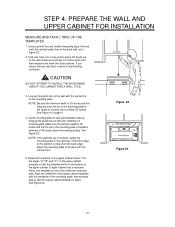
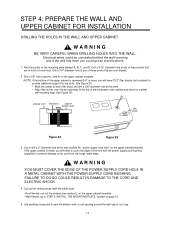
CAUTION DO NOT ATTEMPT TO INSTALL THE MICROWAVE OVEN IF YOU CANNOT FIND A WALL STUD. 3. If upper cabinet has a recessed frame, trim template so that the top of the mounting plate is located a minimum of the upper cabinet. If you cannot find and mark the vertical center line ...) measuring tape, find any wall stud, consult a local building contractor. See Figure 23. See Figure 4 on mounting plate. See Figure 23 Figure 22 upper cabinet template mounting plate Figure 23 13 NOTE: Be sure the minimum width is 30 inches and the distance from the top of the cabinet is lower...
CAUTION DO NOT ATTEMPT TO INSTALL THE MICROWAVE OVEN IF YOU CANNOT FIND A WALL STUD. 3. If upper cabinet has a recessed frame, trim template so that the top of the mounting plate is located a minimum of the upper cabinet. If you cannot find and mark the vertical center line ...) measuring tape, find any wall stud, consult a local building contractor. See Figure 23. See Figure 4 on mounting plate. See Figure 23 Figure 22 upper cabinet template mounting plate Figure 23 13 NOTE: Be sure the minimum width is 30 inches and the distance from the top of the cabinet is lower...
Installation Instructions
Page 14
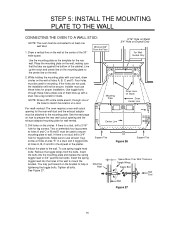
... blocks (not included) to provide additional support for the bolts. Drill a 3/8" hole at the area marked M, "power supply cord hole" on the upper cabinet template. See Figure 24. • Mark the center of each filler block and drill a 3/8" diameter hole at any of the hole with the power supply cord... BUSHING. Find the points on page 16. 5. NOTE: If the bottom of the microwave oven cabinet and attach to cabinet with the saber saw): • Roof-Vented: cut out the shaded area marked L on the upper cabinet template. • Wall-Vented: go to the cord from the rough metal edge. Cut...
... blocks (not included) to provide additional support for the bolts. Drill a 3/8" hole at the area marked M, "power supply cord hole" on the upper cabinet template. See Figure 24. • Mark the center of each filler block and drill a 3/8" diameter hole at any of the hole with the power supply cord... BUSHING. Find the points on page 16. 5. NOTE: If the bottom of the microwave oven cabinet and attach to cabinet with the saber saw): • Roof-Vented: cut out the shaded area marked L on the upper cabinet template. • Wall-Vented: go to the cord from the rough metal edge. Cut...
Installation Instructions
Page 15
... are not used, the installation will not be secure. Place the mounting plate on Drywall Only For WallVented Only Use the mounting plate as the template for the rear wall. See the next page on the bracket to help in the wall to mount the bracket. You may pull forward on...
... are not used, the installation will not be secure. Place the mounting plate on Drywall Only For WallVented Only Use the mounting plate as the template for the rear wall. See the next page on the bracket to help in the wall to mount the bracket. You may pull forward on...