Installation Instructions
Page 2
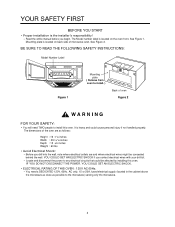
... note where electrical outlets are as possible to the microwave) serving only the microwave. 2 Mounting plate is located on back side of the oven are and where electrical wires might be affected by installing this oven. The dimensions of microwave oven. IF YOU DO NOT DISCONNECT THE POWER, YOU ...COULD GET AN ELECTRIC SHOCK. • ELECTRICAL RATING OF THIS OVEN : 120V AC 60Hz. - YOUR SAFETY...
... note where electrical outlets are as possible to the microwave) serving only the microwave. 2 Mounting plate is located on back side of the oven are and where electrical wires might be affected by installing this oven. The dimensions of microwave oven. IF YOU DO NOT DISCONNECT THE POWER, YOU ...COULD GET AN ELECTRIC SHOCK. • ELECTRICAL RATING OF THIS OVEN : 120V AC 60Hz. - YOUR SAFETY...
Installation Instructions
Page 3
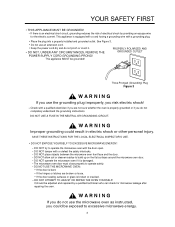
...is broken or cracked. - DO NOT try to build up on the flat surfaces around the microwave oven door. - DO NOT allow soil or cleaner residue to operate the microwave oven with a qualified electrician if you use an extension cord. • Keep the power cord dry... This appliance MUST be adjusted and repaired by providing an escape wire for microwave leakage after repairing the oven. The microwave oven door must close properly to excessive microwave energy. 3 DO NOT place objects between the microwave oven front face and the door. - DO NOT ATTEMPT TO ADJUST OR REPAIR...
...is broken or cracked. - DO NOT try to build up on the flat surfaces around the microwave oven door. - DO NOT allow soil or cleaner residue to operate the microwave oven with a qualified electrician if you use an extension cord. • Keep the power cord dry... This appliance MUST be adjusted and repaired by providing an escape wire for microwave leakage after repairing the oven. The microwave oven door must close properly to excessive microwave energy. 3 DO NOT place objects between the microwave oven front face and the door. - DO NOT ATTEMPT TO ADJUST OR REPAIR...
Installation Instructions
Page 4
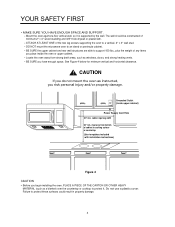
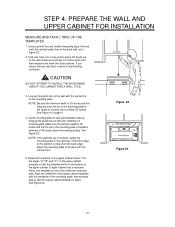
... plus the weight of cabinet to cooking surface or countertop (Use templates included with installation instructions) Figure 4 CAUTION • Before you begin installing the oven, PLACE A PIECE OF THE CARTON OR OTHER HEAVY MATERIAL (such as a blanket) over the countertop or cooktop to a vertical, 2" x 4" wall...risk personal injury and/or property damage. CAUTION If you have enough space. Do not use a plastic cover. DO NOT mount the microwave oven to protect these surfaces could result in property damage. 4 Failure to an island or peninsula cabinet. - See Figure 4 below for ...
... plus the weight of cabinet to cooking surface or countertop (Use templates included with installation instructions) Figure 4 CAUTION • Before you begin installing the oven, PLACE A PIECE OF THE CARTON OR OTHER HEAVY MATERIAL (such as a blanket) over the countertop or cooktop to a vertical, 2" x 4" wall...risk personal injury and/or property damage. CAUTION If you have enough space. Do not use a plastic cover. DO NOT mount the microwave oven to protect these surfaces could result in property damage. 4 Failure to an island or peninsula cabinet. - See Figure 4 below for ...
Installation Instructions
Page 7
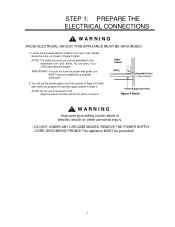
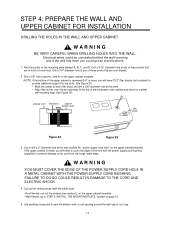
... Outlet ( Inside Cabinet ) Power-Supply-Cord Hole Figure 4 Detail WARNING Improper grounding could result in Step 4. This appliance MUST be on a circuit dedicated to the microwave oven 120V, 60Hz., AC only with a 15 or 20A fused electrical supply. NOTE: The outlet should be grounded! 7 IMPORTANT: If you do not pinch or crush... NOT, UNDER ANY CIRCUMSTANCES, REMOVE THE POWER SUPPLY CORD GROUNDING PRONG! NOTE: Do not use an extension cord. Locate the grounded electric outlet for this oven in the cabinet above the oven, as shown in Figure 4 Detail.
... Outlet ( Inside Cabinet ) Power-Supply-Cord Hole Figure 4 Detail WARNING Improper grounding could result in Step 4. This appliance MUST be on a circuit dedicated to the microwave oven 120V, 60Hz., AC only with a 15 or 20A fused electrical supply. NOTE: The outlet should be grounded! 7 IMPORTANT: If you do not pinch or crush... NOT, UNDER ANY CIRCUMSTANCES, REMOVE THE POWER SUPPLY CORD GROUNDING PRONG! NOTE: Do not use an extension cord. Locate the grounded electric outlet for this oven in the cabinet above the oven, as shown in Figure 4 Detail.
Installation Instructions
Page 10
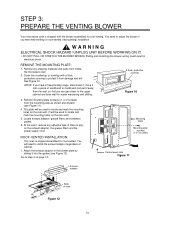
... hardware packet. 6. Go to install the exhaust adaptor regardless of cabinet. 1. ROOF-VENTED INSTALLATION: This oven is any), on the exhaust adaptor, the grease filters and the power supply cord. WARNING ELECTRICAL SHOCK ... shock. NOTE: If you can get closer to the blower plate by sliding it from inside the microwave oven. 2. A thick, protective covering Figure 10 3. This plate will be used to locate and mark... and drilling. STEP 3: PREPARE THE VENTING BLOWER Your microwave oven is shipped with a thick, protective covering to protect it into the guides (see Figure 11). 4.
... hardware packet. 6. Go to install the exhaust adaptor regardless of cabinet. 1. ROOF-VENTED INSTALLATION: This oven is any), on the exhaust adaptor, the grease filters and the power supply cord. WARNING ELECTRICAL SHOCK ... shock. NOTE: If you can get closer to the blower plate by sliding it from inside the microwave oven. 2. A thick, protective covering Figure 10 3. This plate will be used to locate and mark... and drilling. STEP 3: PREPARE THE VENTING BLOWER Your microwave oven is shipped with a thick, protective covering to protect it into the guides (see Figure 11). 4.
Installation Instructions
Page 11
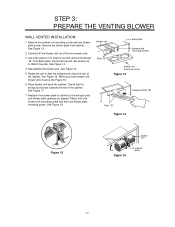
... plate. Remove one blower unit mounting screw and one blower plate mounting screw. Discard knockouts. Check that the exhaust ports face the rear of the microwave oven. 3. Be careful not to cabinet so the exhaust ports and blower plate opening are aligned. STEP 3: PREPARE THE VENTING BLOWER WALL-VENTED INSTALLATION: 1. See Figure...
... plate. Remove one blower unit mounting screw and one blower plate mounting screw. Discard knockouts. Check that the exhaust ports face the rear of the microwave oven. 3. Be careful not to cabinet so the exhaust ports and blower plate opening are aligned. STEP 3: PREPARE THE VENTING BLOWER WALL-VENTED INSTALLATION: 1. See Figure...
Installation Instructions
Page 12
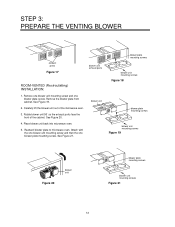
... mounting screw and then the one blower plate screw. Rotate blower unit 90˚ so the exhaust ports face the front of the microwave oven. 3. Reattach blower plate to microwave oven. blower unit blower plate mounting screws blower unit mounting screws Figure 18 blower plate mounting screws blower unit mounting screws Figure 19 Figure... See Figure 19. 2. STEP 3: PREPARE THE VENTING BLOWER exhaust ports Figure 17 blower unit exhaust ports ROOM-VENTED (Recirculating) INSTALLATION: 1. Place blower unit back into microwave oven. 5.
... mounting screw and then the one blower plate screw. Rotate blower unit 90˚ so the exhaust ports face the front of the microwave oven. 3. Reattach blower plate to microwave oven. blower unit blower plate mounting screws blower unit mounting screws Figure 18 blower plate mounting screws blower unit mounting screws Figure 19 Figure... See Figure 19. 2. STEP 3: PREPARE THE VENTING BLOWER exhaust ports Figure 17 blower unit exhaust ports ROOM-VENTED (Recirculating) INSTALLATION: 1. Place blower unit back into microwave oven. 5.
Installation Instructions
Page 13
... line on the wall (Studs are normally 16 inches apart) and then measure and mark the stud locations. CAUTION DO NOT ATTEMPT TO INSTALL THE MICROWAVE OVEN IF YOU CANNOT FIND A WALL STUD. 3. NOTE: Be sure the minimum width is 30 inches and the distance from the top of the mounting plate...
... line on the wall (Studs are normally 16 inches apart) and then measure and mark the stud locations. CAUTION DO NOT ATTEMPT TO INSTALL THE MICROWAVE OVEN IF YOU CANNOT FIND A WALL STUD. 3. NOTE: Be sure the minimum width is 30 inches and the distance from the top of the mounting plate...
Installation Instructions
Page 14
... the edge of the upper cabinet is recessed 3/4" or more, you could get an electric shock. 1. See Figure 24. • Mark the center of the microwave oven cabinet and attach to provide additional support for the bolts. If the upper cabinet is metal, you will need 2"x2" filler blocks (not included) to...
... the edge of the upper cabinet is recessed 3/4" or more, you could get an electric shock. 1. See Figure 24. • Mark the center of the microwave oven cabinet and attach to provide additional support for the bolts. If the upper cabinet is metal, you will need 2"x2" filler blocks (not included) to...
Installation Instructions
Page 17
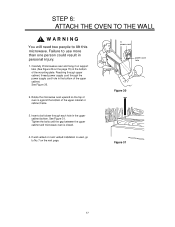
... cabinet, thread power supply cord through each hole in the bottom of oven is closed. 4. Figure 31 17 Insert a bolt down through the power supply cord hole in the upper cabinet bottom. Rotate the microwave oven upward so the top of the upper cabinet. Tighten the bolts until the... gap between the upper cabinet and microwave oven is against the bottom of the mounting plate. Failure to lift this microwave. Carefully lift microwave oven and hang it on support tabs (See Figure 26 on the next page. power cord power...
... cabinet, thread power supply cord through each hole in the bottom of oven is closed. 4. Figure 31 17 Insert a bolt down through the power supply cord hole in the upper cabinet bottom. Rotate the microwave oven upward so the top of the upper cabinet. Tighten the bolts until the... gap between the upper cabinet and microwave oven is against the bottom of the mounting plate. Failure to lift this microwave. Carefully lift microwave oven and hang it on support tabs (See Figure 26 on the next page. power cord power...
Installation Instructions
Page 18
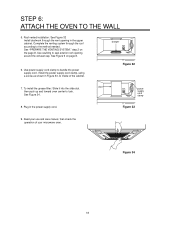
... page 8. 6. damper Figure 32 7. Complete the venting system through the vent opening around the exhaust cap. Use power supply cord clamp to inside of your microwave oven. Plug in Figure 33, to bundle the power supply cord. Read your use and care manual, then check the operation of the cabinet. STEP 6: ATTACH...
... page 8. 6. damper Figure 32 7. Complete the venting system through the vent opening around the exhaust cap. Use power supply cord clamp to inside of your microwave oven. Plug in Figure 33, to bundle the power supply cord. Read your use and care manual, then check the operation of the cabinet. STEP 6: ATTACH...
Use & Care Manual
Page 2
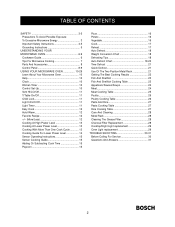
... 3-5 Precautions To Avoid Possible Exposure To Excessive Microwave Energy 3 Important Safety Instructions 4-5 Grounding Instructions 5 UNDERSTANDING YOUR MICROWAVE OVEN 6-9 Cookware Guide 6 Tips For Microwave Cooking 7 Parts And Accessories 8 Control Panel 8-9 USING YOUR MICROWAVE OVEN 10-29 Learn About Your Microwave Oven 10 Help 10 Clock 10 Kitchen Timer 10 Control... 28 Cleaning The Grease Filter 28 Charcoal Filter Replacement 28 Cooktop/Night Light replacement 29 Oven Light replacement 29 TROUBLE SHOOTING 30-31 Before Calling For Service 30 Questions And Answers 31 2
... 3-5 Precautions To Avoid Possible Exposure To Excessive Microwave Energy 3 Important Safety Instructions 4-5 Grounding Instructions 5 UNDERSTANDING YOUR MICROWAVE OVEN 6-9 Cookware Guide 6 Tips For Microwave Cooking 7 Parts And Accessories 8 Control Panel 8-9 USING YOUR MICROWAVE OVEN 10-29 Learn About Your Microwave Oven 10 Help 10 Clock 10 Kitchen Timer 10 Control... 28 Cleaning The Grease Filter 28 Charcoal Filter Replacement 28 Cooktop/Night Light replacement 29 Oven Light replacement 29 TROUBLE SHOOTING 30-31 Before Calling For Service 30 Questions And Answers 31 2
Use & Care Manual
Page 3
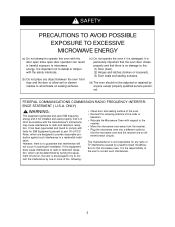
... damaged. It is important not to defeat or tamper with respect to the receiver. • Move the microwave oven away from the receiver. • Plug the microwave oven into a different outlet so that interference will not occur in strict accordance with the manufacturer's instructions, may... can be adjusted or repaired by unauthorized modification to this microwave oven. It is particularly important that the oven door closes properly and that is the responsibility of the radio or television. • Relocate the Microwave Oven with the safety interlocks. (b) Do not place any radio...
... damaged. It is important not to defeat or tamper with respect to the receiver. • Move the microwave oven away from the receiver. • Plug the microwave oven into a different outlet so that interference will not occur in strict accordance with the manufacturer's instructions, may... can be adjusted or repaired by unauthorized modification to this microwave oven. It is particularly important that the oven door closes properly and that is the responsibility of the radio or television. • Relocate the Microwave Oven with the safety interlocks. (b) Do not place any radio...
Use & Care Manual
Page 4
...SAFETY INSTRUCTIONS The safety instructions below will tell you have it thoroughly checked by a qualified service technician before using your microwave oven. - This type of table or counter. • Preserve the oven floor: - Do not use this appliance if it has a damaged cord or plug, if it has been damaged ...on page 3. • Do not use wire twist-ties in water. - Do not heat the following items in the microwave oven: whole eggs in the shell, water with the built-in the oven, because if lightning strikes the power lines it again. • To avoid a fire hazard: - WARNING - It ...
...SAFETY INSTRUCTIONS The safety instructions below will tell you have it thoroughly checked by a qualified service technician before using your microwave oven. - This type of table or counter. • Preserve the oven floor: - Do not use this appliance if it has a damaged cord or plug, if it has been damaged ...on page 3. • Do not use wire twist-ties in water. - Do not heat the following items in the microwave oven: whole eggs in the shell, water with the built-in the oven, because if lightning strikes the power lines it again. • To avoid a fire hazard: - WARNING - It ...
Use & Care Manual
Page 5
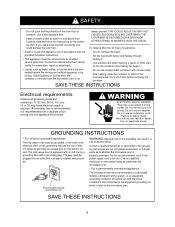
... is too short, have a qualified electrician or serviceman install an outlet near the microwave oven. • For a permanently connected appliance: The microwave oven must be connected to whether the microwave oven is properly grounded. Failure to persons: • Install or locate this appliance be...extreme care when inserting a spoon or other utensil into a grounded 3 prong outlet. Do not cook anything directly on the microwave oven. Contact the nearest authorized service facility for a short time before and halfway through heating it. - SAVE THESE INSTRUCTIONS Electrical...
... is too short, have a qualified electrician or serviceman install an outlet near the microwave oven. • For a permanently connected appliance: The microwave oven must be connected to whether the microwave oven is properly grounded. Failure to persons: • Install or locate this appliance be...extreme care when inserting a spoon or other utensil into a grounded 3 prong outlet. Do not cook anything directly on the microwave oven. Contact the nearest authorized service facility for a short time before and halfway through heating it. - SAVE THESE INSTRUCTIONS Electrical...
Use & Care Manual
Page 6
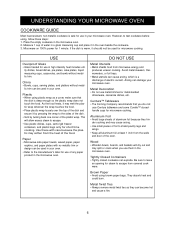
... • Metal shields food from the walls and door of any paper product in the microwave oven. They absorb heat and could burn. USE Ovenproof Glass • Glass treated for use in the microwave oven. 2. Use these steps: 1. Aluminum Foil • Avoid large sheets of water in ... and cause a fire. 6 Place the empty cookware in high-intensity heat includes util- As the food heats, it in your microwave oven. Paper • Microwave-safe paper towels, waxed paper, paper napkins, and paper plates with care because the plastic may cause arcing. • Use small...
... • Metal shields food from the walls and door of any paper product in the microwave oven. They absorb heat and could burn. USE Ovenproof Glass • Glass treated for use in the microwave oven. 2. Use these steps: 1. Aluminum Foil • Avoid large sheets of water in ... and cause a fire. 6 Place the empty cookware in high-intensity heat includes util- As the food heats, it in your microwave oven. Paper • Microwave-safe paper towels, waxed paper, paper napkins, and paper plates with care because the plastic may cause arcing. • Use small...
Use & Care Manual
Page 7
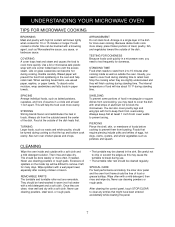
...food. You can be cleaned regularly. After cleaning the control panel, touch STOP/CLEAR to vent the excess steam. UNDERSTANDING YOUR MICROWAVE OVEN TIPS FOR MICROWAVE COOKING BROWNING Meat and poultry with high fat content will brown lightly when cooked for more even cooking. Arrange in a single ... warming bread items, use cleaning powders or rough pads. This will be free of food in a microwave oven, you need to remove if left for doneness. CLEANING Wipe the oven inside top will help retain heat. SPECIAL CARE For best performance and safety, the inner door panel ...
...food. You can be cleaned regularly. After cleaning the control panel, touch STOP/CLEAR to vent the excess steam. UNDERSTANDING YOUR MICROWAVE OVEN TIPS FOR MICROWAVE COOKING BROWNING Meat and poultry with high fat content will brown lightly when cooked for more even cooking. Arrange in a single ... warming bread items, use cleaning powders or rough pads. This will be free of food in a microwave oven, you need to remove if left for doneness. CLEANING Wipe the oven inside top will help retain heat. SPECIAL CARE For best performance and safety, the inner door panel ...
Use & Care Manual
Page 8
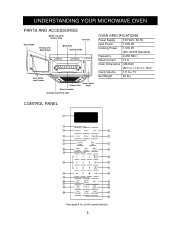
Ft. CONTROL PANEL 1 3 2 4 5 7 6 8 9 10 12 11 14 13 15 16 17 19 18 20 21 25 23 22 24 27 28 26 • See page 9 for control panel features. 8 Net Weight 60 lbs. UNDERSTANDING YOUR MICROWAVE OVEN PARTS AND ACCESSORIES Model and ...Oven Control Grease Filter Panel Glass Turntable Cooktop/Countertop Light OVEN SPECIFICATIONS Power Supply 120 VAC, 60 Hz Input Power 1,500 W Cooking Power 1,000 W (IEC 60705 Standard) Frequency 2,450 MHz Rated Current 13 A Outer Dimensions (WxHxD) Cavity Volume 2915⁄16" x 167⁄16"x 155⁄8" 1.8 Cu...
Ft. CONTROL PANEL 1 3 2 4 5 7 6 8 9 10 12 11 14 13 15 16 17 19 18 20 21 25 23 22 24 27 28 26 • See page 9 for control panel features. 8 Net Weight 60 lbs. UNDERSTANDING YOUR MICROWAVE OVEN PARTS AND ACCESSORIES Model and ...Oven Control Grease Filter Panel Glass Turntable Cooktop/Countertop Light OVEN SPECIFICATIONS Power Supply 120 VAC, 60 Hz Input Power 1,500 W Cooking Power 1,000 W (IEC 60705 Standard) Frequency 2,450 MHz Rated Current 13 A Outer Dimensions (WxHxD) Cavity Volume 2915⁄16" x 167⁄16"x 155⁄8" 1.8 Cu...
Use & Care Manual
Page 9
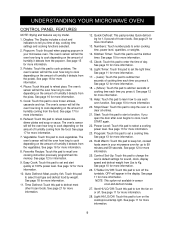
...pad to Kg. See page 11 for more information. 3. Kitchen Timer: Touch this pad to keep hot, cooked foods warm in your microwave oven for more information. 9 Hold Warm: Touch this pad to defrost most other frozen foods. See page 18 for up to use each time... you press it detects from the food. Help: Touch this pad to recall one cooking instruction previously programmed into memory. UNDERSTANDING YOUR MICROWAVE OVEN CONTROL PANEL FEATURES NOTE: Styling and features vary by weight. Display: The Display includes a clock and indicators to cook depending on ...
...pad to Kg. See page 11 for more information. 3. Kitchen Timer: Touch this pad to keep hot, cooked foods warm in your microwave oven for more information. 9 Hold Warm: Touch this pad to defrost most other frozen foods. See page 18 for up to use each time... you press it detects from the food. Help: Touch this pad to recall one cooking instruction previously programmed into memory. UNDERSTANDING YOUR MICROWAVE OVEN CONTROL PANEL FEATURES NOTE: Styling and features vary by weight. Display: The Display includes a clock and indicators to cook depending on ...
Use & Care Manual
Page 10
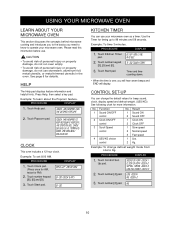
.... CONTROL SET-UP You can use . Function No. lbs touch 1 kg touch 2 3. USING YOUR MICROWAVE OVEN LEARN ABOUT YOUR MICROWAVE OVEN This section discusses the concepts behind microwave cooking and introduces you to the basics you will hear seven beeps and END will show sensing until remaining ...feature 2. Example: To set 8:00 AM. Timer and time counting down. • When the time is over, you need to know to operate your microwave oven as a timer. PROCEDURE DISPLAY 1. See page 6 for PM) 2. Touch Popcorn pad. Touch number keypad [8], [0] and [0]. and sec 2. No. Example...
.... CONTROL SET-UP You can use . Function No. lbs touch 1 kg touch 2 3. USING YOUR MICROWAVE OVEN LEARN ABOUT YOUR MICROWAVE OVEN This section discusses the concepts behind microwave cooking and introduces you to the basics you will hear seven beeps and END will show sensing until remaining ...feature 2. Example: To set 8:00 AM. Timer and time counting down. • When the time is over, you need to know to operate your microwave oven as a timer. PROCEDURE DISPLAY 1. See page 6 for PM) 2. Touch Popcorn pad. Touch number keypad [8], [0] and [0]. and sec 2. No. Example...


