Installation Instructions
Page 1
Household Appliances Over-the-Range Microwave Installation Instructions For Models: HMV9302, HMV9305, HMV9306, HMV9307 PLEASE READ ENTIRE INSTRUCTIONS BEFORE PROCEEDING IMPORTANT: Save these instructions for the owner. INSTALLER: Please leave these instructions for future reference. OWNER: Please retain these Installation Instructions with this unit for the local electrical inspector's use.
Household Appliances Over-the-Range Microwave Installation Instructions For Models: HMV9302, HMV9305, HMV9306, HMV9307 PLEASE READ ENTIRE INSTRUCTIONS BEFORE PROCEEDING IMPORTANT: Save these instructions for the owner. INSTALLER: Please leave these instructions for future reference. OWNER: Please retain these Installation Instructions with this unit for the local electrical inspector's use.
Installation Instructions
Page 2
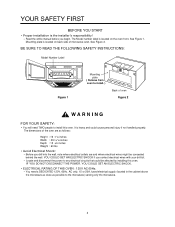
...GET AN ELECTRIC SHOCK if you begin. Before you drill into the wall, note where electrical outlets are as possible to the microwave) serving only the microwave. 2 Locate and disconnect the power to install this oven. Mounting plate is heavy and could be concealed behind the wall. The... - BE SURE TO READ THE FOLLOWING SAFETY INSTRUCTIONS: Model Number Label Figure 1 Mounting plate ( Remove from oven to install. ) Back of microwave oven. You need TWO people to any electrical circuits that could cause personal injury if not handled properly. See Figure 2. The Model number label ...
...GET AN ELECTRIC SHOCK if you begin. Before you drill into the wall, note where electrical outlets are as possible to the microwave) serving only the microwave. 2 Locate and disconnect the power to install this oven. Mounting plate is heavy and could be concealed behind the wall. The... - BE SURE TO READ THE FOLLOWING SAFETY INSTRUCTIONS: Model Number Label Figure 1 Mounting plate ( Remove from oven to install. ) Back of microwave oven. You need TWO people to any electrical circuits that could cause personal injury if not handled properly. See Figure 2. The Model number label ...
Installation Instructions
Page 3
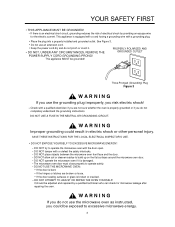
... ANY CIRCUMSTANCES, REMOVE THE GROUNDED OUTLET POWER SUPPLY CORD GROUNDING PRONG! This appliance MUST be adjusted and repaired by providing an escape wire for microwave leakage after repairing the oven. DO NOT allow soil or cleaner residue to operate safely. - DO NOT USE A FUSE IN THE NEUTRAL ...OR GROUNDING CIRCUIT. DO NOT place objects between the microwave oven front face and the door. - See Figure 3. • Do not use an extension cord. • Keep the power cord dry and...
... ANY CIRCUMSTANCES, REMOVE THE GROUNDED OUTLET POWER SUPPLY CORD GROUNDING PRONG! This appliance MUST be adjusted and repaired by providing an escape wire for microwave leakage after repairing the oven. DO NOT allow soil or cleaner residue to operate safely. - DO NOT USE A FUSE IN THE NEUTRAL ...OR GROUNDING CIRCUIT. DO NOT place objects between the microwave oven front face and the door. - See Figure 3. • Do not use an extension cord. • Keep the power cord dry and...
Installation Instructions
Page 4
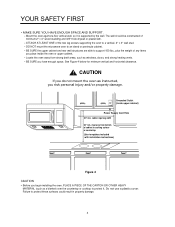
DO NOT mount the microwave oven to support 150 lbs., plus the weight of cabinet to cooking surface or countertop (Use templates included with installation instructions) Figure 4 CAUTION • Before ...
DO NOT mount the microwave oven to support 150 lbs., plus the weight of cabinet to cooking surface or countertop (Use templates included with installation instructions) Figure 4 CAUTION • Before ...
Installation Instructions
Page 7
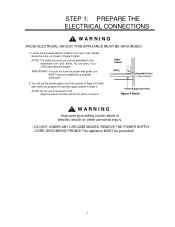
... ( Inside Cabinet ) Power-Supply-Cord Hole Figure 4 Detail WARNING Improper grounding could result in Figure 4 Detail. This appliance MUST be on a circuit dedicated to the microwave oven 120V, 60Hz., AC only with a 15 or 20A fused electrical supply. STEP 1: PREPARE THE ELECTRICAL CONNECTIONS WARNING AVOID ELECTRICAL SHOCK! You will cut the...
... ( Inside Cabinet ) Power-Supply-Cord Hole Figure 4 Detail WARNING Improper grounding could result in Figure 4 Detail. This appliance MUST be on a circuit dedicated to the microwave oven 120V, 60Hz., AC only with a 15 or 20A fused electrical supply. STEP 1: PREPARE THE ELECTRICAL CONNECTIONS WARNING AVOID ELECTRICAL SHOCK! You will cut the...
Installation Instructions
Page 10
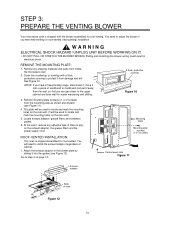
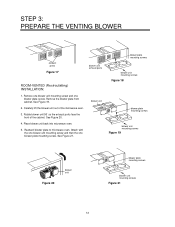
... any ), on the rear wall. (It will need to install the exhaust adaptor regardless of oven Figure 12 10 STEP 3: PREPARE THE VENTING BLOWER Your microwave oven is shipped assembled for roof-vented. WARNING ELECTRICAL SHOCK HAZARD! This plate will be used to locate and mark the mounting holes on the... Figure 11 Exhaust adaptor Back of cabinet. 1. ROOF-VENTED INSTALLATION: This oven is shipped with a thick, protective covering to protect it away from inside the microwave oven. 2. REMOVE THE MOUNTING PLATE: 1.
... any ), on the rear wall. (It will need to install the exhaust adaptor regardless of oven Figure 12 10 STEP 3: PREPARE THE VENTING BLOWER Your microwave oven is shipped assembled for roof-vented. WARNING ELECTRICAL SHOCK HAZARD! This plate will be used to locate and mark the mounting holes on the... Figure 11 Exhaust adaptor Back of cabinet. 1. ROOF-VENTED INSTALLATION: This oven is shipped with a thick, protective covering to protect it away from inside the microwave oven. 2. REMOVE THE MOUNTING PLATE: 1.
Installation Instructions
Page 11
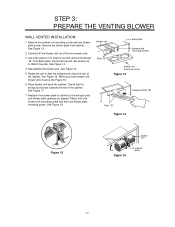
... from Back plate. When you insert blower unit, blower wire must be like Figure 16. 6. Check that the exhaust ports face the rear of the microwave oven. 3. blower unit back plate blower plate mounting screws Parts "B" blower unit mounting screw Figure 13 Parts "B" Knockout Parts "B" Figure 14 Figure 15 blower unit...
... from Back plate. When you insert blower unit, blower wire must be like Figure 16. 6. Check that the exhaust ports face the rear of the microwave oven. 3. blower unit back plate blower plate mounting screws Parts "B" blower unit mounting screw Figure 13 Parts "B" Knockout Parts "B" Figure 14 Figure 15 blower unit...
Installation Instructions
Page 12
See Figure 20. 4. Reattach blower plate to microwave oven. See Figure 19. 2. See Figure 21. Attach with the one blower unit mounting screw and then the one...unit exhaust ports ROOM-VENTED (Recirculating) INSTALLATION: 1. Rotate blower unit 90˚ so the exhaust ports face the front of the microwave oven. 3. blower unit blower plate mounting screws blower unit mounting screws Figure 18 blower plate mounting screws blower unit mounting screws Figure...the blower unit out of the cabinet. Remove the blower plate from cabinet. Place blower unit back into microwave oven. 5.
See Figure 20. 4. Reattach blower plate to microwave oven. See Figure 19. 2. See Figure 21. Attach with the one blower unit mounting screw and then the one...unit exhaust ports ROOM-VENTED (Recirculating) INSTALLATION: 1. Rotate blower unit 90˚ so the exhaust ports face the front of the microwave oven. 3. blower unit blower plate mounting screws blower unit mounting screws Figure 18 blower plate mounting screws blower unit mounting screws Figure...the blower unit out of the cabinet. Remove the blower plate from cabinet. Place blower unit back into microwave oven. 5.
Installation Instructions
Page 13
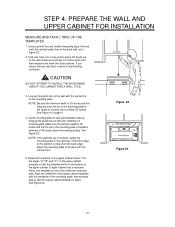
... with the centerline of the mounting plate to the range or counter top is at least 30 inches. CAUTION DO NOT ATTEMPT TO INSTALL THE MICROWAVE OVEN IF YOU CANNOT FIND A WALL STUD. 3. Line up the plumb line on mounting plate. Make sure the minimum width is 30 inches and that...
... with the centerline of the mounting plate to the range or counter top is at least 30 inches. CAUTION DO NOT ATTEMPT TO INSTALL THE MICROWAVE OVEN IF YOU CANNOT FIND A WALL STUD. 3. Line up the plumb line on mounting plate. Make sure the minimum width is 30 inches and that...
Installation Instructions
Page 14
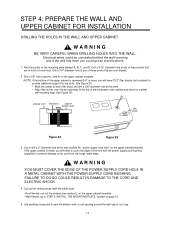
... is metal, you could be concealed behind the wall covering and if the drill hits them you will need to cover the edge of the microwave oven cabinet and attach to cabinet with masking tape. If the upper cabinet is recessed 3/4" or more, you will need 2"x2" filler blocks (not included...
... is metal, you could be concealed behind the wall covering and if the drill hits them you will need to cover the edge of the microwave oven cabinet and attach to cabinet with masking tape. If the upper cabinet is recessed 3/4" or more, you will need 2"x2" filler blocks (not included...
Installation Instructions
Page 17
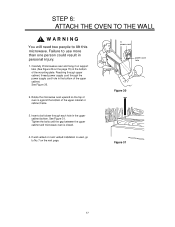
... power supply cord through each hole in the bottom of the upper cabinet or cabinet frame. power cord power cord hole Figure 30 3. Rotate the microwave oven upward so the top of oven is against the bottom of the upper cabinet. See Figure 31. If wall vented or room vented installation... is closed. 4. Tighten the bolts until the gap between the upper cabinet and microwave oven is used, go to No.7 on the page 15) at the bottom of the mounting plate. Figure 31 17 STEP 6: ATTACH THE OVEN TO...
... power supply cord through each hole in the bottom of the upper cabinet or cabinet frame. power cord power cord hole Figure 30 3. Rotate the microwave oven upward so the top of oven is against the bottom of the upper cabinet. See Figure 31. If wall vented or room vented installation... is closed. 4. Tighten the bolts until the gap between the upper cabinet and microwave oven is used, go to No.7 on the page 15) at the bottom of the mounting plate. Figure 31 17 STEP 6: ATTACH THE OVEN TO...
Installation Instructions
Page 18
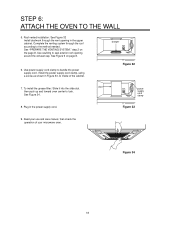
... system through the vent opening around the exhaust cap. See Figure 34. STEP 6: ATTACH THE OVEN TO THE WALL 5. Use caulking to inside of your microwave oven. power supply cord clamp 8. Figure 33 9. Install the power supply cord clamp, using a screw as shown in Figure 33, to seal exterior roof opening...
... system through the vent opening around the exhaust cap. See Figure 34. STEP 6: ATTACH THE OVEN TO THE WALL 5. Use caulking to inside of your microwave oven. power supply cord clamp 8. Figure 33 9. Install the power supply cord clamp, using a screw as shown in Figure 33, to seal exterior roof opening...
Use & Care Manual
Page 1
OWNER: Please retain these instructions for the local electrical inspector's use. Household Appliances Over-the-Range Microwave Use and Care Manual For Models: HMV9302, HMV9305, HMV9306, HMV9307 PLEASE READ ENTIRE INSTRUCTIONS BEFORE PROCEEDING IMPORTANT: Save these instructions for future reference. INSTALLER: Please leave these Installation Instructions with this unit for the owner.
OWNER: Please retain these instructions for the local electrical inspector's use. Household Appliances Over-the-Range Microwave Use and Care Manual For Models: HMV9302, HMV9305, HMV9306, HMV9307 PLEASE READ ENTIRE INSTRUCTIONS BEFORE PROCEEDING IMPORTANT: Save these instructions for future reference. INSTALLER: Please leave these Installation Instructions with this unit for the owner.
Use & Care Manual
Page 2
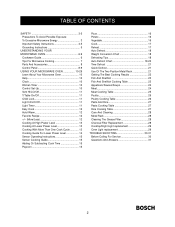
TABLE OF CONTENTS SAFETY 3-5 Precautions To Avoid Possible Exposure To Excessive Microwave Energy 3 Important Safety Instructions 4-5 Grounding Instructions 5 UNDERSTANDING YOUR MICROWAVE OVEN 6-9 Cookware Guide 6 Tips For Microwave Cooking 7 Parts And Accessories 8 Control Panel 8-9 USING YOUR MICROWAVE OVEN 10-29 Learn About Your Microwave Oven 10 Help 10 Clock 10 Kitchen Timer 10 Control Set-Up 10...
TABLE OF CONTENTS SAFETY 3-5 Precautions To Avoid Possible Exposure To Excessive Microwave Energy 3 Important Safety Instructions 4-5 Grounding Instructions 5 UNDERSTANDING YOUR MICROWAVE OVEN 6-9 Cookware Guide 6 Tips For Microwave Cooking 7 Parts And Accessories 8 Control Panel 8-9 USING YOUR MICROWAVE OVEN 10-29 Learn About Your Microwave Oven 10 Help 10 Clock 10 Kitchen Timer 10 Control Set-Up 10...
Use & Care Manual
Page 3
...• Clean door and sealing surface of the oven. • Reorient the receiving antenna of the radio or television. • Relocate the Microwave Oven with limits for any object between the oven front face and the door or allow soil or cleaner residue to accumulate on different branch...television reception, which are on sealing surfaces. (c) Do not operate the oven if it is damaged. It is no guarantee that the microwave oven and the receiver are designed to provide reasonable protection against such interference in strict accordance with the door open since open-door operation ...
...• Clean door and sealing surface of the oven. • Reorient the receiving antenna of the radio or television. • Relocate the Microwave Oven with limits for any object between the oven front face and the door or allow soil or cleaner residue to accumulate on different branch...television reception, which are on sealing surfaces. (c) Do not operate the oven if it is damaged. It is no guarantee that the microwave oven and the receiver are designed to provide reasonable protection against such interference in strict accordance with the door open since open-door operation ...
Use & Care Manual
Page 4
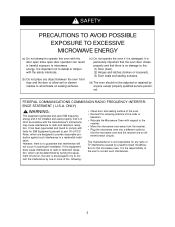
.... • Do not run the oven empty, without close supervision. • Read and follow the specific PRECAUTIONS TO AVOID POSSIBLE EXPOSURE TO EXCESSIVE MICROWAVE ENERGY found on HIGH when cooking foods that touch the door, use only mild, non-abrasive soaps or detergents and a sponge or soft cloth. ...may damage the filters. • Do not tamper with oil or fat, sealed containers, or closed . - These items may cause the oven to excessive microwave energy: • Read all the instructions before using it may explode. • Do not cover or block any openings in the oven. • ...
.... • Do not run the oven empty, without close supervision. • Read and follow the specific PRECAUTIONS TO AVOID POSSIBLE EXPOSURE TO EXCESSIVE MICROWAVE ENERGY found on HIGH when cooking foods that touch the door, use only mild, non-abrasive soaps or detergents and a sponge or soft cloth. ...may damage the filters. • Do not tamper with oil or fat, sealed containers, or closed . - These items may cause the oven to excessive microwave energy: • Read all the instructions before using it may explode. • Do not cover or block any openings in the oven. • ...
Use & Care Manual
Page 5
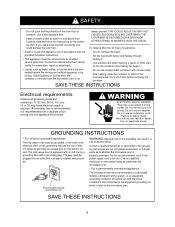
...the oven floor or turntable. Do not overheat the liquid. - SAVE THESE INSTRUCTIONS Electrical requirements Observe all cord connected appliances: The microwave oven must be plugged into an outlet that a separate circuit serving only this appliance only in a risk of the grounding can result... or locate this appliance be grounded. In the event of an electrical short circuit, grounding reduces the risk of injury to whether the microwave oven is not - Ensure proper ground exists before and halfway through heating it. - Stir the liquid both before use WARNING: Improper use...
...the oven floor or turntable. Do not overheat the liquid. - SAVE THESE INSTRUCTIONS Electrical requirements Observe all cord connected appliances: The microwave oven must be plugged into an outlet that a separate circuit serving only this appliance only in a risk of the grounding can result... or locate this appliance be grounded. In the event of an electrical short circuit, grounding reduces the risk of injury to whether the microwave oven is not - Ensure proper ground exists before and halfway through heating it. - Stir the liquid both before use WARNING: Improper use...
Use & Care Manual
Page 6
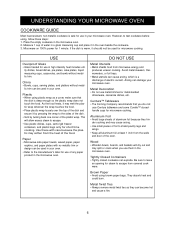
... dishes, bread dishes, pie plates, cake plates, liquid measuring cups, casseroles, and bowls without metal- This will dry out and may soften from microwave energy and produces uneven cooking. Aluminum Foil • Avoid large sheets of the food. However, to escape. • Use plastic dishes, cups... use of the oven. Plastic • When using brown paper bags. Tightly Closed Containers • Tightly closed cookware can damage your microwave oven. Microwave on 100% power for steam to leave an opening for 1 minute. Be sure to escape from the walls and door of any ...
... dishes, bread dishes, pie plates, cake plates, liquid measuring cups, casseroles, and bowls without metal- This will dry out and may soften from microwave energy and produces uneven cooking. Aluminum Foil • Avoid large sheets of the food. However, to escape. • Use plastic dishes, cups... use of the oven. Plastic • When using brown paper bags. Tightly Closed Containers • Tightly closed cookware can damage your microwave oven. Microwave on 100% power for steam to leave an opening for 1 minute. Be sure to escape from the walls and door of any ...
Use & Care Manual
Page 7
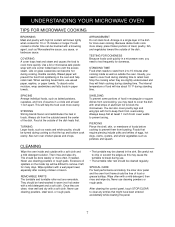
...with a wet paper towel, especially after cooking inside and outside the oven. Once they will help retain heat. UNDERSTANDING YOUR MICROWAVE OVEN TIPS FOR MICROWAVE COOKING BROWNING Meat and poultry with high fat content will be done weekly or more slowly, place thicker portions of meat,..., soy sauce, or barbecue sauce. Foods that might have been entered accidentally while cleaning the panel. 7 They should be cleaned in a microwave oven, you may be cleaned regularly. Food at least 1 inch apart. SHIELDING To prevent some portions of eggs, hot dogs, clams, oysters...
...with a wet paper towel, especially after cooking inside and outside the oven. Once they will help retain heat. UNDERSTANDING YOUR MICROWAVE OVEN TIPS FOR MICROWAVE COOKING BROWNING Meat and poultry with high fat content will be done weekly or more slowly, place thicker portions of meat,..., soy sauce, or barbecue sauce. Foods that might have been entered accidentally while cleaning the panel. 7 They should be cleaned in a microwave oven, you may be cleaned regularly. Food at least 1 inch apart. SHIELDING To prevent some portions of eggs, hot dogs, clams, oysters...
Use & Care Manual
Page 8
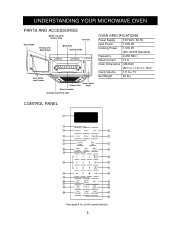
... 11 14 13 15 16 17 19 18 20 21 25 23 22 24 27 28 26 • See page 9 for control panel features. 8 Ft. UNDERSTANDING YOUR MICROWAVE OVEN PARTS AND ACCESSORIES Model and Serial Number Plate Vent Grill Door Handle Window with Metal Shield Metal Rack Cooking Guide Door Safety Lock... W Cooking Power 1,000 W (IEC 60705 Standard) Frequency 2,450 MHz Rated Current 13 A Outer Dimensions (WxHxD) Cavity Volume 2915⁄16" x 167⁄16"x 155⁄8" 1.8 Cu.
... 11 14 13 15 16 17 19 18 20 21 25 23 22 24 27 28 26 • See page 9 for control panel features. 8 Ft. UNDERSTANDING YOUR MICROWAVE OVEN PARTS AND ACCESSORIES Model and Serial Number Plate Vent Grill Door Handle Window with Metal Shield Metal Rack Cooking Guide Door Safety Lock... W Cooking Power 1,000 W (IEC 60705 Standard) Frequency 2,450 MHz Rated Current 13 A Outer Dimensions (WxHxD) Cavity Volume 2915⁄16" x 167⁄16"x 155⁄8" 1.8 Cu.


