Use & Care Manual
Page 2
Warming Drawer (some models 19 About the Warming Drawer 19 Operation 20 Getting the Most Out of Your Appliance 21 Getting the Most Out of Your Cooktop 21 Getting ...
Warming Drawer (some models 19 About the Warming Drawer 19 Operation 20 Getting the Most Out of Your Appliance 21 Getting the Most Out of Your Cooktop 21 Getting ...
Use & Care Manual
Page 7
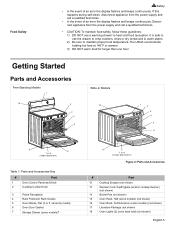
... warmer. 3) DO NOT warm food for longer than one hour. Getting Started Parts and Accessories Free-Standing Models 1 10 2 3 4 5 Slide-In Models 10 1 2 3 4 5 6 9 6 7 or 8 (model dependent) Table 1: Parts and Accessories Key # Part 1 Oven Control Panel and Knob 2 Cooktop Control Knob... 3 Probe Receptacle 4 Rack Positions/ Rack Guides 5 Oven Racks, Flat (2 or 3; varies by model) 6 Oven Door Gasket 7 Storage Drawer (some models)a 9 7 or 8 (model dependent) Figure 2: Parts and Accessories # Part 12 Cooktop Scraper (not shown) 13 Weiman Cook Top® ...
... warmer. 3) DO NOT warm food for longer than one hour. Getting Started Parts and Accessories Free-Standing Models 1 10 2 3 4 5 Slide-In Models 10 1 2 3 4 5 6 9 6 7 or 8 (model dependent) Table 1: Parts and Accessories Key # Part 1 Oven Control Panel and Knob 2 Cooktop Control Knob... 3 Probe Receptacle 4 Rack Positions/ Rack Guides 5 Oven Racks, Flat (2 or 3; varies by model) 6 Oven Door Gasket 7 Storage Drawer (some models)a 9 7 or 8 (model dependent) Figure 2: Parts and Accessories # Part 12 Cooktop Scraper (not shown) 13 Weiman Cook Top® ...

Use & Care Manual
Page 8
...cooktop is still hot. Dual Element The dual element consists of two radiant ribbon elements within the same heating area. Bridge Element (some models)a 9 Model # and Serial # Plate 10 Oven Vent 11 Anti-Tip Bracket (not shown) 19 Convection Fan and Element (oven back wall; ... foods at serving temperatures for a short time. Getting Started Table 1: Parts and Accessories Key # Part # Part 8 Warming Drawer (some models) The bridge element joins the front single element and the back single element to create one of the following combinations: • Three flat ...
...cooktop is still hot. Dual Element The dual element consists of two radiant ribbon elements within the same heating area. Bridge Element (some models)a 9 Model # and Serial # Plate 10 Oven Vent 11 Anti-Tip Bracket (not shown) 19 Convection Fan and Element (oven back wall; ... foods at serving temperatures for a short time. Getting Started Table 1: Parts and Accessories Key # Part # Part 8 Warming Drawer (some models) The bridge element joins the front single element and the back single element to create one of the following combinations: • Three flat ...

Use & Care Manual
Page 9
... the user. However, the top section extends beyond the bottom section bringing the food closer to cooking foods. Back of rack Extension Oven Rack (some models) Front of rack Insert rack with the back of the rack toward you . When the stop is reached, tilt rack up to a horizontal position and...
... the user. However, the top section extends beyond the bottom section bringing the food closer to cooking foods. Back of rack Extension Oven Rack (some models) Front of rack Insert rack with the back of the rack toward you . When the stop is reached, tilt rack up to a horizontal position and...

Use & Care Manual
Page 10
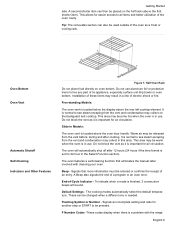
... side of top rack towards you can be under the rack guide on the other side toward the back of Rack Half Oven Rack (Some Models) English 8 Figure 6: Reassembly Cleaning Clean rack with hot sudsy water. Rotate one side of the rack below and a shorter item (such as a half-sized rack...
... side of top rack towards you can be under the rack guide on the other side toward the back of Rack Half Oven Rack (Some Models) English 8 Figure 6: Reassembly Cleaning Clean rack with hot sudsy water. Rotate one side of the rack below and a shorter item (such as a half-sized rack...
Use & Care Manual
Page 11
Free-standing Models: The oven vent is important for air circulation. Do not block the vent as it is finished, 3 consecutive beeps will automatically shut off after cooking. ... any part of an appliance, especially surface unit drip bowls or oven bottom. Getting Started side. It is a problem with cleaning your oven. Slide-in Models: The oven vent is normal to see steam escaping from the vent and condensation may become hot when the oven is in the Select Function...
Free-standing Models: The oven vent is important for air circulation. Do not block the vent as it is finished, 3 consecutive beeps will automatically shut off after cooking. ... any part of an appliance, especially surface unit drip bowls or oven bottom. Getting Started side. It is a problem with cleaning your oven. Slide-in Models: The oven vent is normal to see steam escaping from the vent and condensation may become hot when the oven is in the Select Function...

Use & Care Manual
Page 12
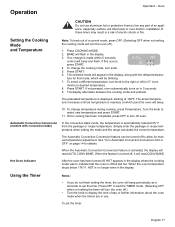
...set the oven temperature, set the time(s) and to set or change the time of day or the timer. Each counts down the time in models only) The cooling fan runs during heavy cooktop use the touchpad, press the center part of oven during any convection mode. Also displays the warming... to change the time of the mode. Light - With less than 60 minutes remaining, the timer also displays seconds. Indicates that the warming drawer (some models) is selected. Press Time and turn off oven and/or warming drawer. Off - Indicates that is on the backguard, are two timers - Shows the...
...set the oven temperature, set the time(s) and to set or change the time of day or the timer. Each counts down the time in models only) The cooling fan runs during heavy cooktop use the touchpad, press the center part of oven during any convection mode. Also displays the warming... to change the time of the mode. Light - With less than 60 minutes remaining, the timer also displays seconds. Indicates that the warming drawer (some models) is selected. Press Time and turn off oven and/or warming drawer. Off - Indicates that is on the backguard, are two timers - Shows the...

Use & Care Manual
Page 17
... cause permanent damage. • Plastic, paper and cloth can permanently damage the pan, the element and the cooktop glass. Turn knob left or right to models) the symbol (counterclockwise).
... cause permanent damage. • Plastic, paper and cloth can permanently damage the pan, the element and the cooktop glass. Turn knob left or right to models) the symbol (counterclockwise).

Use & Care Manual
Page 18
To turn on all three elements, Push in and turn ON the other single element, too. Depending on the model, the bridge element is either activated in on the control knob and turn clockwise to determine your configuration. Oven About the Oven English 16 This ... 12: Bridge Element Knob Operation - Inner Element Only All Three Elements Inner and Middle Element Figure 11: Triple Element Knob Bridge Element Control Knob (some models) The bridge element connects two single elements to set the heat level. Turn knob left or right to create one long cooking surface.
To turn on all three elements, Push in and turn ON the other single element, too. Depending on the model, the bridge element is either activated in on the control knob and turn clockwise to determine your configuration. Oven About the Oven English 16 This ... 12: Bridge Element Knob Operation - Inner Element Only All Three Elements Inner and Middle Element Figure 11: Triple Element Knob Bridge Element Control Knob (some models) The bridge element connects two single elements to set the heat level. Turn knob left or right to create one long cooking surface.
Use & Care Manual
Page 19
... 100ºF. To change is no longer seen in the display where the cooking mode was to allow for manual temperature adjustment. Automatic Convection Conversion (models with the default tempera- Simply enter the package or recipe temperature when setting the mode and the range calculates the correct temperature. Oven CAUTION Do...
... 100ºF. To change is no longer seen in the display where the cooking mode was to allow for manual temperature adjustment. Automatic Convection Conversion (models with the default tempera- Simply enter the package or recipe temperature when setting the mode and the range calculates the correct temperature. Oven CAUTION Do...

Use & Care Manual
Page 21
... press TIME. 9. Display will show TIME COOK END and reminder beeps will appear. 5. Food left in the oven. 3. Using the Probe (some models)" on page 25 for detailed instructions. Oven temperature can be set for the probe is installed in the oven will appear in dis- Setting the.... Hours Flash. 5: 00 PM 400 oF HR:MIN DELAYED BAKE 5. Press OFF to BAKE END or BAKE TIME. 3. See "The Probe (some models) This section explains how to change oven temperature if necessary. 6. Prepare meat and place in roasting pan (or on recommended oven rack. Press COOKING MODE...
... press TIME. 9. Display will show TIME COOK END and reminder beeps will appear. 5. Food left in the oven. 3. Using the Probe (some models)" on page 25 for detailed instructions. Oven temperature can be set for the probe is installed in the oven will appear in dis- Setting the.... Hours Flash. 5: 00 PM 400 oF HR:MIN DELAYED BAKE 5. Press OFF to BAKE END or BAKE TIME. 3. See "The Probe (some models) This section explains how to change oven temperature if necessary. 6. Prepare meat and place in roasting pan (or on recommended oven rack. Press COOKING MODE...
Use & Care Manual
Page 22
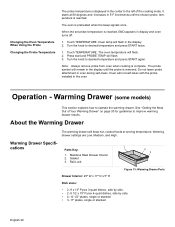
... is complete. Note: Always remove probe from oven when cooking is preheated when the beep signals once. The probe symbol will flash. 3. Warming Drawer (some models) This section explains how to desired temperature and press START again. About the Warming Drawer The warming drawer will not self-clean with the probe...
... is complete. Note: Always remove probe from oven when cooking is preheated when the beep signals once. The probe symbol will flash. 3. Warming Drawer (some models) This section explains how to desired temperature and press START again. About the Warming Drawer The warming drawer will not self-clean with the probe...

Use & Care Manual
Page 23
...: 20 minutes Turning on the desired heat level. 2. Note: The warming drawer does not operate with the drawer or a hot cooking container. Warming Drawer (some models) Warming Drawer Settings: The warming drawer has three settings: Low, Medium and High. Turn knob to select heat setting. 4. Press START. 1. Press START. 4. Turn knob...
...: 20 minutes Turning on the desired heat level. 2. Note: The warming drawer does not operate with the drawer or a hot cooking container. Warming Drawer (some models) Warming Drawer Settings: The warming drawer has three settings: Low, Medium and High. Turn knob to select heat setting. 4. Press START. 1. Press START. 4. Turn knob...
Use & Care Manual
Page 25
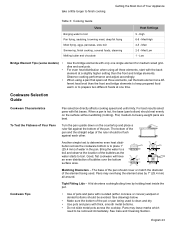
... without wobbling (rocking). See drawings below. • Make sure the bottom of bubbles over the bottom surface area. Med-High 4-5 - Low Bridge Element Tips (some models) • • • Use the bridge elements with thick, smooth metal bottoms. • Do not slide metal pots across the cookware bottom is hot, the...
... without wobbling (rocking). See drawings below. • Make sure the bottom of bubbles over the bottom surface area. Med-High 4-5 - Low Bridge Element Tips (some models) • • • Use the bridge elements with thick, smooth metal bottoms. • Do not slide metal pots across the cookware bottom is hot, the...

Use & Care Manual
Page 27
... your ability to easily connect the probe to the receptacle and to keep food at serving temperature. • Use the Warming setting on the model, you may hear the convection fan while the oven is 170°. • Foods that must be kept moist should be displayed. Inserting ... the oven if the recipe recommends it is cooking with a lid or aluminum foil. Allow standing time (10 -20 minutes) before using the probe (some models) Oven Cooking Modes Getting the Most Out of a yeast dough. • The Proofing mode temperatures are 140° - 220° F. Place oven racks...
... your ability to easily connect the probe to the receptacle and to keep food at serving temperature. • Use the Warming setting on the model, you may hear the convection fan while the oven is 170°. • Foods that must be kept moist should be displayed. Inserting ... the oven if the recipe recommends it is cooking with a lid or aluminum foil. Allow standing time (10 -20 minutes) before using the probe (some models) Oven Cooking Modes Getting the Most Out of a yeast dough. • The Proofing mode temperatures are 140° - 220° F. Place oven racks...

Use & Care Manual
Page 30
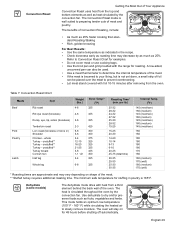
... least 1 1/2" thick. • Turn meats once halfway through the cooking time (See Convection Broil Chart for browning breads, casseroles and other foods. Convection Broil (some models) Convection Broil is typically not recommended for examples). • Use the broil pan and grid included with your range. • Do not cover the broiler...
... least 1 1/2" thick. • Turn meats once halfway through the cooking time (See Convection Broil Chart for browning breads, casseroles and other foods. Convection Broil (some models) Convection Broil is typically not recommended for examples). • Use the broil pan and grid included with your range. • Do not cover the broiler...
Use & Care Manual
Page 31
... the meat. • If the meat is browned to your liking, but is circulated throughout the oven by the convection fan. unstuffed** Turkey - Dehydrate (some models) The dehydrate mode dries with the range for examples. • Do not cover meat or use cooking bags. • Use the broil pan and grid...
... the meat. • If the meat is browned to your liking, but is circulated throughout the oven by the convection fan. unstuffed** Turkey - Dehydrate (some models) The dehydrate mode dries with the range for examples. • Do not cover meat or use cooking bags. • Use the broil pan and grid...
Use & Care Manual
Page 41
...from whom you purchased the Range. Be sure that runs during modes that the Range was purchased (1) for your use without charge. On some models, the convection fan will repair or replace, at BSH's option. It is preheating for the Range, you , the first using purchaser and are...shall become the property of BSH, at its normal and customary manner (commercial use of the Range shall not be effective unless authorized in models also have been altered, defaced of removed. THIS WARRANTY IS IN LIEU OF ALL OTHER EXPRESS WARRANTIES. If your exclusive remedies with applicable state...
...from whom you purchased the Range. Be sure that runs during modes that the Range was purchased (1) for your use without charge. On some models, the convection fan will repair or replace, at BSH's option. It is preheating for the Range, you , the first using purchaser and are...shall become the property of BSH, at its normal and customary manner (commercial use of the Range shall not be effective unless authorized in models also have been altered, defaced of removed. THIS WARRANTY IS IN LIEU OF ALL OTHER EXPRESS WARRANTIES. If your exclusive remedies with applicable state...
Installation Instructions
Page 6
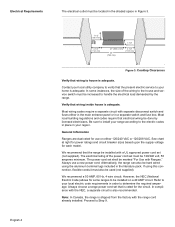
... ranges to the electric codes in place in your home is adequate. We recommend that the present electric service to house is rated for each model. Proceed to determine the required amperage. Always use on a 40 AMP circuit. If using the aluminum terminal lugs included in the literature pack. However, the...
... ranges to the electric codes in place in your home is adequate. We recommend that the present electric service to house is rated for each model. Proceed to determine the required amperage. Always use on a 40 AMP circuit. If using the aluminum terminal lugs included in the literature pack. However, the...
Installation Instructions
Page 7
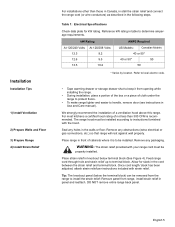
... included with the hood. Remove any packaging. kW Rating AMPS Required At 120/240 Volts: 12.3 12.6 13.5 At 120/208 Volts: 9.2 9.5 10.2 US Models: Canadian Models: 40 or 50* 40 or 50* 50 50 * Varies by location. Seal any holes in Use and Care manual). Refer to local electric code. •...
... included with the hood. Remove any packaging. kW Rating AMPS Required At 120/240 Volts: 12.3 12.6 13.5 At 120/208 Volts: 9.2 9.5 10.2 US Models: Canadian Models: 40 or 50* 40 or 50* 50 50 * Varies by location. Seal any holes in Use and Care manual). Refer to local electric code. •...


