Use & Care Manual
Page 7
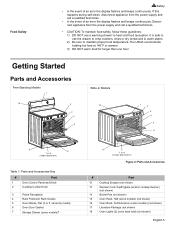
...1 2 3 4 5 6 9 6 7 or 8 (model dependent) Table 1: Parts and Accessories Key # Part 1 Oven Control Panel and Knob 2 Cooktop Control Knob 3 Probe Receptacle 4 Rack Positions/ Rack Guides 5 Oven Racks, Flat (2 or 3; Disconnect appliance from the power supply and call a qualified technician. • CAUTION: To maintain food safety... is safe to use the drawer to crisp crackers, chips or dry cereal and to warm plates. 2) Be sure to maintain proper food temperature. varies by model) 6 Oven Door Gasket 7 Storage Drawer (some models)a 9 7 or 8 (model dependent) Figure 2: Parts and ...
...1 2 3 4 5 6 9 6 7 or 8 (model dependent) Table 1: Parts and Accessories Key # Part 1 Oven Control Panel and Knob 2 Cooktop Control Knob 3 Probe Receptacle 4 Rack Positions/ Rack Guides 5 Oven Racks, Flat (2 or 3; Disconnect appliance from the power supply and call a qualified technician. • CAUTION: To maintain food safety... is safe to use the drawer to crisp crackers, chips or dry cereal and to warm plates. 2) Be sure to maintain proper food temperature. varies by model) 6 Oven Door Gasket 7 Storage Drawer (some models)a 9 7 or 8 (model dependent) Figure 2: Parts and ...

Use & Care Manual
Page 12
... operates during all oven modes. Press Time and turn the control knob to change the time of day or the timer. Oven Temperature - Probe Indicator (some models, the convection fan also runs during preheat for the mode that are two timers - Start - Press pad ... for the bake mode. It may feel warm air as well. Note: On some models) - Press pad to select cooking temperature. Shows the oven temperature. Preheat Temperature - Shows the cooking elements that is selected. Press pad to toggle between timer and clock display. TIMER 1 AND TIMER 2; ...
... operates during all oven modes. Press Time and turn the control knob to change the time of day or the timer. Oven Temperature - Probe Indicator (some models, the convection fan also runs during preheat for the mode that are two timers - Start - Press pad ... for the bake mode. It may feel warm air as well. Note: On some models) - Press pad to select cooking temperature. Shows the oven temperature. Preheat Temperature - Shows the cooking elements that is selected. Press pad to toggle between timer and clock display. TIMER 1 AND TIMER 2; ...

Use & Care Manual
Page 15
... the Sabbath Feature About the Sabbath Feature The Sabbath Feature is also activated in display and temperature will show in the oven. • The probe CANNOT be displayed. BAKE will flash. 6. Turn knob to set oven temperature. 5. Turn the warming drawer on if desired (press LIGHT). BAKE will be off automatically. Note: The...
... the Sabbath Feature About the Sabbath Feature The Sabbath Feature is also activated in display and temperature will show in the oven. • The probe CANNOT be displayed. BAKE will flash. 6. Turn knob to set oven temperature. 5. Turn the warming drawer on if desired (press LIGHT). BAKE will be off automatically. Note: The...

Use & Care Manual
Page 21
...appear. 5. Press Time. 2. Press Time. Using the Probe (some models)" on page 13. See "Inserting the Probe" on page 25 for guidelines, tips and suggestions. Press START. Turn knob to set the probe temperature (desired end temperature of day at which cooking mode starts and stops. English...pan (or on recommended oven rack. Place roasting pan with meat in display. Plug probe into the meat. The probe symbol will automatically turn off . Note: The probe temperature can be set when the probe is installed in the upper right hand corner of a Timed Mode Operation - Touch ...
...appear. 5. Press Time. 2. Press Time. Using the Probe (some models)" on page 13. See "Inserting the Probe" on page 25 for guidelines, tips and suggestions. Press START. Turn knob to set the probe temperature (desired end temperature of day at which cooking mode starts and stops. English...pan (or on recommended oven rack. Place roasting pan with meat in display. Plug probe into the meat. The probe symbol will automatically turn off . Note: The probe temperature can be set when the probe is installed in the upper right hand corner of a Timed Mode Operation - Touch ...
Use & Care Manual
Page 22
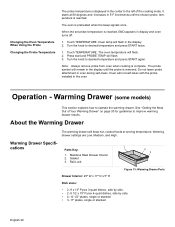
... will flash. 3. Warming Drawer (some models) This section explains how to desired temperature and press START twice. 1. Changing the Oven Temperature When Using the Probe Changing the Probe Temperature The probe temperature is displayed in the center to the left of Your Warming Drawer" on page ... See "Getting the Most Out of the cooking mode. cations Parts Key: 1 1. Turn the knob to desired temperature and press START again. Do not leave probe attachment in the oven Operation - Warming Drawer Specifi- Stainless Steel Drawer Interior 2. Gasket 3. Rail Lock 2 3...
... will flash. 3. Warming Drawer (some models) This section explains how to desired temperature and press START twice. 1. Changing the Oven Temperature When Using the Probe Changing the Probe Temperature The probe temperature is displayed in the center to the left of Your Warming Drawer" on page ... See "Getting the Most Out of the cooking mode. cations Parts Key: 1 1. Turn the knob to desired temperature and press START again. Do not leave probe attachment in the oven Operation - Warming Drawer Specifi- Stainless Steel Drawer Interior 2. Gasket 3. Rail Lock 2 3...

Use & Care Manual
Page 27
...will use the oven light to serve. • Warming mode temperatures are 85° to cook after the oven has shut off. The default temperature is necessary for inserting and removing. English 25 Preheating the Oven The Probe (some models). Preheating is 100° F. • Loosely ... will impair your ability to easily connect the probe to the receptacle and to insert it is not recommended when using the probe. Use a potholder to remove since the probe becomes hot. • Remove the probe from the oven, set the internal (probe) temperature 5 - 10 degrees below the desired final ...
...will use the oven light to serve. • Warming mode temperatures are 85° to cook after the oven has shut off. The default temperature is necessary for inserting and removing. English 25 Preheating the Oven The Probe (some models). Preheating is 100° F. • Loosely ... will impair your ability to easily connect the probe to the receptacle and to insert it is not recommended when using the probe. Use a potholder to remove since the probe becomes hot. • Remove the probe from the oven, set the internal (probe) temperature 5 - 10 degrees below the desired final ...


