Use & Care Manual
Page 3
...is near a window, forced air vent, or fan, be sure to clean and maintain your range. • The Service section includes troubleshooting tips and your Warranty. TO REDUCE THE RISK OF A RANGE TOP GREASE FIRE: English 1 For example, never use the appliance for its intended use .... This manual contains several sections: • The Overview section describes the features and functionality of the range, including a description of how to set up the range and operate the range's control panel. • The three Operations sections describe how to operate and get the best performance...
...is near a window, forced air vent, or fan, be sure to clean and maintain your range. • The Service section includes troubleshooting tips and your Warranty. TO REDUCE THE RISK OF A RANGE TOP GREASE FIRE: English 1 For example, never use the appliance for its intended use .... This manual contains several sections: • The Overview section describes the features and functionality of the range, including a description of how to set up the range and operate the range's control panel. • The three Operations sections describe how to operate and get the best performance...

Use & Care Manual
Page 4
Crepes Suzette, Cherries Jubilee, Peppercorn Beef Flambe'). 3) Clean ventilating fans frequently. TO REDUCE THE RISK OF INJURY TO PERSONS IN THE EVENT OF A RANGE TOP GREASE FIRE, OBSERVE THE FOLLOWING: 1) SMOTHER FLAMES with baking soda. You may result in burns from food fires other flammable materials contact heating elements ...
Crepes Suzette, Cherries Jubilee, Peppercorn Beef Flambe'). 3) Clean ventilating fans frequently. TO REDUCE THE RISK OF INJURY TO PERSONS IN THE EVENT OF A RANGE TOP GREASE FIRE, OBSERVE THE FOLLOWING: 1) SMOTHER FLAMES with baking soda. You may result in burns from food fires other flammable materials contact heating elements ...
Use & Care Manual
Page 6
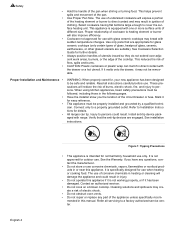
... movement of the circuit breaker or fuse. When using kitchen appliances, basic safety precautions must be followed, including those in direct contact with range. See installation instructions. All ranges can melt if in the following pages. Cleaning solutions and spillovers may result in ignition of corrosive chemicals in this appliance. Select cookware...
... movement of the circuit breaker or fuse. When using kitchen appliances, basic safety precautions must be followed, including those in direct contact with range. See installation instructions. All ranges can melt if in the following pages. Cleaning solutions and spillovers may result in ignition of corrosive chemicals in this appliance. Select cookware...

Use & Care Manual
Page 8
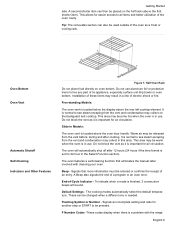
... element uses a wire ribbon located under the glass ceramic surface to better match the size of the cook setting. Oven Racks Depending on model, the range is equipped with one long oblong element. It is too hot to protect the glass cooking surface from extreme high temperatures. Dual Element The dual...
... element uses a wire ribbon located under the glass ceramic surface to better match the size of the cook setting. Oven Racks Depending on model, the range is equipped with one long oblong element. It is too hot to protect the glass cooking surface from extreme high temperatures. Dual Element The dual...

Use & Care Manual
Page 9
... near you . 2. Once the stop is reached, grasp the top section and pull straight out until the second stop is in the back of the range. Reinstall it is reached. English 7 Grasp the entire rack (both sides and pull rack toward the back wall of the oven. Grasp the bottom section...
... near you . 2. Once the stop is reached, grasp the top section and pull straight out until the second stop is in the back of the range. Reinstall it is reached. English 7 Grasp the entire rack (both sides and pull rack toward the back wall of the oven. Grasp the bottom section...
Use & Care Manual
Page 11
... result in this area. Installation of an appliance, especially surface unit drip bowls or oven bottom. Signals that eliminates the manual labor involved with the range. Do not block the vent as a trivet or cooling rack. Do not use . A second shorter item can also be changed when a different one is important...
... result in this area. Installation of an appliance, especially surface unit drip bowls or oven bottom. Signals that eliminates the manual labor involved with the range. Do not block the vent as a trivet or cooling rack. Do not use . A second shorter item can also be changed when a different one is important...

Use & Care Manual
Page 12
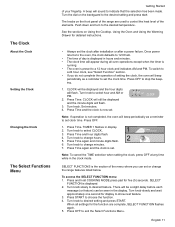
... With less than 60 minutes remaining, the timer also displays seconds. Also displays the warming drawer setting. You control the operation of the range by using the touch pads and dial on the backguard and the knobs on or off oven and/or warming drawer. Shows the cooking ...The backguard touchpads, in conjunction with a 12 or 24 hour option. It may feel warm air as well. Light - Press pad to set up your range. TIMER 1 AND TIMER 2; Convection Fan The convection fan operates during preheat for the mode that the probe is on the backguard, are two timers - ...
... With less than 60 minutes remaining, the timer also displays seconds. Also displays the warming drawer setting. You control the operation of the range by using the touch pads and dial on the backguard and the knobs on or off oven and/or warming drawer. Shows the cooking ...The backguard touchpads, in conjunction with a 12 or 24 hour option. It may feel warm air as well. Light - Press pad to set up your range. TIMER 1 AND TIMER 2; Convection Fan The convection fan operates during preheat for the mode that the probe is on the backguard, are two timers - ...
Use & Care Manual
Page 13
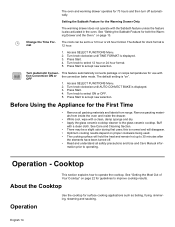
... dial on Using the Cooktop, Using the Oven and Using the Warming Drawer for the function are used to control the heat level of the range are complete, SELECT FUNCTION flashes again. 5. See the sections on the backguard to the desired setting and press start. To switch to a 24 hour clock... setting and press START. SELECT FUNCTIONS is not completed, the oven will be a slight delay before each message (or feature) can set or change the range features listed below. Turn knob to the desired temperature. Press Time and the clock is now set. 12: 00 AM CLOCK Note: If operation is...
... dial on Using the Cooktop, Using the Oven and Using the Warming Drawer for the function are used to control the heat level of the range are complete, SELECT FUNCTION flashes again. 5. See the sections on the backguard to the desired setting and press start. To switch to a 24 hour clock... setting and press START. SELECT FUNCTIONS is not completed, the oven will be a slight delay before each message (or feature) can set or change the range features listed below. Turn knob to the desired temperature. Press Time and the clock is now set. 12: 00 AM CLOCK Note: If operation is...
Use & Care Manual
Page 16
... disappear. • Optimum cooking results depend on page 22 for surface cooking applications such as boiling, frying, simmering, steaming and sauteing. Remove packing materials from range. Cooktop This section explains how to operating. Change the Time Format The clock can be a slight odor during first uses; Press Start. 4. Press Start. 4. Before...
... disappear. • Optimum cooking results depend on page 22 for surface cooking applications such as boiling, frying, simmering, steaming and sauteing. Remove packing materials from range. Cooktop This section explains how to operating. Change the Time Format The clock can be a slight odor during first uses; Press Start. 4. Press Start. 4. Before...
Use & Care Manual
Page 19
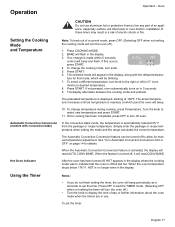
... read AUTO CONV BAKE. Automatic Convection Conversion (models with the default tempera- Simply enter the package or recipe temperature when setting the mode and the range calculates the correct temperature. When the feature is automatically reduced 25° F from the package or recipe temperature. Using the Timer Notes: • If you...
... read AUTO CONV BAKE. Automatic Convection Conversion (models with the default tempera- Simply enter the package or recipe temperature when setting the mode and the range calculates the correct temperature. When the feature is automatically reduced 25° F from the package or recipe temperature. Using the Timer Notes: • If you...
Use & Care Manual
Page 20
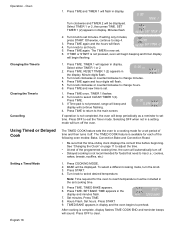
... again and the hours will flash. 5. Press OFF to step 4. Press TIME. If setting only minutes, press START. If TIME or START is not pressed, range will beep and display will turn off the oven. HR:MIN TIMED BAKE 7. TIMER 2: 02Pm 3. Turn knob to change hours. 6. HR:MIN Set TIMER 2 5. Press...
... again and the hours will flash. 5. Press OFF to step 4. Press TIME. If setting only minutes, press START. If TIME or START is not pressed, range will beep and display will turn off the oven. HR:MIN TIMED BAKE 7. TIMER 2: 02Pm 3. Turn knob to change hours. 6. HR:MIN Set TIMER 2 5. Press...

Use & Care Manual
Page 21
... END appears in dis- Set hours and then press TIME. 9. To Check the Cooking Time and Stop Time After a Delay Has Been Set 1. The temperature range for 100°F up to 450°F (38°C up to 93°C). Oven temperature can be set for the probe is properly inserted into...
... END appears in dis- Set hours and then press TIME. 9. To Check the Cooking Time and Stop Time After a Delay Has Been Set 1. The temperature range for 100°F up to 450°F (38°C up to 93°C). Oven temperature can be set for the probe is properly inserted into...

Use & Care Manual
Page 24
... of water and the size of the element. • Select a pan with water that is connected to select CANCEL DRWR, CANCEL OVEN, or CANCEL BOTH. 3. A range of the food, • element used and • the cook's preference. Turn knob to 208 volts, the same heat settings apply but foods may English...
... of water and the size of the element. • Select a pan with water that is connected to select CANCEL DRWR, CANCEL OVEN, or CANCEL BOTH. 3. A range of the food, • element used and • the cook's preference. Turn knob to 208 volts, the same heat settings apply but foods may English...

Use & Care Manual
Page 28
... the Automatic Convection Conversion feature is similar to side on multiple racks. Simply enter the package or recipe temperature when setting the mode and the range calculates the correct temperature. mends holding hot food at once For Best Results: • Reduce recipe temperature by the convection fan. The Convection Bake mode...
... the Automatic Convection Conversion feature is similar to side on multiple racks. Simply enter the package or recipe temperature when setting the mode and the range calculates the correct temperature. mends holding hot food at once For Best Results: • Reduce recipe temperature by the convection fan. The Convection Bake mode...
Use & Care Manual
Page 29
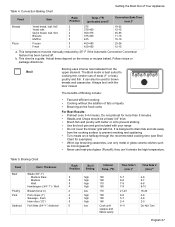
... at least 3/4" thick • Brush fish and poultry with butter or oil to prevent sticking • Use the broil pan and grid included with your range • Do not cover the broiler grid with the door closed. This chart is designed to drain fats and oils away from the upper element...
... at least 3/4" thick • Brush fish and poultry with butter or oil to prevent sticking • Use the broil pan and grid included with your range • Do not cover the broiler grid with the door closed. This chart is designed to drain fats and oils away from the upper element...

Use & Care Manual
Page 30
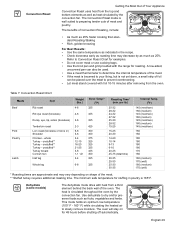
... cooking with a preheated broil element. The Convection Broil mode is typically not recommended for examples). • Use the broil pan and grid included with your range. • Do not cover the broiler grid with the door closed. Do not preheat more that 5 minutes. • Meats should be at least 1 1/2" thick. •...
... cooking with a preheated broil element. The Convection Broil mode is typically not recommended for examples). • Use the broil pan and grid included with your range. • Do not cover the broiler grid with the door closed. Do not preheat more that 5 minutes. • Meats should be at least 1 1/2" thick. •...
Use & Care Manual
Page 31
... 12-15 325 16-20 325 21-25 325 3-8 325 1-1 1/2 350 3-4 325 6-8 325 Roasting Time* (min. Dehydrate (some models) The dehydrate mode dries with the range for 48 hours before shutting off automatically.
... 12-15 325 16-20 325 21-25 325 3-8 325 1-1 1/2 350 3-4 325 6-8 325 Roasting Time* (min. Dehydrate (some models) The dehydrate mode dries with the range for 48 hours before shutting off automatically.

Use & Care Manual
Page 34
... between uses. 1. Clean the surface when completely cool with a clean, damp sponge or paper towel. Apply white vinegar if smudge remains and rinse. Wipe with range) on a daily basis. Possible Solution Remove pan and turn off of Soil Dry sugar, sugar syrup, milk or tomato spills. English 32 it off the...
... between uses. 1. Clean the surface when completely cool with a clean, damp sponge or paper towel. Apply white vinegar if smudge remains and rinse. Wipe with range) on a daily basis. Possible Solution Remove pan and turn off of Soil Dry sugar, sugar syrup, milk or tomato spills. English 32 it off the...

Use & Care Manual
Page 35
..., dark streaks, and specks Greasy spatters Metal marks: Iridescent stain Hard Water Spots - Use recommended glass ceramic cooktop cleaner daily on surface Surface scratches - The range can be transferred onto the surface and cause stains. Can be reduced by laying a damp paper towel or sponge on the content and amount of...
..., dark streaks, and specks Greasy spatters Metal marks: Iridescent stain Hard Water Spots - Use recommended glass ceramic cooktop cleaner daily on surface Surface scratches - The range can be transferred onto the surface and cause stains. Can be reduced by laying a damp paper towel or sponge on the content and amount of...

Use & Care Manual
Page 36
... gasket. Press START. phone service. The default cleaning time is 4 hours. The default cleaning time is 4 hours. Otherwise, continue to hold in "Setting Up Your Range". 1. Figure 18: Cleaning Guidelines 4. Press START. Press START. 3. Be sure oven light is designed to step 4. 4. Wipe up to front of the Self-Clean English...
... gasket. Press START. phone service. The default cleaning time is 4 hours. The default cleaning time is 4 hours. Otherwise, continue to hold in "Setting Up Your Range". 1. Figure 18: Cleaning Guidelines 4. Press START. Press START. 3. Be sure oven light is designed to step 4. 4. Wipe up to front of the Self-Clean English...


