Installation Instructions
Page 7
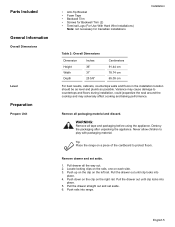
... the drawer straight out and set aside. 1. Push rails into place. 4. Destroy the packaging after unpacking the appliance. Tip: Place the range on the right rail. Pull drawer all packaging material and discard. Push down on the clip on a piece of the cardboard to protect ... Backwall Trim (2) • Terminal Lugs (For Use With Hard Wire Installations) Note: not necessary for Canadian installations Installation Table 2: Overall Dimensions Dimension Height Width Depth Inches 36" 31" 25 5/8" Centimeters 91.44 cm 78.74 cm 65.09 cm For best results, cabinets, countertops walls and floors in...
... the drawer straight out and set aside. 1. Push rails into place. 4. Destroy the packaging after unpacking the appliance. Tip: Place the range on the right rail. Pull drawer all packaging material and discard. Push down on the clip on a piece of the cardboard to protect ... Backwall Trim (2) • Terminal Lugs (For Use With Hard Wire Installations) Note: not necessary for Canadian installations Installation Table 2: Overall Dimensions Dimension Height Width Depth Inches 36" 31" 25 5/8" Centimeters 91.44 cm 78.74 cm 65.09 cm For best results, cabinets, countertops walls and floors in...
Installation Instructions
Page 11
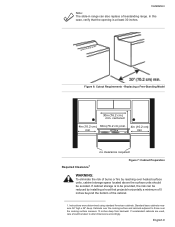
... the bottom of burns or fire by installing a hood that the opening is to those over the cooking surface measure 13 inches deep from backwall. Replacing a Free-Standing Model 30in (76.2 cm ) min. centered 4in (10.2 cm ) 30in (76...range. If cabinet storage is at least 30 inches. If nonstandard cabinets are used, care should be avoided. Instructions were determined using standard American cabinets. Installation Note: The slide-in range can be reduced by reaching over heated surface units, cabinet storage space located above the surface units should be taken to alter dimensions...
... the bottom of burns or fire by installing a hood that the opening is to those over the cooking surface measure 13 inches deep from backwall. Replacing a Free-Standing Model 30in (76.2 cm ) min. centered 4in (10.2 cm ) 30in (76...range. If cabinet storage is at least 30 inches. If nonstandard cabinets are used, care should be avoided. Instructions were determined using standard American cabinets. Installation Note: The slide-in range can be reduced by reaching over heated surface units, cabinet storage space located above the surface units should be taken to alter dimensions...
Installation Instructions
Page 19
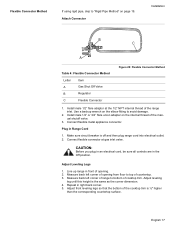
... breaker is the same as the corner dimension. 4. Measure back left corner of opening . 2. Connect flexible connector at the 1/2" NPT internal thread of countertop. 3. Adjust Leveling Legs 1. Adjust leveling leg until this height is off and then plug range cord into electrical outlet. 2. Use a... Before you plug in an electrical cord, be sure all controls are in front of the manual shutoff valve. 3. Measure back left corner of range to "Rigid Pipe Method" on page 19. English 17 Attach Connector Installation B C A Table 4: Flexible Connector Method Letter Item A Gas Shut ...
... breaker is the same as the corner dimension. 4. Measure back left corner of opening . 2. Connect flexible connector at the 1/2" NPT internal thread of countertop. 3. Adjust Leveling Legs 1. Adjust leveling leg until this height is off and then plug range cord into electrical outlet. 2. Use a... Before you plug in an electrical cord, be sure all controls are in front of the manual shutoff valve. 3. Measure back left corner of range to "Rigid Pipe Method" on page 19. English 17 Attach Connector Installation B C A Table 4: Flexible Connector Method Letter Item A Gas Shut ...