
Use & Care Manual
Page 10
... on the model, your appliance has either a storage drawer or a warming drawer. They provide a more even heat, espceially when cooking at lower temperatures. Models with Stainless Steel Cooktop: There are two burner grates: one for the left side of the cooktop. As a result, there are missing or damaged. Position them so that...
... on the model, your appliance has either a storage drawer or a warming drawer. They provide a more even heat, espceially when cooking at lower temperatures. Models with Stainless Steel Cooktop: There are two burner grates: one for the left side of the cooktop. As a result, there are missing or damaged. Position them so that...

Use & Care Manual
Page 28
... when the corresponding setting is selected: Low Medium For recommended settings, see "Warming Drawer Chart" on page 37 for guidelines to operate the warming drawer. Stainless Steel Drawer Interior 2. About the Warming Drawer Warming Drawer Specifications The warming drawer will keep hot, cooked foods at serving temperature. Operation - Gasket 3. High Figure 17...
... when the corresponding setting is selected: Low Medium For recommended settings, see "Warming Drawer Chart" on page 37 for guidelines to operate the warming drawer. Stainless Steel Drawer Interior 2. About the Warming Drawer Warming Drawer Specifications The warming drawer will keep hot, cooked foods at serving temperature. Operation - Gasket 3. High Figure 17...
Use & Care Manual
Page 42
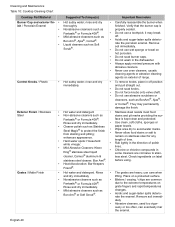
...; • Important Reminders Carefully reassemble the burner when finished. To remove knobs, place in the direction of range. Do not soak knobs. Stainless steel resists most food stains and pit marks providing the surface is properly seated. Never allow food stains or salt ... or Comet®. Hard water spots: Household white vinegar. • Mild Abrasive Cleaners: Kleen King® stainless steel liquid • cleaner, Cameo® aluminum & stainless steel cleaner, Bon Ami®. Heat discoloration: Bar Keepers Friend®. Rinse and dry immediately. Verify that the ...
...; • Important Reminders Carefully reassemble the burner when finished. To remove knobs, place in the direction of range. Do not soak knobs. Stainless steel resists most food stains and pit marks providing the surface is properly seated. Never allow food stains or salt ... or Comet®. Hard water spots: Household white vinegar. • Mild Abrasive Cleaners: Kleen King® stainless steel liquid • cleaner, Cameo® aluminum & stainless steel cleaner, Bon Ami®. Heat discoloration: Bar Keepers Friend®. Rinse and dry immediately. Verify that the ...
Use & Care Manual
Page 45
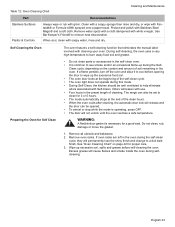
...lessen with Fantastik® or Formula 409® sprayed onto a paper towel. Protect and polish with soapy water, rinse and dry. When cool, clean with Stainless Steel Magic® and a soft cloth. Clean cycle, depending on page 42 for a good seal. WARNING: A flexible door gasket is common to help eliminate..., damage or move the gasket. 1. Excess grease will permanently lose the shiny finish and change to cool before self-cleaning the oven. The range can be well ventilated to see smoke and/or an occasional flame-up the excessive food soil. • The oven door locks at the ...
...lessen with Fantastik® or Formula 409® sprayed onto a paper towel. Protect and polish with soapy water, rinse and dry. When cool, clean with Stainless Steel Magic® and a soft cloth. Clean cycle, depending on page 42 for a good seal. WARNING: A flexible door gasket is common to help eliminate..., damage or move the gasket. 1. Excess grease will permanently lose the shiny finish and change to cool before self-cleaning the oven. The range can be well ventilated to see smoke and/or an occasional flame-up the excessive food soil. • The oven door locks at the ...

Use & Care Manual
Page 48
... hinge slots. 2. After moving the hinge brackets back down into position, be damaged and injury could result in "Cleaning Guidelines" on hinge toward range). 3. Cleaning and Maintenance Stainless Steel Cooktop Models Oven Maintenance Removing the Door No maintenance is required other than daily cleaning as it is correctly and securely in place. 4. Fail...
... hinge slots. 2. After moving the hinge brackets back down into position, be damaged and injury could result in "Cleaning Guidelines" on hinge toward range). 3. Cleaning and Maintenance Stainless Steel Cooktop Models Oven Maintenance Removing the Door No maintenance is required other than daily cleaning as it is correctly and securely in place. 4. Fail...

Use & Care Manual
Page 50
...; Gas is not shut off and allow the burners to cool. See cleaning recommendations. Turn the cooktop off . Replace with single-edge, stainless steel blades. See "Boiling Water" on bottom of range. • Cooking pan is wet, damaged or dirty. Verify that burner caps are properly positioned over burners. • Burner cap is...
...; Gas is not shut off and allow the burners to cool. See cleaning recommendations. Turn the cooktop off . Replace with single-edge, stainless steel blades. See "Boiling Water" on bottom of range. • Cooking pan is wet, damaged or dirty. Verify that burner caps are properly positioned over burners. • Burner cap is...
Installation Instructions
Page 12
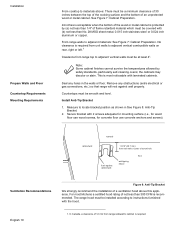
... No. 28 MSG sheet metal, 0.015 inch stainless steel' or 0.024 inch aluminum or copper. In Canada, a clearance of 12 mm from rear wall to materials above this appliance. the cabinets may discolor or stain. Remove any holes in See Figure 8: Anti-Tip Bracket. 2. The range hood must be installed according to instructions...
... No. 28 MSG sheet metal, 0.015 inch stainless steel' or 0.024 inch aluminum or copper. In Canada, a clearance of 12 mm from rear wall to materials above this appliance. the cabinets may discolor or stain. Remove any holes in See Figure 8: Anti-Tip Bracket. 2. The range hood must be installed according to instructions...