Use & Care Manual
Page 12
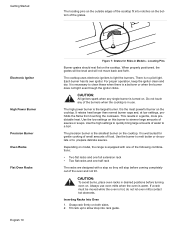
...the grates. The high power burner is the smallest burner on the cooktop. The precision burner is the largest burner. Depending on model, the range is necessary to simmer large amounts of sauces or soups. Inserting Racks Into Oven 1. Do not touch any single burner is well suited for... Slide-in a gentle, more predictable heat. Always use . Getting Started The locating pins on the outside edges of the cooktop fit into rack guide. ...
...the grates. The high power burner is the smallest burner on the cooktop. The precision burner is the largest burner. Depending on model, the range is necessary to simmer large amounts of sauces or soups. Inserting Racks Into Oven 1. Do not touch any single burner is well suited for... Slide-in a gentle, more predictable heat. Always use . Getting Started The locating pins on the outside edges of the cooktop fit into rack guide. ...
Use & Care Manual
Page 16
...a self-cleaning function that more information must be entered or confirms the receipt of the mode. Signals that eliminates the manual labor involved with the range. Default Settings - This is needed. The convection fan operates during all oven modes. English 14 To indicate when a mode is finished, 3 ... use . These can be changed when a different one is normal. Getting Started Automatic Shutoff Self Cleaning Indicators and Other Features Cooling Fan (Slide-in models only) Convection Fan area may be warm when the oven is in use as well. Do not block the vent as it...
...a self-cleaning function that more information must be entered or confirms the receipt of the mode. Signals that eliminates the manual labor involved with the range. Default Settings - This is needed. The convection fan operates during all oven modes. English 14 To indicate when a mode is finished, 3 ... use . These can be changed when a different one is normal. Getting Started Automatic Shutoff Self Cleaning Indicators and Other Features Cooling Fan (Slide-in models only) Convection Fan area may be warm when the oven is in use as well. Do not block the vent as it...
Use & Care Manual
Page 52
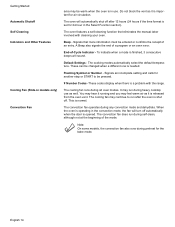
...as is", or previously returned model), and not for resale, or commercial use convection Possible Causes and Suggested Solutions This is preheating for Bosch to return your finger. Press OFF to Obtain Service or Parts Product Data Plate To reach a service representative, see or feel steam or...Open the drawer to view it Applies to: The limited warranty provided by BSH Home Appliances ("Bosch") in this Statement of Limited Product Warranty applies only to the Bosch freestanding and slide-in range, ("Product") sold to the data plate on your normal, household (non-commercial) use, and...
...as is", or previously returned model), and not for resale, or commercial use convection Possible Causes and Suggested Solutions This is preheating for Bosch to return your finger. Press OFF to Obtain Service or Parts Product Data Plate To reach a service representative, see or feel steam or...Open the drawer to view it Applies to: The limited warranty provided by BSH Home Appliances ("Bosch") in this Statement of Limited Product Warranty applies only to the Bosch freestanding and slide-in range, ("Product") sold to the data plate on your normal, household (non-commercial) use, and...
Installation Instructions
Page 11
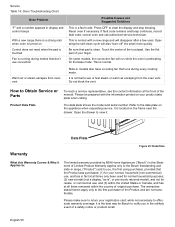
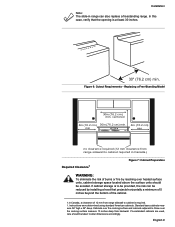
... over the cooking surface measure 13 inches deep from backwall. centered 4in (10.2 cm ) 30in (76.2 cm) min. 4in (10.2 cm) min min no clearance required (12 mm clearance from range sidewall to cabinet is at least 30 inches. 30" (76.2 cm) min. Instructions were... horizontally a minimum of 5 inches beyond the bottom of the cabinet. 1.In Canada, a clearance of 12 mm from range sidewall to alter dimensions accordingly. Installation Note: The slide-in Canada.) Required Clearance1 Figure 7: Cabinet Preparation WARNING: To eliminate the risk of burns or fire by installing a hood...
... over the cooking surface measure 13 inches deep from backwall. centered 4in (10.2 cm ) 30in (76.2 cm) min. 4in (10.2 cm) min min no clearance required (12 mm clearance from range sidewall to cabinet is at least 30 inches. 30" (76.2 cm) min. Instructions were... horizontally a minimum of 5 inches beyond the bottom of the cabinet. 1.In Canada, a clearance of 12 mm from range sidewall to alter dimensions accordingly. Installation Note: The slide-in Canada.) Required Clearance1 Figure 7: Cabinet Preparation WARNING: To eliminate the risk of burns or fire by installing a hood...

Installation Instructions
Page 20
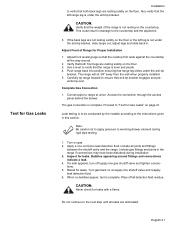
... points: • countertop • foam tape • floor under the anti-tip bracket, slide range out, adjust legs and slide back in. Also verify that the left leg is not under range legs 2. CAUTION: Verify that both back legs are not resting solidly on the floor or the...If the back legs are resting solidly on the frame around the back of the range must not rest on the countertop. Slide range into position. Adjust Front of Range for Proper Installation If the range does not slide easily: Use soapy water to crimp flexible connector. Wipe up soapy water. Tip: ...
... points: • countertop • foam tape • floor under the anti-tip bracket, slide range out, adjust legs and slide back in. Also verify that the left leg is not under range legs 2. CAUTION: Verify that both back legs are not resting solidly on the floor or the...If the back legs are resting solidly on the frame around the back of the range must not rest on the countertop. Slide range into position. Adjust Front of Range for Proper Installation If the range does not slide easily: Use soapy water to crimp flexible connector. Wipe up soapy water. Tip: ...

Installation Instructions
Page 22
...standing model, the backwall trim strip should not be any gap between the countertop and the trim; Slide range into position. Do not apply pressure to cooktop when sliding into opening, being careful not to prevent damage Check Back of opening from floor to dampen the ...pressure points: • countertop • foam tape • floor under the range Remove drawer and oven door to damage countertops, floors, or the range drawer front. Line up range in power cord. 2. Slide Range into electrical outlet. There should be sure all controls are in right back corner...
...standing model, the backwall trim strip should not be any gap between the countertop and the trim; Slide range into position. Do not apply pressure to cooktop when sliding into opening, being careful not to prevent damage Check Back of opening from floor to dampen the ...pressure points: • countertop • foam tape • floor under the range Remove drawer and oven door to damage countertops, floors, or the range drawer front. Line up range in power cord. 2. Slide Range into electrical outlet. There should be sure all controls are in right back corner...
Installation Instructions
Page 23
... solidly on the floor. CAUTION: Verify that the weight of Range for Proper Installation 1. Verify that range leg slides under the anti-tip bracket, slide range out, adjust legs and slide back in this section. Push range back into position ensuring that both back legs are resting solidly on... the floor. 3. The range will sit 3/4" away from the wall when ...
... solidly on the floor. CAUTION: Verify that the weight of Range for Proper Installation 1. Verify that range leg slides under the anti-tip bracket, slide range out, adjust legs and slide back in this section. Push range back into position ensuring that both back legs are resting solidly on... the floor. 3. The range will sit 3/4" away from the wall when ...


