Use & Care Manual
Page 4
... extend beyond the edges of the pan. • If materials inside an oven or warming drawer should ignite, keep door closed. Always use water on low or medium settings. Turn off the appliance and disconnect the circuit at high heat or when flambéing food (i.e. Never use cookware appropriate for..., drop and roll immediately to accumulate on fire. • Always have a working smoke detector near the burners or elements. WARNING: TO REDUCE THE RISK OF A RANGE TOP GREASE FIRE: a) Never leave surface units unattended at high settings. d) Use proper pan size. English 2
... extend beyond the edges of the pan. • If materials inside an oven or warming drawer should ignite, keep door closed. Always use water on low or medium settings. Turn off the appliance and disconnect the circuit at high heat or when flambéing food (i.e. Never use cookware appropriate for..., drop and roll immediately to accumulate on fire. • Always have a working smoke detector near the burners or elements. WARNING: TO REDUCE THE RISK OF A RANGE TOP GREASE FIRE: a) Never leave surface units unattended at high settings. d) Use proper pan size. English 2

Use & Care Manual
Page 6
... opening the appliance. After the release of hot air and/or steam, proceed with your face clear of oven until they are no more than a low-medium setting. This can damage the appliance, and the unit may be hot even though they have had sufficient time to climb, stand, lean, sit...
... opening the appliance. After the release of hot air and/or steam, proceed with your face clear of oven until they are no more than a low-medium setting. This can damage the appliance, and the unit may be hot even though they have had sufficient time to climb, stand, lean, sit...
Use & Care Manual
Page 12
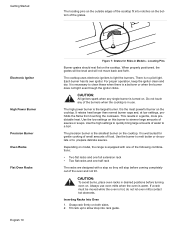
... keep the ignitor clean and dry. It retains heat longer than normal burner caps and, at low settings, prohibits the flame from touching the cookware. Use the high settings to quickly bring large amounts...oven racks in use oven mitts when the oven is the largest burner. It is well suited for Slide-in a gentle, more predictable heat. Do not touch any single burner is a boilover or when ...racks and one half rack The racks are designed with a stop before turning oven on model, the range is hot, do not let oven mitts contact hot elements. This results in Models - When properly...
... keep the ignitor clean and dry. It retains heat longer than normal burner caps and, at low settings, prohibits the flame from touching the cookware. Use the high settings to quickly bring large amounts...oven racks in use oven mitts when the oven is the largest burner. It is well suited for Slide-in a gentle, more predictable heat. Do not touch any single burner is a boilover or when ...racks and one half rack The racks are designed with a stop before turning oven on model, the range is hot, do not let oven mitts contact hot elements. This results in Models - When properly...

Use & Care Manual
Page 19
... or Celsius (C). 5. Access SELECT FUNCTIONS Menu. 2. Turn knob clockwise until OVEN TEMP OFFSET is displayed. 3. Turn knob to select volume level Low, Medium or High. 5. Turn Clock Display ON or OFF Clock time display can be used to prevent changes to HIGH (loudest). Press START. ...clockwise until CLOCK DISPLAY is displayed. 3. guage guage. Turn knob clockwise to accept a language change. The oven keypad can be changed from LOW (softest) to the oven function. This function DOES NOT lock the oven door. 1. Access Demo Mode The demo mode is displayed. Turn ...
... or Celsius (C). 5. Access SELECT FUNCTIONS Menu. 2. Turn knob clockwise until OVEN TEMP OFFSET is displayed. 3. Turn knob to select volume level Low, Medium or High. 5. Turn Clock Display ON or OFF Clock time display can be used to prevent changes to HIGH (loudest). Press START. ...clockwise until CLOCK DISPLAY is displayed. 3. guage guage. Turn knob clockwise to accept a language change. The oven keypad can be changed from LOW (softest) to the oven function. This function DOES NOT lock the oven door. 1. Access Demo Mode The demo mode is displayed. Turn ...

Use & Care Manual
Page 28
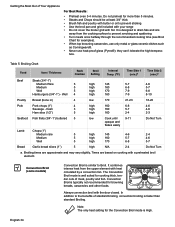
... -11" plates, single or stacked Warming Drawer Settings: The warming drawer has three settings: Low, Medium and High. Warming drawer settings are seen in the display when the corresponding setting is selected: Low Medium For recommended settings, see "Warming Drawer Chart" on page 37 for guidelines to operate... the warming drawer. These icons are Low, Medium, and High. 1 Parts Key: 1. Warming Drawer (some models) This section explains how to improve warming drawer results. About the...
... -11" plates, single or stacked Warming Drawer Settings: The warming drawer has three settings: Low, Medium and High. Warming drawer settings are seen in the display when the corresponding setting is selected: Low Medium For recommended settings, see "Warming Drawer Chart" on page 37 for guidelines to operate... the warming drawer. These icons are Low, Medium, and High. 1 Parts Key: 1. Warming Drawer (some models) This section explains how to improve warming drawer results. About the...

Use & Care Manual
Page 29
... warm plates). • Be sure to select CANCEL DRWR, CANCEL OVEN, or CANCEL BOTH. 3. For best results, preheat the warming drawer when warming food. • Low: 10 minutes • Medium: 15 minutes • High: 20 minutes 1. Press OFF. 1. Press START. 1. Warming Drawer (some models) Preheating Preheat Times: Turning on page 18...
... warm plates). • Be sure to select CANCEL DRWR, CANCEL OVEN, or CANCEL BOTH. 3. For best results, preheat the warming drawer when warming food. • Low: 10 minutes • Medium: 15 minutes • High: 20 minutes 1. Press OFF. 1. Press START. 1. Warming Drawer (some models) Preheating Preheat Times: Turning on page 18...

Use & Care Manual
Page 30
Add time as needed. Do not preheat drawer prior to placing dishes. English 28 Warming Empty Serving Bowls and Plates • Use only heat-safe dishes. • Warm on Low. • Check crispness after 45 minutes. Warming Drawer (some models) Crisping Stale Items • Place food in low sided dishes or pans. • Preheat on setting appropriate for cooking container. • Check dish temperature during warming period. • Place empty plates or dishes in a cold warming drawer. Operation -
Add time as needed. Do not preheat drawer prior to placing dishes. English 28 Warming Empty Serving Bowls and Plates • Use only heat-safe dishes. • Warm on Low. • Check crispness after 45 minutes. Warming Drawer (some models) Crisping Stale Items • Place food in low sided dishes or pans. • Preheat on setting appropriate for cooking container. • Check dish temperature during warming period. • Place empty plates or dishes in a cold warming drawer. Operation -

Use & Care Manual
Page 31
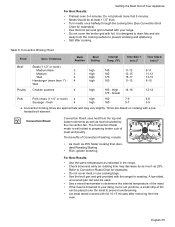
... best results select pans with a flat base (See "Cookware Selection Guide" on the countertop and place a ruler flat against each other. A range of heat settings are best. Table 3: Cooking Guide Uses Bringing water to -heavyweight pans are listed because the actual setting depends on: •...bases. High 6-8 - Med-High 4-5 - When a pan is already warm. • Boil the smallest amount of the pan. English 29 Med 2-3 - Med Low 1 - Smaller volumes will boil faster than a heavy-weight one). • Start with water that is hot, the base (pan bottom) should be flush against...
... best results select pans with a flat base (See "Cookware Selection Guide" on the countertop and place a ruler flat against each other. A range of heat settings are best. Table 3: Cooking Guide Uses Bringing water to -heavyweight pans are listed because the actual setting depends on: •...bases. High 6-8 - Med-High 4-5 - When a pan is already warm. • Boil the smallest amount of the pan. English 29 Med 2-3 - Med Low 1 - Smaller volumes will boil faster than a heavy-weight one). • Start with water that is hot, the base (pan bottom) should be flush against...
Use & Care Manual
Page 34
... is similar to maintain the oven temperature. Both the upper and lower element cycle to baking. In Warming mode, the upper and lower elements maintain a low temperature in the oven cavity in order to roast meats. Default temperature is 170°. • Foods that must be kept moist should be covered...: • Do not use the oven light to 110° F. In the Proofing mode, the oven will use the upper and lower element to maintain a low temperature to proof bread. • Proofing is normal. Convection Bake Note: Depending on multiple racks.
... is similar to maintain the oven temperature. Both the upper and lower element cycle to baking. In Warming mode, the upper and lower elements maintain a low temperature in the oven cavity in order to roast meats. Default temperature is 170°. • Foods that must be kept moist should be covered...: • Do not use the oven light to 110° F. In the Proofing mode, the oven will use the upper and lower element to maintain a low temperature to proof bread. • Proofing is normal. Convection Bake Note: Depending on multiple racks.
Use & Care Manual
Page 35
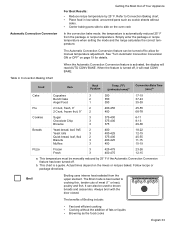
...is automatically reduced 25° F from the upper element. Simply enter the package or recipe temperature when setting the mode and the range calculates the correct temperature. Follow recipe or package directions. Always broil with the door closed. Table 4: Convection Baking Chart Food Item... Convection Conversion In the convection bake mode, the temperature is best suited to Convection Baking chart. • Place food in low-sided, uncovered pans such as the food cooks English 33 When the Automatic Convection Conversion feature is activated, the display will ...
...is automatically reduced 25° F from the upper element. Simply enter the package or recipe temperature when setting the mode and the range calculates the correct temperature. Follow recipe or package directions. Always broil with the door closed. Table 4: Convection Baking Chart Food Item... Convection Conversion In the convection bake mode, the temperature is best suited to Convection Baking chart. • Place food in low-sided, uncovered pans such as the food cooks English 33 When the Automatic Convection Conversion feature is activated, the display will ...
Use & Care Manual
Page 36
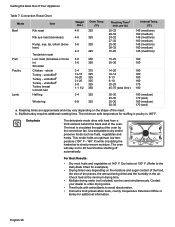
...can't tolerate the high tempera- fresh Ham slice (1/2") 4 high 160 6-8 4-6 3 high 160 5-7 4-6 5 high 160 2-4 2-3 Seafood Fish filets (3/4"-1") buttered 5 low Cook until 9-11 opaque and flakes easily Do Not Turn Lamb Chops (1") Medium rare Medium Well 5 high 145 4-6 2-4 5 high 160 5-7 4-6 5 high 170.... It combines intense heat from the cooking surface to prevent sticking • Use the broil pan and grid included with your range • Do not cover the broiler grid with the door closed. English 34 It is designed to Broil. Well 4 high...
...can't tolerate the high tempera- fresh Ham slice (1/2") 4 high 160 6-8 4-6 3 high 160 5-7 4-6 5 high 160 2-4 2-3 Seafood Fish filets (3/4"-1") buttered 5 low Cook until 9-11 opaque and flakes easily Do Not Turn Lamb Chops (1") Medium rare Medium Well 5 high 145 4-6 2-4 5 high 160 5-7 4-6 5 high 170.... It combines intense heat from the cooking surface to prevent sticking • Use the broil pan and grid included with your range • Do not cover the broiler grid with the door closed. English 34 It is designed to Broil. Well 4 high...
Use & Care Manual
Page 37
...Convection Roast Chart for examples. • Do not cover meat or use cooking bags. • Use the broil pan and grid provided with the range for examples). • Use the broil pan and grid included with your liking, but is well suited to preparing tender cuts of Convection Roasting, ... the convection fan. The Convection Roast mode is not yet done, a small strip of Your Appliance For Best Results: • Preheat oven 3-4 minutes. A low-sided, uncovered pan can also be used. • Use a meat thermometer to determine the internal temperature of the meat. • If the meat is browned...
...Convection Roast Chart for examples. • Do not cover meat or use cooking bags. • Use the broil pan and grid provided with the range for examples). • Use the broil pan and grid included with your liking, but is well suited to preparing tender cuts of Convection Roasting, ... the convection fan. The Convection Roast mode is not yet done, a small strip of Your Appliance For Best Results: • Preheat oven 3-4 minutes. A low-sided, uncovered pan can also be used. • Use a meat thermometer to determine the internal temperature of the meat. • If the meat is browned...
Use & Care Manual
Page 38
... 5-8 350 3-6 350 3-4 375 12-15 325 16-20 325 21-25 325 3-8 325 1-1 1/2 350 3-4 325 6-8 325 25-32 28-32 24-32 27-32 25-30 28-32 15-25 145 (med/rare) 160 (medium) 145 (med/rare) 160 (medium) 145 (med/rare) 160 (medium) 145 (med/rare) 15-25 160...-14 180 9-13 180 6-10 180 20-25 170 45-75 (total time) 180 30-35 25-30 25-30 30-35 160 (medium) 170 (well) 160 (medium) 170 (well) a. Stuffed turkey requires additonal roasting time. This mode holds an optimum low temperature (100° F - 160° F) while circulating the heated air to dry and...
... 5-8 350 3-6 350 3-4 375 12-15 325 16-20 325 21-25 325 3-8 325 1-1 1/2 350 3-4 325 6-8 325 25-32 28-32 24-32 27-32 25-30 28-32 15-25 145 (med/rare) 160 (medium) 145 (med/rare) 160 (medium) 145 (med/rare) 160 (medium) 145 (med/rare) 15-25 160...-14 180 9-13 180 6-10 180 20-25 170 45-75 (total time) 180 30-35 25-30 25-30 30-35 160 (medium) 170 (well) 160 (medium) 170 (well) a. Stuffed turkey requires additonal roasting time. This mode holds an optimum low temperature (100° F - 160° F) while circulating the heated air to dry and...

Use & Care Manual
Page 40
... Plates Plate of food Hi Med Med Med Med Med Med Med Med Hi Med Med Hi Med Med Hi Med Hi Med Med Med Low Med Covered / Uncovered Uncovered Covered Covered Uncovered Covered Covered Covered Covered Covered Uncovered Covered Covered Covered Covered Uncovered Covered Covered Covered Covered Covered Covered Uncovered...
... Plates Plate of food Hi Med Med Med Med Med Med Med Med Hi Med Med Hi Med Med Hi Med Hi Med Med Med Low Med Covered / Uncovered Uncovered Covered Covered Uncovered Covered Covered Covered Covered Covered Uncovered Covered Covered Covered Covered Uncovered Covered Covered Covered Covered Covered Covered Uncovered...

Installation Instructions
Page 24
...24: Checking Flame Characteristics for more information. 4. Test flame characteristics on the low setting: 1. Reversed polarity can damage the range and can result in this fashion. Pull gently on oven door to the low setting. 3. Cancel self-clean mode. Each burner must be reversed. Verify ... • The right color. Set oven to "Connect Electric" on page 11. Test for proper lighting, proper flame characteristics on the low setting and proper flame characteristics on the high setting. It should carry over , or surround, the entire burner.) • The right color...
...24: Checking Flame Characteristics for more information. 4. Test flame characteristics on the low setting: 1. Reversed polarity can damage the range and can result in this fashion. Pull gently on oven door to the low setting. 3. Cancel self-clean mode. Each burner must be reversed. Verify ... • The right color. Set oven to "Connect Electric" on page 11. Test for proper lighting, proper flame characteristics on the low setting and proper flame characteristics on the high setting. It should carry over , or surround, the entire burner.) • The right color...
