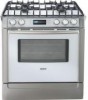
Installation Instructions
Page 6
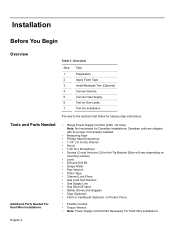
Tools and Parts Needed Additional Parts Needed For Hard Wire Installations • Range Power Supply Cord Kit (240V -30 Amp) Note: Not necessary for Anti-Tip Bracket (Style will vary depending on mounting surface) • Level • Drill and Drill Bit • Soapy Water &#...
Tools and Parts Needed Additional Parts Needed For Hard Wire Installations • Range Power Supply Cord Kit (240V -30 Amp) Note: Not necessary for Anti-Tip Bracket (Style will vary depending on mounting surface) • Level • Drill and Drill Bit • Soapy Water &#...
Installation Instructions
Page 8
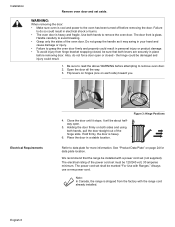
... before removing the door. Be sure to avoid breaking. • Grasp only the sides of the power cord set must be 120/240 volt, 30 amperes minimum. Place the door in electrical shock or burns. • The oven door is heavy and fragile. See "Product Data Plate" on ... be about halfway open or closed , be damaged and injury could result in place before removing door. The power cord set shall be installed with Ranges." Electrical Requirements 4. WARNING: When removing the door: • Make sure oven is shipped from hinge bracket snapping closed - Close the door until ...
... before removing the door. Be sure to avoid breaking. • Grasp only the sides of the power cord set must be 120/240 volt, 30 amperes minimum. Place the door in electrical shock or burns. • The oven door is heavy and fragile. See "Product Data Plate" on ... be about halfway open or closed , be damaged and injury could result in place before removing door. The power cord set shall be installed with Ranges." Electrical Requirements 4. WARNING: When removing the door: • Make sure oven is shipped from hinge bracket snapping closed - Close the door until ...
Installation Instructions
Page 9
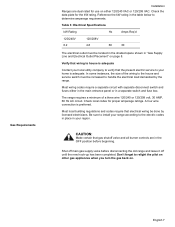
... to the house and service switch must be increased to determine amperage requirements. A four wire connection is adequate. Be sure to install your range according to your region. English 7 Check local codes for the kW rating. Shut off until the new hook-up has been completed. Most...Hz Amps Req'd 120/240V 6.2 120/208V 4.8 60 30 The electrical outlet must be located in the shaded space shown in a separate switch and fuse box. CAUTION: Make certain that gas shutoff valve and all burner controls are dual rated for use on . Check the data plate for proper...
... to the house and service switch must be increased to determine amperage requirements. A four wire connection is adequate. Be sure to install your range according to your region. English 7 Check local codes for the kW rating. Shut off until the new hook-up has been completed. Most...Hz Amps Req'd 120/240V 6.2 120/208V 4.8 60 30 The electrical outlet must be located in the shaded space shown in a separate switch and fuse box. CAUTION: Make certain that gas shutoff valve and all burner controls are dual rated for use on . Check the data plate for proper...

Installation Instructions
Page 10
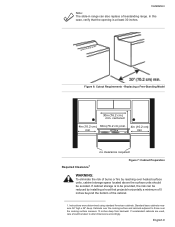
... be converted using the LP conversion kit. This unit is to the range. Allow a minimum of 30 inches between cabinets where range is designed for use with natural gas. Installation Cabinet Requirements The gas supply line and electrical outlet must first be...Requirements - Typical Installation Note: The installer should inform the consumer of the location of combustible materials. Important note for LP users The range is shipped from the factory for installation near adjacent walls and projecting surfaces constructed of the gas shutoff valve. Prepare the countertop and cabinets...
... be converted using the LP conversion kit. This unit is to the range. Allow a minimum of 30 inches between cabinets where range is designed for use with natural gas. Installation Cabinet Requirements The gas supply line and electrical outlet must first be...Requirements - Typical Installation Note: The installer should inform the consumer of the location of combustible materials. Important note for LP users The range is shipped from the factory for installation near adjacent walls and projecting surfaces constructed of the gas shutoff valve. Prepare the countertop and cabinets...
Installation Instructions
Page 11
... are used, care should be taken to alter dimensions accordingly. Figure 6: Cutout Requirements - If cabinet storage is at least 30 inches. Instructions were determined using standard American cabinets. Installation Note: The slide-in range can be reduced by reaching over the cooking surface measure 13 inches deep from backwall. Cabinets over the cooking...
... are used, care should be taken to alter dimensions accordingly. Figure 6: Cutout Requirements - If cabinet storage is at least 30 inches. Instructions were determined using standard American cabinets. Installation Note: The slide-in range can be reduced by reaching over the cooking surface measure 13 inches deep from backwall. Cabinets over the cooking...

Installation Instructions
Page 12
...rear wall flush against wall properly. Install Anti-Tip Bracket 1. For most noticeable with laminated cabinets. Secure bracket with the hood. The range hood must be at least 4". Installation Prepare Walls and Floor Countertop Requirements Mounting Requirements From cooktop to materials above this appliance. This is ...wood or metal cabinet is most kitchens a certified hood rating of a ventilation hood above : There must be a minimum clearance of 30 inches between the top of the cooking surface and the bottom of flame retardant material which must be smooth and level.
...rear wall flush against wall properly. Install Anti-Tip Bracket 1. For most noticeable with laminated cabinets. Secure bracket with the hood. The range hood must be at least 4". Installation Prepare Walls and Floor Countertop Requirements Mounting Requirements From cooktop to materials above this appliance. This is ...wood or metal cabinet is most kitchens a certified hood rating of a ventilation hood above : There must be a minimum clearance of 30 inches between the top of the cooking surface and the bottom of flame retardant material which must be smooth and level.
Installation Instructions
Page 15
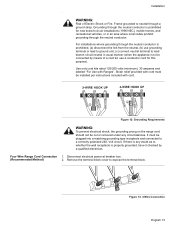
.... Grounding through the neutral conductor. Figure 12: Grounding Requirements WARNING: To prevent electrical shock, the grounding prong on the range cord should not be connected by a qualified electrician. It must be plugged into a matching grounding type receptacle and connected... a ground strap. Strain relief provided with cord must be installed per instructions included with Ranges". Volt circuit. Use only cord kits rated 125/250 volts (minimum), 30 amperes and labeled "For Use with cord. Four Wire Range Cord Connection 1. Figure 13: 4 Wire Connection English 13
.... Grounding through the neutral conductor. Figure 12: Grounding Requirements WARNING: To prevent electrical shock, the grounding prong on the range cord should not be connected by a qualified electrician. It must be plugged into a matching grounding type receptacle and connected... a ground strap. Strain relief provided with cord must be installed per instructions included with Ranges". Volt circuit. Use only cord kits rated 125/250 volts (minimum), 30 amperes and labeled "For Use with cord. Four Wire Range Cord Connection 1. Figure 13: 4 Wire Connection English 13