
Installation Instructions
Page 5
... the connection point properly. ___ 8. Remove the oven door(s) to reduce the unit weight and to provide access to remove the side hinge door (some models). Slide the unit all applicable codes.
... the connection point properly. ___ 8. Remove the oven door(s) to reduce the unit weight and to provide access to remove the side hinge door (some models). Slide the unit all applicable codes.

Installation Instructions
Page 6
...8226; Installation of 2x4's extending front to back flush with the cabinet cutout. Left Packaging Bracket Removal Right Packaging Bracket Removal Note: Different models use (varies by model up to 429 lbs. (195 kg)). Unit should stay on outside of box. • Remove cardboard box. • Remove all top...Styrofoam braces. • Place oven in front of cabinets where it is to be flat and capable of supporting the weight of your model in the "Cabinet Dimensions Requirements" section at the back of this installation manual for your oven when in use different packaging materials. ...
...8226; Installation of 2x4's extending front to back flush with the cabinet cutout. Left Packaging Bracket Removal Right Packaging Bracket Removal Note: Different models use (varies by model up to 429 lbs. (195 kg)). Unit should stay on outside of box. • Remove cardboard box. • Remove all top...Styrofoam braces. • Place oven in front of cabinets where it is to be flat and capable of supporting the weight of your model in the "Cabinet Dimensions Requirements" section at the back of this installation manual for your oven when in use different packaging materials. ...

Installation Instructions
Page 10
... junction box. Replace the oven mounted junction box cover and tighten the two screws holding it clicks into place. 6. Electrical Installation All model ovens on the rear top of the microwave or steam oven conduit to the single oven before connecting the microwave oven or steam oven... box cover (located on the front cover of the combination unit to the Single Oven Note: If installing the oven with all applicable local codes. Model HBN54, HBN84, HBL53, HBL54, HBL84, HBLP4 HBL55 HBN56, HBL56, HBL57, HBN86, HBL86, HBL87, HBLP6, HBLP7, HSLP7 Circuit Required 208V, 60 Hz ...
... junction box. Replace the oven mounted junction box cover and tighten the two screws holding it clicks into place. 6. Electrical Installation All model ovens on the rear top of the microwave or steam oven conduit to the single oven before connecting the microwave oven or steam oven... box cover (located on the front cover of the combination unit to the Single Oven Note: If installing the oven with all applicable local codes. Model HBN54, HBN84, HBL53, HBL54, HBL84, HBLP4 HBL55 HBN56, HBL56, HBL57, HBN86, HBL86, HBL87, HBLP6, HBLP7, HSLP7 Circuit Required 208V, 60 Hz ...

Installation Instructions
Page 11
... remove the side hinge door (some oven doors may swing in cabinet to attach to avoid breaking. • Grasp only the sides of installation, some models). For ease of the oven door. Also, do so could result. • Do not lay removed door on a flat, smooth surface, positioned so... snapping closed - It is also acceptable. Installing the Oven Unit into place. It is also recommended to remove the oven door (bottom hinge models only) to help reduce the unit weight and provide easier access to Main Power Supply The four-wire connection is preferred, but where local codes...
... remove the side hinge door (some oven doors may swing in cabinet to attach to avoid breaking. • Grasp only the sides of installation, some models). For ease of the oven door. Also, do so could result. • Do not lay removed door on a flat, smooth surface, positioned so... snapping closed - It is also acceptable. Installing the Oven Unit into place. It is also recommended to remove the oven door (bottom hinge models only) to help reduce the unit weight and provide easier access to Main Power Supply The four-wire connection is preferred, but where local codes...

Installation Instructions
Page 14
Verify that the door locks when the lock icon appears in the Use and Care Manual. Data Plate The data plate shows the model and serial number. See the Use and Care Manual for troubleshooting information. Test the door lock. Service Before Calling Service See Use and ... Turn on your product data plate when calling. Select the BAKE mode. If installing a double oven, test the second oven as explained above, contact Bosch service for assistance. If any of the control panel. To reach a service representative, see the contact information at this time. Refer to the data ...
Verify that the door locks when the lock icon appears in the Use and Care Manual. Data Plate The data plate shows the model and serial number. See the Use and Care Manual for troubleshooting information. Test the door lock. Service Before Calling Service See Use and ... Turn on your product data plate when calling. Select the BAKE mode. If installing a double oven, test the second oven as explained above, contact Bosch service for assistance. If any of the control panel. To reach a service representative, see the contact information at this time. Refer to the data ...

Supplement
Page 2
... size). Packaging Bracket Removal (left and right sides of the oven bottom trim. The unit should stay on the left and right sides) Note: Different models use different packaging materials. Note: The screws near the base mounting bracket are all accessories, racks, packing materials and literature from each bracket. The bottom...
... size). Packaging Bracket Removal (left and right sides of the oven bottom trim. The unit should stay on the left and right sides) Note: Different models use different packaging materials. Note: The screws near the base mounting bracket are all accessories, racks, packing materials and literature from each bracket. The bottom...

Supplement
Page 4
... the installation manual regarding the door removal before attempting to protect hands and forearms from the front when lifting the oven. Flip levers on select models). Remove Prior to Install Important: Do not attempt to grip from abrasion and potential scratches during installation by using both sides and using the oven...
... the installation manual regarding the door removal before attempting to protect hands and forearms from the front when lifting the oven. Flip levers on select models). Remove Prior to Install Important: Do not attempt to grip from abrasion and potential scratches during installation by using both sides and using the oven...
Supplement
Page 6
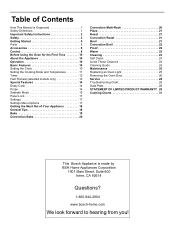
... hinges as much as well. no longer pull itself closed opens without incident. You feel a slight bump properly with the unit's side trim. Probe Some models include a temperature probe used to engage until the door closes smoothly. The door does not hold the trim away from a closed , the door may also...
... hinges as much as well. no longer pull itself closed opens without incident. You feel a slight bump properly with the unit's side trim. Probe Some models include a temperature probe used to engage until the door closes smoothly. The door does not hold the trim away from a closed , the door may also...
Supplement
Page 7
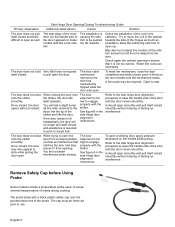
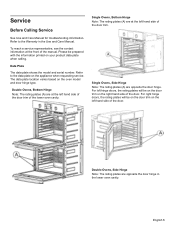
... data plate location varies based on the appliance when requesting service. For left hand side of the door. Data Plate The data plate shows the model and serial number. Single Ovens, Bottom Hinge Note: The rating plates (A) are opposite the door hinge. For right hinge doors, the rating plates will be... prepared with the information printed on the left hand side of the door trim of the door. Refer to the data plate on the oven model and door hinge type. To reach a service representative, see the contact information at the left hand side of the door trim.
... data plate location varies based on the appliance when requesting service. For left hand side of the door. Data Plate The data plate shows the model and serial number. Single Ovens, Bottom Hinge Note: The rating plates (A) are opposite the door hinge. For right hinge doors, the rating plates will be... prepared with the information printed on the left hand side of the door trim of the door. Refer to the data plate on the oven model and door hinge type. To reach a service representative, see the contact information at the left hand side of the door trim.
Instructions for Use
Page 2
... About the Appliance 10 Operation 10 Basic Features 10 Setting the Clock 10 Setting the Cooking Mode and Temperature 11 Timer 12 Fast Preheat (selected models only 13 Special Features 14 Delay Cook 14 Probe 14 Sabbath Mode 15 Panel Lock 17 Settings 17 Settings Menu Options 17 Getting the Most... Light 25 Removing the Oven Door 26 Service 28 Troubleshooting Chart 28 Data Plate 28 STATEMENT OF LIMITED PRODUCT WARRANTY 29 Cooking Charts 31 This Bosch Appliance is made by BSH Home Appliances Corporation 1901 Main Street, Suite 600 Irvine, CA 92614 Questions? 1-800-944-2904 www...
... About the Appliance 10 Operation 10 Basic Features 10 Setting the Clock 10 Setting the Cooking Mode and Temperature 11 Timer 12 Fast Preheat (selected models only 13 Special Features 14 Delay Cook 14 Probe 14 Sabbath Mode 15 Panel Lock 17 Settings 17 Settings Menu Options 17 Getting the Most... Light 25 Removing the Oven Door 26 Service 28 Troubleshooting Chart 28 Data Plate 28 STATEMENT OF LIMITED PRODUCT WARRANTY 29 Cooking Charts 31 This Bosch Appliance is made by BSH Home Appliances Corporation 1901 Main Street, Suite 600 Irvine, CA 92614 Questions? 1-800-944-2904 www...
Instructions for Use
Page 11
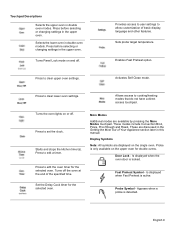
.... Turns off the oven at the end of Your Appliance section later in the upper oven. Touchpad Descriptions Selects the upper oven in double oven models. Selects the lower oven in double oven modes. Press to cooking/heating modes that do not have a direct access touchpad. Display Symbols Note: All symbols...
.... Turns off the oven at the end of Your Appliance section later in the upper oven. Touchpad Descriptions Selects the upper oven in double oven models. Selects the lower oven in double oven modes. Press to cooking/heating modes that do not have a direct access touchpad. Display Symbols Note: All symbols...
Instructions for Use
Page 13
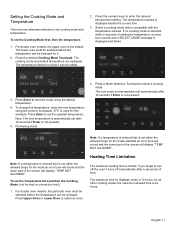
... 1. The lower oven must be selected before the temperature can be changed . Press Enter to select a cooking mode. For double oven models, the particular oven must be selected before the temperature can be changed for it turns off automatically after a set cooking mode and temperature....To change the temperature, enter the new temperature using the default temperature. 4. If you forget to select an oven. For double oven models, the upper oven is compatible with the temperature entered. The cooking mode and default temperature are two alternate methods to enter the desired...
... 1. The lower oven must be selected before the temperature can be changed . Press Enter to select a cooking mode. For double oven models, the particular oven must be selected before the temperature can be changed for it turns off automatically after a set cooking mode and temperature....To change the temperature, enter the new temperature using the default temperature. 4. If you forget to select an oven. For double oven models, the upper oven is compatible with the temperature entered. The cooking mode and default temperature are two alternate methods to enter the desired...
Instructions for Use
Page 26
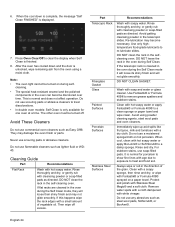
... pads or abrasive cleaners. Always wipe or rub in the direction of vegetable oil. Press Oven Clear/Off to treat discolorations. • In double oven models: Self Clean is normal for one oven at a time. The other oven must be turned on a paper towel. Rinse thoroughly and dry, or gently rub...
... pads or abrasive cleaners. Always wipe or rub in the direction of vegetable oil. Press Oven Clear/Off to treat discolorations. • In double oven models: Self Clean is normal for one oven at a time. The other oven must be turned on a paper towel. Rinse thoroughly and dry, or gently rub...
Instructions for Use
Page 30
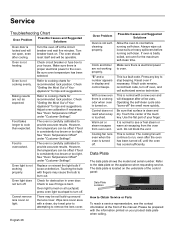
... the center of Your Appliance" for recommended rack position. It is normal to cool before running self-clean. Data Plate The data plate shows the model and serial number. Food is a fault code. There may cause the bulb to oven. With a new oven there is a strong odor when oven is turned...
... the center of Your Appliance" for recommended rack position. It is normal to cool before running self-clean. Data Plate The data plate shows the model and serial number. Food is a fault code. There may cause the bulb to oven. With a new oven there is a strong odor when oven is turned...
Instructions for Use
Page 31
...manufacturer-defective Product only, using purchaser, provided that the Product is in materials or workmanship. in any such event, if you request, Bosch would still be extended with respect to have been specially trained on your Product without limitation, any form of commercial use, use or ... for a period of three hundred and sixty-five (365) days from the date of Warranty Product Bosch is to provide you (subject to certain limitations stated herein) if your Product (upgraded models may be stalled, tolled, extended, or suspended, for the Product if it is located in a ...
...manufacturer-defective Product only, using purchaser, provided that the Product is in materials or workmanship. in any such event, if you request, Bosch would still be extended with respect to have been specially trained on your Product without limitation, any form of commercial use, use or ... for a period of three hundred and sixty-five (365) days from the date of Warranty Product Bosch is to provide you (subject to certain limitations stated herein) if your Product (upgraded models may be stalled, tolled, extended, or suspended, for the Product if it is located in a ...


