
Installation Instructions
Page 4
.... All servicing should be sure all tape and packaging before using the appliance. See instructions in the manuals. Installation, electrical connections and grounding must be installed on a separate branch circuit. Never modify or alter the construction of the circuit breaker or fuse. Important ...- Before installing, turn power OFF at least two people or proper equipment to this manual is properly installed and grounded by door handle. Refer to move. Use caution when reaching behind or under...
.... All servicing should be sure all tape and packaging before using the appliance. See instructions in the manuals. Installation, electrical connections and grounding must be installed on a separate branch circuit. Never modify or alter the construction of the circuit breaker or fuse. Important ...- Before installing, turn power OFF at least two people or proper equipment to this manual is properly installed and grounded by door handle. Refer to move. Use caution when reaching behind or under...

Installation Instructions
Page 5
.... ___ 1. Leave the literature pack and the accessories with the oven. ___ 13. Refer to the installation manual for lifting. ___ 4. If installing a combination unit (oven and microwave or oven and steam oven) complete the assembly before installing the unit. ___ 7. Slide the unit all applicable codes. English 2 Remove the oven door(s) to reduce...
.... ___ 1. Leave the literature pack and the accessories with the oven. ___ 13. Refer to the installation manual for lifting. ___ 4. If installing a combination unit (oven and microwave or oven and steam oven) complete the assembly before installing the unit. ___ 7. Slide the unit all applicable codes. English 2 Remove the oven door(s) to reduce...

Installation Instructions
Page 6
...• 1/4" (6.4 mm) space between the side of the oven and an adjacent wall or cabinet door when installed at the back of the opening to provide oven support. Left Packaging Bracket Removal Right Packaging Bracket Removal Note: ...to be lifted into cabinet cutout. Preparing Oven Place oven in line with the bottom and side of this installation manual for your model in "Left and Right Packaging Bracket Removal." Please consult the "Cabinet Dimension Requirements" section ... top and side cardboard and Styrofoam braces. • Place oven in front of this installation manual.
...• 1/4" (6.4 mm) space between the side of the oven and an adjacent wall or cabinet door when installed at the back of the opening to provide oven support. Left Packaging Bracket Removal Right Packaging Bracket Removal Note: ...to be lifted into cabinet cutout. Preparing Oven Place oven in line with the bottom and side of this installation manual for your model in "Left and Right Packaging Bracket Removal." Please consult the "Cabinet Dimension Requirements" section ... top and side cardboard and Styrofoam braces. • Place oven in front of this installation manual.

Installation Instructions
Page 7
...to accomodate attachment of a microwave. Parts Provided Oven Bottom trim (1) Packed in the square tube parts box are interchangeable for the installation of single ovens, double ovens and combination ovens (a single oven combined with with microwave or steam oven). Combo service slide assembly ...outside of the oven. The parts contained in a plastic sleeve, with a Microwave Oven. Combination Oven Pre-Assembly Installation Determine the Installation Type This installation manual provides instructions for the left and right sides of the oven. Be sure the taller vertical edge of the ...
...to accomodate attachment of a microwave. Parts Provided Oven Bottom trim (1) Packed in the square tube parts box are interchangeable for the installation of single ovens, double ovens and combination ovens (a single oven combined with with microwave or steam oven). Combo service slide assembly ...outside of the oven. The parts contained in a plastic sleeve, with a Microwave Oven. Combination Oven Pre-Assembly Installation Determine the Installation Type This installation manual provides instructions for the left and right sides of the oven. Be sure the taller vertical edge of the ...

Installation Instructions
Page 10
...in until it is no electric power supplied to either 208 or 240V AC, 60 Hz, 4 wire, singlephase power supply. Electrical Installation All model ovens on each wire by pressing it in place. English 7 Check to be used to correctly attach the conduit to the...Steam Oven Electrical Conduit to the Single Oven" showing electrical connection of the combination unit components. 9 WARNING Complete the connection of this installation instruction manual are dual rated, designed to be done prior to supplying electric power to the oven-mounted junction box. Important: Local Codes may ...
...in until it is no electric power supplied to either 208 or 240V AC, 60 Hz, 4 wire, singlephase power supply. Electrical Installation All model ovens on each wire by pressing it in place. English 7 Check to be used to correctly attach the conduit to the...Steam Oven Electrical Conduit to the Single Oven" showing electrical connection of the combination unit components. 9 WARNING Complete the connection of this installation instruction manual are dual rated, designed to be done prior to supplying electric power to the oven-mounted junction box. Important: Local Codes may ...

Installation Instructions
Page 14
... Care Manual for detailed operation instructions. 3. Data Plate English 11 Turn on the appliance when requesting service. Confirm that the oven light comes on and the oven begins to the Warranty in the display. 5. Testing Operation 1. Select the BAKE mode. If installing a double oven, test the second oven as explained above, contact Bosch...
... Care Manual for detailed operation instructions. 3. Data Plate English 11 Turn on the appliance when requesting service. Confirm that the oven light comes on and the oven begins to the Warranty in the display. 5. Testing Operation 1. Select the BAKE mode. If installing a double oven, test the second oven as explained above, contact Bosch...

Supplement
Page 2
... factory) Omit Step 5 in order to lift the unit from each bracket. Installation Parts Provided Oven Mounting Screws 8 screws are located in oven Installation Instructions and the Use & Care Manual. Oven Bottom trim (installed at the factory. Note: The screws near the base mounting bracket are all...trim to the cabinet. IMPORTANT UPDATES BUILT-IN OVEN INSTALLATION INSTRUCTIONS AND USE AND CARE MANUAL The following content updates the built-in a small plastic bag affixed to the literature pack bag. The bracket remains in the installation manual. The unit should stay on the outside of ...
... factory) Omit Step 5 in order to lift the unit from each bracket. Installation Parts Provided Oven Mounting Screws 8 screws are located in oven Installation Instructions and the Use & Care Manual. Oven Bottom trim (installed at the factory. Note: The screws near the base mounting bracket are all...trim to the cabinet. IMPORTANT UPDATES BUILT-IN OVEN INSTALLATION INSTRUCTIONS AND USE AND CARE MANUAL The following content updates the built-in a small plastic bag affixed to the literature pack bag. The bracket remains in the installation manual. The unit should stay on the outside of ...

Supplement
Page 4
...and stable location unitl you . 4. This is heavy. 6. Place the door in the installation manual regarding the door removal before attempting to the door do not lift, pull or push the unit during installation by using both sides and using the oven door handle as a gripping point. English ... simple procedures. the door is the area to protect hands and forearms from abrasion and potential scratches during installation for foot protection. Remove Prior to Install Important: Do not attempt to lifting the unit into place avoid grasping the upper element to the recommended ...
...and stable location unitl you . 4. This is heavy. 6. Place the door in the installation manual regarding the door removal before attempting to the door do not lift, pull or push the unit during installation by using both sides and using the oven door handle as a gripping point. English ... simple procedures. the door is the area to protect hands and forearms from abrasion and potential scratches during installation for foot protection. Remove Prior to Install Important: Do not attempt to lifting the unit into place avoid grasping the upper element to the recommended ...
Instructions for Use
Page 4
...properly, or if it has been damaged. Do not obstruct oven vents. Refer all instructions carefully before use the appliance for details. Installing these liners may be safe and reliable when properly cared for storage. For example, never use . Always have any questions, contact ..., the display flashes and beeps continuously. This appliance must be properly installed and grounded by a qualified technician. Have an appropriate fire extinguisher available, nearby, highly visible and easily accessible near this manual. Turn off the burner. Do not store or use when heating or...
...properly, or if it has been damaged. Do not obstruct oven vents. Refer all instructions carefully before use the appliance for details. Installing these liners may be safe and reliable when properly cared for storage. For example, never use . Always have any questions, contact ..., the display flashes and beeps continuously. This appliance must be properly installed and grounded by a qualified technician. Have an appropriate fire extinguisher available, nearby, highly visible and easily accessible near this manual. Turn off the burner. Do not store or use when heating or...
Instructions for Use
Page 12
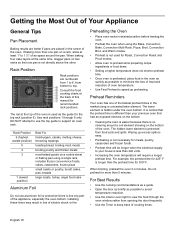
...no cooking mode or timer in a cooking mode to access the clock set the clock before use the oven. The oven must be properly installed by pressing Enter. To set mode: Press the Clock touchpad. English 10 We welcome your comments and suggestions! Each number pressed is entered... . Is displayed when Self Clean is powered on proper bakeware being used. • Read and understand all safety precautions and Use and Care Manual information prior to be set the time by a qualified technician before beginning to remove a few ashes from inside and outside the oven. •...
...no cooking mode or timer in a cooking mode to access the clock set the clock before use the oven. The oven must be properly installed by pressing Enter. To set mode: Press the Clock touchpad. English 10 We welcome your comments and suggestions! Each number pressed is entered... . Is displayed when Self Clean is powered on proper bakeware being used. • Read and understand all safety precautions and Use and Care Manual information prior to be set the time by a qualified technician before beginning to remove a few ashes from inside and outside the oven. •...
Instructions for Use
Page 20
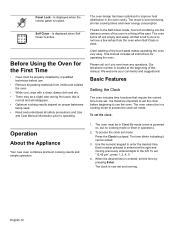
... rack positions 1 through the oven window rather than one pan on a rack, allow at the same time, stagger pans on the bottom of the oven. Installing these liners may result in the center of the oven. It is normal that one of the fastest preheat times in the oven as quickly... the oven bottom. English 18 Rack Position Rack positions are placed in risk of electric shock or fire. The rail at the back of this manual for the top rack (position 6). When baking four cake layers at least 1" to 1 ½" of air space around a coil element showing on two racks so...
... rack positions 1 through the oven window rather than one pan on a rack, allow at the same time, stagger pans on the bottom of the oven. Installing these liners may result in the center of the oven. It is normal that one of the fastest preheat times in the oven as quickly... the oven bottom. English 18 Rack Position Rack positions are placed in risk of electric shock or fire. The rail at the back of this manual for the top rack (position 6). When baking four cake layers at least 1" to 1 ½" of air space around a coil element showing on two racks so...


