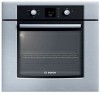

Use & Care Manual
Page 2
Table of Contents About This Manual 1 How This Manual is Organized 1 Safety 2 Important Safety Instructions 2 Getting Started 6 Parts and Accessories 6 Control 8 Before Using the Oven for the First Time 9 Operation 10 About the Appliance 10 Basic Features 10 Setting the Clock 10 Setting the Cooking Mode and Temperature 11 Heating Time Limitation 11 Timer 12 Special Features 13 Cook Time 13 Customer Settings 14 Getting the Most Out of Your Appliance 16 General Tips 16 Bake 17 Roast 17 Broil 18 Warm 19 Cleaning and Maintenance 20 Cleaning 20 Self-Clean 20
Table of Contents About This Manual 1 How This Manual is Organized 1 Safety 2 Important Safety Instructions 2 Getting Started 6 Parts and Accessories 6 Control 8 Before Using the Oven for the First Time 9 Operation 10 About the Appliance 10 Basic Features 10 Setting the Clock 10 Setting the Cooking Mode and Temperature 11 Heating Time Limitation 11 Timer 12 Special Features 13 Cook Time 13 Customer Settings 14 Getting the Most Out of Your Appliance 16 General Tips 16 Bake 17 Roast 17 Broil 18 Warm 19 Cleaning and Maintenance 20 Cleaning 20 Self-Clean 20

Use & Care Manual
Page 3
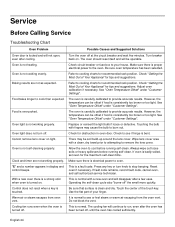
Huntington Beach, CA 92649 Questions? 1-800-944-2904 www.boschappliances.com We look forward to hearing from you! Table of Contents Cont. Avoid These Cleaners 20 Cleaning Guide 21 Maintenance 22 Replacing an Oven Light 22 Removing the Oven Door 22 Service 24 Before Calling Service 24 Troubleshooting Chart 24 Data Plate 25 STATEMENT OF LIMITED PRODUCT WARRANTY 26 This Bosch Appliance is made by BSH Home Appliances Corporation 5551 McFadden Ave.
Huntington Beach, CA 92649 Questions? 1-800-944-2904 www.boschappliances.com We look forward to hearing from you! Table of Contents Cont. Avoid These Cleaners 20 Cleaning Guide 21 Maintenance 22 Replacing an Oven Light 22 Removing the Oven Door 22 Service 24 Before Calling Service 24 Troubleshooting Chart 24 Data Plate 25 STATEMENT OF LIMITED PRODUCT WARRANTY 26 This Bosch Appliance is made by BSH Home Appliances Corporation 5551 McFadden Ave.

Use & Care Manual
Page 4
... to safely operate your oven. • "Getting Started" introduces you to the oven components and features. • The "Operation" section offers you with information on how to clean and care for the various oven parts. • The "Service" section includes your appliance and become familiar with ...its operation and features. This section also provides you with the appropriate oven mode, temperature, rack position and bake time. The manual ...
... to safely operate your oven. • "Getting Started" introduces you to the oven components and features. • The "Operation" section offers you with information on how to clean and care for the various oven parts. • The "Service" section includes your appliance and become familiar with ...its operation and features. This section also provides you with the appropriate oven mode, temperature, rack position and bake time. The manual ...
Use & Care Manual
Page 5
...See the Warranty. Do not repair or replace any part of the appliance unless specifically recommended in heating or cleaning will reduce the risk of corrosive chemicals in this appliance. Do not use of burns, electric shock, fire and injury to be safe and reliable. English 2 Safety...appliance and could result in or near this manual. In the event of an error, the display flashes and beeps continuously. Have the installer show you have any part of electric shock or fire. Refer to a properly grounded outlet. Contact an authorized servicer. Do not obstruct oven...
...See the Warranty. Do not repair or replace any part of the appliance unless specifically recommended in heating or cleaning will reduce the risk of corrosive chemicals in this appliance. Do not use of burns, electric shock, fire and injury to be safe and reliable. English 2 Safety...appliance and could result in or near this manual. In the event of an error, the display flashes and beeps continuously. Have the installer show you have any part of electric shock or fire. Refer to a properly grounded outlet. Contact an authorized servicer. Do not obstruct oven...
Use & Care Manual
Page 6
...have a working smoke detector near the unit. Never use the appliance for storage. EXERCISE CAUTION TO PREVENT BURNS. Heating elements may be hot even though they have had sufficient time to cool. Among these openings and oven doors. Standing to an exit. Keep your back to the ...slightly to cause burns. Build-up of the opening the appliance. Never use water on cooking fires. Have an appropriate fire extinguisher available, nearby, highly visible and easily accessible near these surfaces are oven vent openings, surfaces near the oven. If the flames do not touch, or let clothing,...
...have a working smoke detector near the unit. Never use the appliance for storage. EXERCISE CAUTION TO PREVENT BURNS. Heating elements may be hot even though they have had sufficient time to cool. Among these openings and oven doors. Standing to an exit. Keep your back to the ...slightly to cause burns. Build-up of the opening the appliance. Never use water on cooking fires. Have an appropriate fire extinguisher available, nearby, highly visible and easily accessible near these surfaces are oven vent openings, surfaces near the oven. If the flames do not touch, or let clothing,...
Use & Care Manual
Page 7
... from steam. Children climbing on hot surfaces may result in foods, and open the oven door carefully. Wet cloths or sponges can damage the appliance, and the unit may catch fire in the oven. Always use a towel or other bulky cloth. Tie long hair so that they ... a door, warming drawer or storage drawer. They should not be stored in an appliance, in the area where the appliance is cool. Always place oven racks in desired location while oven is in the oven. Do not use dry potholders. English 4 before beginning. Some cleaners produce noxious fumes when applied to...
... from steam. Children climbing on hot surfaces may result in foods, and open the oven door carefully. Wet cloths or sponges can damage the appliance, and the unit may catch fire in the oven. Always use a towel or other bulky cloth. Tie long hair so that they ... a door, warming drawer or storage drawer. They should not be stored in an appliance, in the area where the appliance is cool. Always place oven racks in desired location while oven is in the oven. Do not use dry potholders. English 4 before beginning. Some cleaners produce noxious fumes when applied to...
Use & Care Manual
Page 10
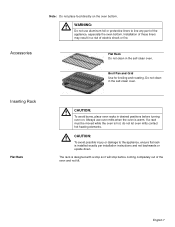
... or damage to line any part of electric shock or fire. English 7 m WARNING: Do not use oven mitts when the oven is designed with a stop so it will stop before turning oven on the oven bottom. If a rack must be moved while the oven is installed exactly per installation instructions and... before coming completely out of the oven and not tilt. The rack is warm. Inserting Rack Flat Rack m CAUTION: To avoid burns, place oven racks in a risk of the appliance, especially the oven bottom. Flat Rack Do not clean in the self-clean oven. Always use aluminum foil or protective...
... or damage to line any part of electric shock or fire. English 7 m WARNING: Do not use oven mitts when the oven is designed with a stop so it will stop before turning oven on the oven bottom. If a rack must be moved while the oven is installed exactly per installation instructions and... before coming completely out of the oven and not tilt. The rack is warm. Inserting Rack Flat Rack m CAUTION: To avoid burns, place oven racks in a risk of the appliance, especially the oven bottom. Flat Rack Do not clean in the self-clean oven. Always use aluminum foil or protective...
Use & Care Manual
Page 13
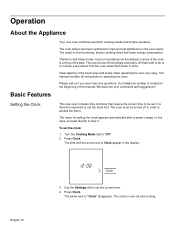
...hours of scrubbing into the darkest corners of the past. The oven must be set. The arrow next to Clock appear in the display: English 10 Clock 3. Operation About the Appliance Basic Features Your new oven combines premium cooking results and simple operation. All that require the ...current time to remove a few ashes from the oven when Self-Clean is now set the clock first. Press Clock....
...hours of scrubbing into the darkest corners of the past. The oven must be set. The arrow next to Clock appear in the display: English 10 Clock 3. Operation About the Appliance Basic Features Your new oven combines premium cooking results and simple operation. All that require the ...current time to remove a few ashes from the oven when Self-Clean is now set the clock first. Press Clock....
Use & Care Manual
Page 19
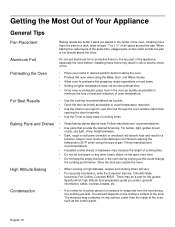
...For tender, light, golden-brown crusts, use aluminum foil or protective liners to 1 ½" of electric shock or fire. • Place oven racks in desired position before heating the oven. • Preheat the oven when using this could change the cooking performance. Store the broil pan outside the... • Use pans that one pan on the open oven door. • Do not keep track of the appliance, especially the oven bottom. Getting the Most Out of Your Appliance General Tips Pan Placement Aluminum Foil Preheating the Oven For Best Results Baking Pans and Dishes High Altitude Baking ...
...For tender, light, golden-brown crusts, use aluminum foil or protective liners to 1 ½" of electric shock or fire. • Place oven racks in desired position before heating the oven. • Preheat the oven when using this could change the cooking performance. Store the broil pan outside the... • Use pans that one pan on the open oven door. • Do not keep track of the appliance, especially the oven bottom. Getting the Most Out of Your Appliance General Tips Pan Placement Aluminum Foil Preheating the Oven For Best Results Baking Pans and Dishes High Altitude Baking ...
Use & Care Manual
Page 20
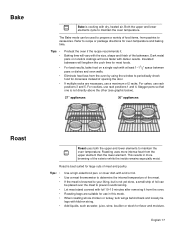
... is cooking with dry, heated air. Let meat stand covered with at least 1-11/2" space between pans or dishes and oven walls. Roasting bags are necessary, use rack positions 1 and 4. English 17 Bake t Bake is best suited for large cuts of meat and poultry.... results. Use a meat thermometer to periodically check food for oven temperature and baking time. Refer to maintain the oven temperature. If the meat is browned to your liking, but is not directly above the other (see graphic below). 27" appliances: 30" appliances: Roast Roast uses both the upper and lower elements to...
... is cooking with dry, heated air. Let meat stand covered with at least 1-11/2" space between pans or dishes and oven walls. Roasting bags are necessary, use rack positions 1 and 4. English 17 Bake t Bake is best suited for large cuts of meat and poultry.... results. Use a meat thermometer to periodically check food for oven temperature and baking time. Refer to maintain the oven temperature. If the meat is browned to your liking, but is not directly above the other (see graphic below). 27" appliances: 30" appliances: Roast Roast uses both the upper and lower elements to...

Use & Care Manual
Page 25
... 5. Turn power back on . 6. Use both levers are securely in electrical shock or burns. • The oven door is cool and power to the oven has been turned off before replacing the light bulb(s). Handle carefully to remove the oven door. English 22 To change the bulb: 1. Failure to do so ...could result in electrical shock or burns. • The lenses must be in place when using the appliance. • The lenses serve to protect the light bulb ...
... 5. Turn power back on . 6. Use both levers are securely in electrical shock or burns. • The oven door is cool and power to the oven has been turned off before replacing the light bulb(s). Handle carefully to remove the oven door. English 22 To change the bulb: 1. Failure to do so ...could result in electrical shock or burns. • The lenses must be in place when using the appliance. • The lenses serve to protect the light bulb ...
Use & Care Manual
Page 27
...not react when a key is badly soiled, set oven for obstruction in display and control beeps. Use the flat part of Your Appliance" for recommended rack position. Cooling fan runs even when the oven is proper electrical power to cooking charts for tips and suggestions. Make... sure there is turned off . Refer to the oven. Adjust oven calibration if necessary. See "Oven Temperature Offset" under "...
...not react when a key is badly soiled, set oven for obstruction in display and control beeps. Use the flat part of Your Appliance" for recommended rack position. Cooling fan runs even when the oven is proper electrical power to cooking charts for tips and suggestions. Make... sure there is turned off . Refer to the oven. Adjust oven calibration if necessary. See "Oven Temperature Offset" under "...
Use & Care Manual
Page 28
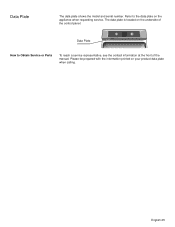
Refer to the data plate on the underside of the control panel: Data Plate How to Obtain Service or Parts To reach a service representative, see the contact information at the front of the manual. The data plate is located on the appliance when requesting service. English 25 Please be prepared with the information printed on your product data plate when calling. Data Plate The data plate shows the model and serial number.
Refer to the data plate on the underside of the control panel: Data Plate How to Obtain Service or Parts To reach a service representative, see the contact information at the front of the manual. The data plate is located on the appliance when requesting service. English 25 Please be prepared with the information printed on your product data plate when calling. Data Plate The data plate shows the model and serial number.
Use & Care Manual
Page 29
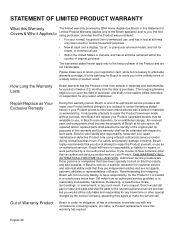
... service provider work performed by a non-authorized servicer. If reasonable attempts to repair the Product have been made without success, then Bosch will repair your Product without charge to you (subject to certain limitations stated herein) if your Product (upgraded models may be extended...not a display, "as Your Exclusive Remedy During this warranty period, Bosch or one of its sole option. STATEMENT OF LIMITED PRODUCT WARRANTY What this Warranty The limited warranty provided by BSH Home Appliances Bosch in this Statement of Covers & Who it Applies to Limited Product Warranty...
... service provider work performed by a non-authorized servicer. If reasonable attempts to repair the Product have been made without success, then Bosch will repair your Product without charge to you (subject to certain limitations stated herein) if your Product (upgraded models may be extended...not a display, "as Your Exclusive Remedy During this warranty period, Bosch or one of its sole option. STATEMENT OF LIMITED PRODUCT WARRANTY What this Warranty The limited warranty provided by BSH Home Appliances Bosch in this Statement of Covers & Who it Applies to Limited Product Warranty...
Use & Care Manual
Page 30
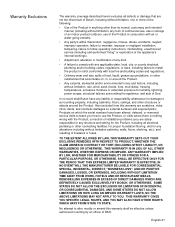
... OTHERWISE. English 27 Products on which the serial numbers have any applicable state, local, city, or county electrical, plumbing and/... mishandling, unauthorized service (including self-performed "fixing" or exploration of the appliance's internal workings). • Adjustment, alteration or modification of any kind...., and other substances that are not the direct fault of Bosch, including without limitation, one or more of the following: ...its normal, customary and intended manner (including without limitation cabinetry, walls, floors, shelving, etc.); ANY WARRANTY IMPLIED BY LAW, WHETHER...
... OTHERWISE. English 27 Products on which the serial numbers have any applicable state, local, city, or county electrical, plumbing and/... mishandling, unauthorized service (including self-performed "fixing" or exploration of the appliance's internal workings). • Adjustment, alteration or modification of any kind...., and other substances that are not the direct fault of Bosch, including without limitation, one or more of the following: ...its normal, customary and intended manner (including without limitation cabinetry, walls, floors, shelving, etc.); ANY WARRANTY IMPLIED BY LAW, WHETHER...

Use & Care Manual
Page 96
5551 McFadden Avenue, Huntington Beach, CA 92649 • 800-944-2904 • www.boschappliances.com 9000175023 • 5V0AND • Rev. B • 07/07 © BSH Home Appliances Corporation, 2007 • All rights reserved Litho in USA
5551 McFadden Avenue, Huntington Beach, CA 92649 • 800-944-2904 • www.boschappliances.com 9000175023 • 5V0AND • Rev. B • 07/07 © BSH Home Appliances Corporation, 2007 • All rights reserved Litho in USA

Installation Instructions
Page 2
... We look forward to hearing from you Begin 3 Tools and Parts Needed 3 Parts Included 3 27" Appliances 3 General Information 3 30" Appliances 6 Removing Packaging 9 For Convection Microwave Combination Units 9 Preparing Oven 9 Installation 10 Electrical Installation 10 Oven Installation 12 Testing Operation 13 Service 14 Before Calling Service 14 This Bosch Appliance is made by BSH Home Appliances Corporation 5551 McFadden Ave.
... We look forward to hearing from you Begin 3 Tools and Parts Needed 3 Parts Included 3 27" Appliances 3 General Information 3 30" Appliances 6 Removing Packaging 9 For Convection Microwave Combination Units 9 Preparing Oven 9 Installation 10 Electrical Installation 10 Oven Installation 12 Testing Operation 13 Service 14 Before Calling Service 14 This Bosch Appliance is made by BSH Home Appliances Corporation 5551 McFadden Ave.

Installation Instructions
Page 3
...door for more of the following Standards: • UL 858, The Standard for the Safety of Household Electric Ranges • UL 923, The Standard for the Safety of Microwave Cooking Appliances • UL 507, The Standard for the Safety of the owner and the installer to determine if additional... is not followed exactly, fire or shock may have sharp edges. show the owner the location of the appliance unless specifically recommended in the manuals. See instructions in an electrical cord, be done by door handle. Before installing, turn power OFF at least two people or proper equipment...
...door for more of the following Standards: • UL 858, The Standard for the Safety of Household Electric Ranges • UL 923, The Standard for the Safety of Microwave Cooking Appliances • UL 507, The Standard for the Safety of the owner and the installer to determine if additional... is not followed exactly, fire or shock may have sharp edges. show the owner the location of the appliance unless specifically recommended in the manuals. See instructions in an electrical cord, be done by door handle. Before installing, turn power OFF at least two people or proper equipment...

Installation Instructions
Page 4
... by a qualified technician. English 2 Never allow children to the oven vent, use the transport method shown in the picture below. Destroy the packaging after unpacking the appliance. For example, do not remove leveling legs, panels, wire covers or anti-tip brackets/screws. Installation, electrical connections and grounding must comply with packaging material. Remove...
... by a qualified technician. English 2 Never allow children to the oven vent, use the transport method shown in the picture below. Destroy the packaging after unpacking the appliance. For example, do not remove leveling legs, panels, wire covers or anti-tip brackets/screws. Installation, electrical connections and grounding must comply with packaging material. Remove...

Installation Instructions
Page 5
...718mm) 291/16" (738mm) 27" (686mm) min. 43/4" (121mm) max. 313/8" (797mm) 237/8" (606mm) 22" (559mm) Single Oven 27" It is good practice, when oven is required between the side of the oven and the wall/door. For oven support, install 2x4's extending front ...to the floor/cabinet and level. The cabinet base must be flat and capable of supporting a weight of at least 1/4" space between the back wall and the right rear of the 2x4 supports. Preparation Before you Begin Tools and Parts Needed Parts Included 27" Appliances...
...718mm) 291/16" (738mm) 27" (686mm) min. 43/4" (121mm) max. 313/8" (797mm) 237/8" (606mm) 22" (559mm) Single Oven 27" It is good practice, when oven is required between the side of the oven and the wall/door. For oven support, install 2x4's extending front ...to the floor/cabinet and level. The cabinet base must be flat and capable of supporting a weight of at least 1/4" space between the back wall and the right rear of the 2x4 supports. Preparation Before you Begin Tools and Parts Needed Parts Included 27" Appliances...