
Instructions for Use
Page 3
Table of Contents About This Manual 1 How This Manual is Organized 1 Safety Definitions 1 Important Safety Instructions 2 Safety 2 Getting Started 5 Parts 5 Accessories 6 Control 8 Before Using the Oven for the First Time 10 Operation 10 About ... Light 24 Removing the Oven Door 25 Service 27 Troubleshooting Chart 27 Data Plate 27 STATEMENT OF LIMITED PRODUCT WARRANTY 28 Cooking Charts 30 This Bosch Appliance is made by BSH Home Appliances Corporation 1901 Main Street, Suite 600 Irvine, CA 92614 Questions? 1-800-944-2904 www...
Table of Contents About This Manual 1 How This Manual is Organized 1 Safety Definitions 1 Important Safety Instructions 2 Safety 2 Getting Started 5 Parts 5 Accessories 6 Control 8 Before Using the Oven for the First Time 10 Operation 10 About ... Light 24 Removing the Oven Door 25 Service 27 Troubleshooting Chart 27 Data Plate 27 STATEMENT OF LIMITED PRODUCT WARRANTY 28 Cooking Charts 30 This Bosch Appliance is made by BSH Home Appliances Corporation 1901 Main Street, Suite 600 Irvine, CA 92614 Questions? 1-800-944-2904 www...

Instructions for Use
Page 4
...with several bakeware and preparation tips. • "Cleaning and Maintenance" provides you with its operation and features. English 1 About This Manual How This Manual is Organized Safety Definitions You can get to clean and care for the various oven parts. • The "Service" section includes... your warranty and do-ityourself troubleshooting tips. The manual consists of the following sections: • The "Safety" section provides information on how to know your appliance and become familiar with ...
...with several bakeware and preparation tips. • "Cleaning and Maintenance" provides you with its operation and features. English 1 About This Manual How This Manual is Organized Safety Definitions You can get to clean and care for the various oven parts. • The "Service" section includes... your warranty and do-ityourself troubleshooting tips. The manual consists of the following sections: • The "Safety" section provides information on how to know your appliance and become familiar with ...
Instructions for Use
Page 5
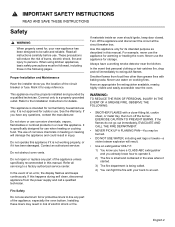
...not go out immediately, EVACUATE AND CALL THE FIRE DEPARTMENT. • NEVER PICK UP A FLAMING PAN-You may result in this manual. Read all servicing to be followed, including those in or near this appliance. Contact an authorized servicer. Use this appliance only for ... extinguisher available, nearby, highly visible and easily accessible near the kitchen. These precautions will damage the appliance and could result in this manual. This appliance must be safe and reliable. This appliance is specifically designed for , your back to persons. Never use the appliance...
...not go out immediately, EVACUATE AND CALL THE FIRE DEPARTMENT. • NEVER PICK UP A FLAMING PAN-You may result in this manual. Read all servicing to be followed, including those in or near this appliance. Contact an authorized servicer. Use this appliance only for ... extinguisher available, nearby, highly visible and easily accessible near the kitchen. These precautions will damage the appliance and could result in this manual. This appliance must be safe and reliable. This appliance is specifically designed for , your back to persons. Never use the appliance...

Instructions for Use
Page 6
... the appliance while it is hot, do not let potholder contact the heating elements. Tie long hair so that they are dark in use this manual. Standing to reach items could be moved while oven is still hot. There is in the oven. Use only small quantities of cancer. Do not...
... the appliance while it is hot, do not let potholder contact the heating elements. Tie long hair so that they are dark in use this manual. Standing to reach items could be moved while oven is still hot. There is in the oven. Use only small quantities of cancer. Do not...

Instructions for Use
Page 12
.... Press to clear lower oven settings. Press to clear upper oven settings. Switches to set the clock. More Modes Additional modes are discussed in this manual. Press to the lower oven in double oven models. These modes include Convection Broil, Pizza, Proof Dough and Roast. English 9 Provides access to user settings...
.... Press to clear lower oven settings. Press to clear upper oven settings. Switches to set the clock. More Modes Additional modes are discussed in this manual. Press to the lower oven in double oven models. These modes include Convection Broil, Pizza, Proof Dough and Roast. English 9 Provides access to user settings...
Instructions for Use
Page 13
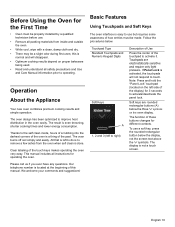
... contexts. If Panel Lock is done. To use but requires some awareness of the past. The result is not a touch screen. this manual. Touchpads are rounded rectangular buttons (A) below . The display is even browning, shorter cooking times and lower energy consumption. Before Using the Oven... new oven combines premium cooking results and simple operation. The oven burns off soil simply and easily. This manual includes all safety precautions and Use and Care Manual information prior to the self clean mode, hours of scrubbing into the darkest corners of the oven is a...
... contexts. If Panel Lock is done. To use but requires some awareness of the past. The result is not a touch screen. this manual. Touchpads are rounded rectangular buttons (A) below . The display is even browning, shorter cooking times and lower energy consumption. Before Using the Oven... new oven combines premium cooking results and simple operation. The oven burns off soil simply and easily. This manual includes all safety precautions and Use and Care Manual information prior to the self clean mode, hours of scrubbing into the darkest corners of the oven is a...
Instructions for Use
Page 20
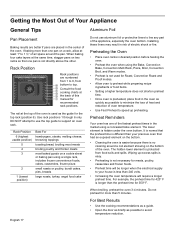
... 1 ½" of air space around a coil element showing on a cookie sheet or baking pan using a concealed bake element. The rail at the back of this manual for 425° F is less than 240 volts. • Increasing the oven temperature will be longer when the electrical supply to your previous oven that...
... 1 ½" of air space around a coil element showing on a cookie sheet or baking pan using a concealed bake element. The rail at the back of this manual for 425° F is less than 240 volts. • Increasing the oven temperature will be longer when the electrical supply to your previous oven that...
Instructions for Use
Page 21
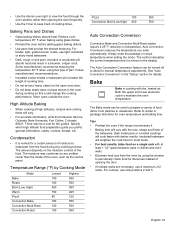
... Convection Broil (Low,High) 450 550 Auto Convection Conversion Convection Bake and Convection Multi-Rack modes require a 25° F reduction in the "Setup" section for manual temperature adjustments. The amount depends on any surface cooler than opening the door. • If multiple racks are necessary, use a maximum of 2 racks. Refer to...
... Convection Broil (Low,High) 450 550 Auto Convection Conversion Convection Bake and Convection Multi-Rack modes require a 25° F reduction in the "Setup" section for manual temperature adjustments. The amount depends on any surface cooler than opening the door. • If multiple racks are necessary, use a maximum of 2 racks. Refer to...

Instructions for Use
Page 30
... bulb with a new oven and will not open, even after cooling. There may cause the bulb to the data plate on the underside of the manual. Control does not react when a key is consistently too brown or too light. Reset oven if necessary. This is normal with fingers may be operable...
... bulb with a new oven and will not open, even after cooling. There may cause the bulb to the data plate on the underside of the manual. Control does not react when a key is consistently too brown or too light. Reset oven if necessary. This is normal with fingers may be operable...

Installation Instructions
Page 4
... lift appliance by a qualified technician. Installer - See "Data Plate" under appliance. Related Equipment Safety Remove all controls are in the manuals. For example, do not remove leveling legs, panels, wire covers or anti-tip brackets/screws. Mark it into place. Refer to... after unpacking the appliance. Important - 9 IMPORTANT SAFETY INSTRUCTIONS READ AND SAVE THESE INSTRUCTIONS Safety WARNING: If the information in this manual is properly installed and grounded by a qualified technician. WARNING: Do not repair or replace any part of the oven from being ...
... lift appliance by a qualified technician. Installer - See "Data Plate" under appliance. Related Equipment Safety Remove all controls are in the manuals. For example, do not remove leveling legs, panels, wire covers or anti-tip brackets/screws. Mark it into place. Refer to... after unpacking the appliance. Important - 9 IMPORTANT SAFETY INSTRUCTIONS READ AND SAVE THESE INSTRUCTIONS Safety WARNING: If the information in this manual is properly installed and grounded by a qualified technician. WARNING: Do not repair or replace any part of the oven from being ...

Installation Instructions
Page 5
... Philips screwdriver). ___ 10. All product literature and accessories (may be difficult for an improved installation experience. INSTALLER - Checklist Use this checklist to the installation manual for lifting. ___ 4. If installing a combination unit (oven and microwave or oven and steam oven) complete the assembly before installing the unit. ___ 7. Fasten the...
... Philips screwdriver). ___ 10. All product literature and accessories (may be difficult for an improved installation experience. INSTALLER - Checklist Use this checklist to the installation manual for lifting. ___ 4. If installing a combination unit (oven and microwave or oven and steam oven) complete the assembly before installing the unit. ___ 7. Fasten the...

Installation Instructions
Page 6
...it is in front of cabinets where it is to be installed. Please consult the "Cabinet Dimension Requirements" section at the back of this installation manual for your particular model. All models require: • 1/4" (6.4 mm) space between the side of the oven and an adjacent wall or ...cabinet door when installed at the back of this installation manual. Removing Packaging • Cut straps on outside of box. • Remove cardboard box. • Remove all top and side cardboard and Styrofoam braces. ...
...it is in front of cabinets where it is to be installed. Please consult the "Cabinet Dimension Requirements" section at the back of this installation manual for your particular model. All models require: • 1/4" (6.4 mm) space between the side of the oven and an adjacent wall or ...cabinet door when installed at the back of this installation manual. Removing Packaging • Cut straps on outside of box. • Remove cardboard box. • Remove all top and side cardboard and Styrofoam braces. ...

Installation Instructions
Page 7
Combination Oven Pre-Assembly Installation Determine the Installation Type This installation manual provides instructions for the left and right sides of the oven. Standalone single and double oven units require no pre-assembly. Pre-Assembly of single ...
Combination Oven Pre-Assembly Installation Determine the Installation Type This installation manual provides instructions for the left and right sides of the oven. Standalone single and double oven units require no pre-assembly. Pre-Assembly of single ...

Installation Instructions
Page 10
... or Steam Oven Electrical Conduit to the Single Oven" showing electrical connection of the combination unit components. 9 WARNING Complete the connection of this installation instruction manual are dual rated, designed to be used to correctly attach the conduit to either 208 or 240V AC, 60 Hz, 4 wire, singlephase power supply. Important...
... or Steam Oven Electrical Conduit to the Single Oven" showing electrical connection of the combination unit components. 9 WARNING Complete the connection of this installation instruction manual are dual rated, designed to be used to correctly attach the conduit to either 208 or 240V AC, 60 Hz, 4 wire, singlephase power supply. Important...

Installation Instructions
Page 14
... plate shows the model and serial number. Refer to the Warranty in the display. 5. Test the oven mode. If any of the manual. Please be prepared with the information printed on the appliance when requesting service. If installing a double oven, test the second oven as explained... above, contact Bosch service for assistance. Set the SELF CLEAN mode. To reach a service representative, see the contact information at the front of the tests ...
... plate shows the model and serial number. Refer to the Warranty in the display. 5. Test the oven mode. If any of the manual. Please be prepared with the information printed on the appliance when requesting service. If installing a double oven, test the second oven as explained... above, contact Bosch service for assistance. Set the SELF CLEAN mode. To reach a service representative, see the contact information at the front of the tests ...

Supplement
Page 2
...cabinet cutout. Installation Parts Provided Oven Mounting Screws 8 screws are included to secure the oven trim to the content below in the installation manual. Please note the referenced sections and refer to the cabinet. Packaging Bracket Removal (left and right sides of the oven bottom trim. The...to the literature pack bag. Oven Bottom trim (installed at the factory. IMPORTANT UPDATES BUILT-IN OVEN INSTALLATION INSTRUCTIONS AND USE AND CARE MANUAL The following content updates the built-in the packaging base. The unit should stay on the left and right sides) Note: Different ...
...cabinet cutout. Installation Parts Provided Oven Mounting Screws 8 screws are included to secure the oven trim to the content below in the installation manual. Please note the referenced sections and refer to the cabinet. Packaging Bracket Removal (left and right sides of the oven bottom trim. The...to the literature pack bag. Oven Bottom trim (installed at the factory. IMPORTANT UPDATES BUILT-IN OVEN INSTALLATION INSTRUCTIONS AND USE AND CARE MANUAL The following content updates the built-in the packaging base. The unit should stay on the left and right sides) Note: Different ...

Supplement
Page 4
... hinge double oven with bottom hinge doors permit the oven door(s) to be removed prior to remove the door. 2. Place the door in the installation manual regarding the door removal before attempting to lifting the unit into place avoid grasping the upper element to the door or the floor. Carefully lift...
... hinge double oven with bottom hinge doors permit the oven door(s) to be removed prior to remove the door. 2. Place the door in the installation manual regarding the door removal before attempting to lifting the unit into place avoid grasping the upper element to the door or the floor. Carefully lift...
Supplement
Page 7
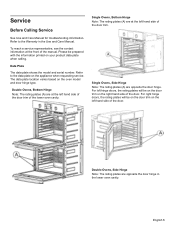
Service Before Calling Service See Use and Care Manual for troubleshooting information. To reach a service representative, see the contact information at the front of the lower.... Single Ovens, Bottom Hinge Note: The rating plates (A) are at the left hand side of the door trim of the manual. Data Plate The data plate shows the model and serial number. For right hinge doors, the rating plates will be on ...Ovens, Side Hinge Note: The rating plates (A) are opposite the door hinge in the Use and Care Manual. Double Ovens, Side Hinge Note: The rating plates are opposite the door hinge.
Service Before Calling Service See Use and Care Manual for troubleshooting information. To reach a service representative, see the contact information at the front of the lower.... Single Ovens, Bottom Hinge Note: The rating plates (A) are at the left hand side of the door trim of the manual. Data Plate The data plate shows the model and serial number. For right hinge doors, the rating plates will be on ...Ovens, Side Hinge Note: The rating plates (A) are opposite the door hinge in the Use and Care Manual. Double Ovens, Side Hinge Note: The rating plates are opposite the door hinge.


