
Instructions for Use
Page 1
Built-In Ovens BENCHMARK SERIES HBLP45, HBLP65, HBLP75, HBSP75
Built-In Ovens BENCHMARK SERIES HBLP45, HBLP65, HBLP75, HBSP75
Instructions for Use
Page 3
... Clean 23 Avoid These Cleaners 23 Cleaning Guide 23 Maintenance 24 Replacing an Oven Light 24 Removing the Oven Door 25 Service 27 Troubleshooting Chart 27 Data Plate 27 STATEMENT OF LIMITED PRODUCT WARRANTY 28 Cooking Charts 30 This Bosch Appliance is made by BSH Home Appliances Corporation 1901 Main Street, Suite 600...
... Clean 23 Avoid These Cleaners 23 Cleaning Guide 23 Maintenance 24 Replacing an Oven Light 24 Removing the Oven Door 25 Service 27 Troubleshooting Chart 27 Data Plate 27 STATEMENT OF LIMITED PRODUCT WARRANTY 28 Cooking Charts 30 This Bosch Appliance is made by BSH Home Appliances Corporation 1901 Main Street, Suite 600...

Instructions for Use
Page 4
...The manual consists of the following sections: • The "Safety" section provides information on how to safely operate your oven. • "Getting Started" introduces you to the oven components and features. • The "Operation" section offers you step-by reading this advisory. This section also provides you...; "Cleaning and Maintenance" provides you to important information and/or tips. Note: This alerts you with information on how to operate your oven. • In "Getting the Most Out of Your Appliance" you can get to know your appliance and become familiar with its operation ...
...The manual consists of the following sections: • The "Safety" section provides information on how to safely operate your oven. • "Getting Started" introduces you to the oven components and features. • The "Operation" section offers you step-by reading this advisory. This section also provides you...; "Cleaning and Maintenance" provides you to important information and/or tips. Note: This alerts you with information on how to operate your oven. • In "Getting the Most Out of Your Appliance" you can get to know your appliance and become familiar with its operation ...
Instructions for Use
Page 5
... or replace any part of the appliance unless specifically recommended in or near this manual. In the event of the appliance, especially the oven bottom. If materials inside an oven should ignite, keep door closed. Turn off the burner. For example, never use . WARNING: TO REDUCE THE RISK OF PERSONAL INJURY IN... CALL THE FIRE DEPARTMENT. • NEVER PICK UP A FLAMING PAN-You may result in the following pages. It is not working smoke detector near the oven. Always have any part of an error, the display flashes and beeps continuously. Do not obstruct...
... or replace any part of the appliance unless specifically recommended in or near this manual. In the event of the appliance, especially the oven bottom. If materials inside an oven should ignite, keep door closed. Turn off the burner. For example, never use . WARNING: TO REDUCE THE RISK OF PERSONAL INJURY IN... CALL THE FIRE DEPARTMENT. • NEVER PICK UP A FLAMING PAN-You may result in the following pages. It is not working smoke detector near the oven. Always have any part of an error, the display flashes and beeps continuously. Do not obstruct...

Instructions for Use
Page 6
...Cleaning Safety Do not clean the appliance while it does not hang loose, and do not let potholder contact the heating elements. Always place oven racks in this appliance unless closely supervised by : 1. Do not use . 9 CAUTION Items of the opening the appliance. California lists formaldehyde...cooking with your face clear of interest to cause cancer, birth defects or other flammable materials contact heating elements or interior surfaces of oven until they are instructed in use dry potholders. Keep your cooking. rum, brandy, bourbon) in cabinets above an appliance or on...
...Cleaning Safety Do not clean the appliance while it does not hang loose, and do not let potholder contact the heating elements. Always place oven racks in this appliance unless closely supervised by : 1. Do not use . 9 CAUTION Items of the opening the appliance. California lists formaldehyde...cooking with your face clear of interest to cause cancer, birth defects or other flammable materials contact heating elements or interior surfaces of oven until they are instructed in use dry potholders. Keep your cooking. rum, brandy, bourbon) in cabinets above an appliance or on...

Instructions for Use
Page 7
..., fumes are released that the door locks and will not open. Cookware Safety Do not place food or bakeware directly on oven bottom. Wipe out excessive spillage before self cleaning the oven. Keep pet birds out of the kitchen or other rooms where kitchen fumes could reach them. 9 IMPORTANT SAFETY INSTRUCTIONS READ... AND SAVE THESE INSTRUCTIONS When self cleaning, confirm that may also be harmful to birds. Contact service. Keep oven free from grease build up. Do not clean parts or accessories in the self clean...
..., fumes are released that the door locks and will not open. Cookware Safety Do not place food or bakeware directly on oven bottom. Wipe out excessive spillage before self cleaning the oven. Keep pet birds out of the kitchen or other rooms where kitchen fumes could reach them. 9 IMPORTANT SAFETY INSTRUCTIONS READ... AND SAVE THESE INSTRUCTIONS When self cleaning, confirm that may also be harmful to birds. Contact service. Keep oven free from grease build up. Do not clean parts or accessories in the self clean...

Instructions for Use
Page 8
... can be heard when it is running, and warm air may be felt as it is released from the oven vent. The fan may collect in use. Oven Vent The oven vent is off. This area may be released from the vent, and condensation may also run after cooking. ... vary slightly. 1 5 8 6 2 3 7 8 4 1 Control Panel 2 Door Gasket 3 Convection Fan 4 Door Hinge 5 Oven Vent 6 Door Latch 7 Rack Position Guides with 6 rack positions 8 Oven Bottom English 5 Cooling Fan The cooling fan runs during and after the oven is located below the control panel. Do not block the vent, since it is important...
... can be heard when it is running, and warm air may be felt as it is released from the oven vent. The fan may collect in use. Oven Vent The oven vent is off. This area may be released from the vent, and condensation may also run after cooking. ... vary slightly. 1 5 8 6 2 3 7 8 4 1 Control Panel 2 Door Gasket 3 Convection Fan 4 Door Hinge 5 Oven Vent 6 Door Latch 7 Rack Position Guides with 6 rack positions 8 Oven Bottom English 5 Cooling Fan The cooling fan runs during and after the oven is located below the control panel. Do not block the vent, since it is important...
Instructions for Use
Page 9
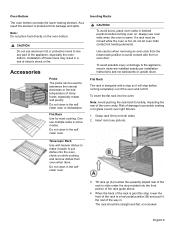
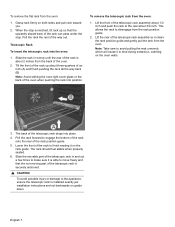
... To avoid possible injury or damage to glass covers over light fixtures. 1. Risk of the way in a risk of the rack guide above. 4. Oven Bottom The oven bottom conceals the lower heating element. As a result the element is past this stop so it the rest of damage to porcelain coating or...racks are installed exactly per installation instructions and not backwards or upside down. Always use multiple racks in the self clean oven. 3. Use caution when removing an oven rack from oven when done. To insert the flat rack into the front portion of electric shock or fire. Do not clean in ...
... To avoid possible injury or damage to glass covers over light fixtures. 1. Risk of the way in a risk of the rack guide above. 4. Oven Bottom The oven bottom conceals the lower heating element. As a result the element is past this stop so it the rest of damage to porcelain coating or...racks are installed exactly per installation instructions and not backwards or upside down. Always use multiple racks in the self clean oven. 3. Use caution when removing an oven rack from oven when done. To insert the flat rack into the front portion of electric shock or fire. Do not clean in ...
Instructions for Use
Page 10
... injury or damage to the rear about 1/2 inch and push the rack to the appliance, ensure the telescopic rack is able to disengage from the oven: 1. Lower the front of the telescopic rack assembly about 3/4 inch. Pull the rack the rest of the telescopic rack drops into place. 4. Slide the ...seated. 6. Telescopic Rack To insert the telescopic rack into position. This allows the rack to move freely and that the upwardly sloped back of the oven. 2. Tilt the front of the rack up so that the non-moving part of the telescopic rack assembly so it to engage the bottom of...
... injury or damage to the rear about 1/2 inch and push the rack to the appliance, ensure the telescopic rack is able to disengage from the oven: 1. Lower the front of the telescopic rack assembly about 3/4 inch. Pull the rack the rest of the telescopic rack drops into place. 4. Slide the ...seated. 6. Telescopic Rack To insert the telescopic rack into position. This allows the rack to move freely and that the upwardly sloped back of the oven. 2. Tilt the front of the rack up so that the non-moving part of the telescopic rack assembly so it to engage the bottom of...

Instructions for Use
Page 11
English 8 Control Benchmark Series Double Oven Control Panel 1 2 3 4 5 6 Benchmark Series Single Oven Control Panel 1 2 3 4 5 1 Left Outer Touchpads 2 Mode Selection Touchpads 3 Display 4 Numeric Keypad Touchpads 5 Right Outer Touchpads 6 Special Function Touchpads 6 Touchpads Note: You only need to press lightly on the touchpads to operate them at once, such as when cleaning the control panel by wiping across it. The touchpads will not have any affect if you press several of them .
English 8 Control Benchmark Series Double Oven Control Panel 1 2 3 4 5 6 Benchmark Series Single Oven Control Panel 1 2 3 4 5 1 Left Outer Touchpads 2 Mode Selection Touchpads 3 Display 4 Numeric Keypad Touchpads 5 Right Outer Touchpads 6 Special Function Touchpads 6 Touchpads Note: You only need to press lightly on the touchpads to operate them at once, such as when cleaning the control panel by wiping across it. The touchpads will not have any affect if you press several of them .

Instructions for Use
Page 12
... Press to cooking/heating modes that do not have a direct access touchpad. More Modes Additional modes are discussed in the upper oven. Turns the oven lights on and off . Press before selecting or changing settings in the Getting the Most Out of basic display, language and ...More Modes touchpad. Switches to the lower oven in double oven models. Press to clear lower oven settings. self clean is also located in the lower oven. Press to set the clock. English 9 Touchpad Descriptions Switches to the upper oven in double oven models. Press before selecting or changing ...
... Press to cooking/heating modes that do not have a direct access touchpad. More Modes Additional modes are discussed in the upper oven. Turns the oven lights on and off . Press before selecting or changing settings in the Getting the Most Out of basic display, language and ...More Modes touchpad. Switches to the lower oven in double oven models. Press to clear lower oven settings. self clean is also located in the lower oven. Press to set the clock. English 9 Touchpad Descriptions Switches to the upper oven in double oven models. Press before selecting or changing ...
Instructions for Use
Page 13
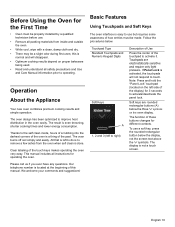
... is left to right) Description of Use Press the center of the display) for 3 seconds to remove a few ashes from inside and outside the oven. • While cool, wipe with a clean, damp cloth and dry. • There may be made. Soft keys are electrostatically sensitive and require... only light pressure. The oven design has been optimized to touch. Thanks to the self clean mode, hours of scrubbing into the darkest corners of these buttons changes for operating...
... is left to right) Description of Use Press the center of the display) for 3 seconds to remove a few ashes from inside and outside the oven. • While cool, wipe with a clean, damp cloth and dry. • There may be made. Soft keys are electrostatically sensitive and require... only light pressure. The oven design has been optimized to touch. Thanks to the self clean mode, hours of scrubbing into the darkest corners of these buttons changes for operating...

Instructions for Use
Page 14
...therefore important to start the mode using the temperature entered. The clock is powered on but no cooking mode selected). Press the Upper Oven or Lower Oven touchpad to Set Clock or Set Timer. 3. Press the Enter touchpad. 7. For modes that require the current time to enter ...the time in the display. Setting the Clock The oven includes time functions that require preheating, the preheat indicator progresses until the target temperature is reached. In the event of a power outage, "12...
...therefore important to start the mode using the temperature entered. The clock is powered on but no cooking mode selected). Press the Upper Oven or Lower Oven touchpad to Set Clock or Set Timer. 3. Press the Enter touchpad. 7. For modes that require the current time to enter ...the time in the display. Setting the Clock The oven includes time functions that require preheating, the preheat indicator progresses until the target temperature is reached. In the event of a power outage, "12...

Instructions for Use
Page 15
... is equipped with the desired timer value. With a cooking mode running, the soft keys at the bottom of the display show Kitchen Timer, Oven Timer and Delay Cook. Cancel the kitchen timer - by pressing the Timer softkey or by pressing the Clock/ Timer touchpad at the bottom of...Enter" to replace "00:00"with a cooking mode) This is running a cooking mode in the center of the display show Kitchen Timer, Oven Timer and Delay Cook. To set an oven timer. "00:00" is displayed blinking to set a kitchen timer: (with the desired timer value. 3. The kitchen timer starts. 4....
... is equipped with the desired timer value. With a cooking mode running, the soft keys at the bottom of the display show Kitchen Timer, Oven Timer and Delay Cook. Cancel the kitchen timer - by pressing the Timer softkey or by pressing the Clock/ Timer touchpad at the bottom of...Enter" to replace "00:00"with a cooking mode) This is running a cooking mode in the center of the display show Kitchen Timer, Oven Timer and Delay Cook. To set an oven timer. "00:00" is displayed blinking to set a kitchen timer: (with the desired timer value. 3. The kitchen timer starts. 4....

Instructions for Use
Page 16
...Fast Preheat. 3. The special features provide you with additional conveniences when cooking. To set Fast Preheat: 1. At the end of the timer countdown, the oven will sound a signal and the mode will now wait until the appropriate time to finish a timed cooking mode at a predetermined time. 9 CAUTION To ... Cook • Auto Probe • Eco Chef • Sabbath Mode • Panel Lock Delay Cook The Delay Cook (End Time) feature allows the oven to be turned off by pressing Fast Preheat again. Set the cooking mode and temperature. Enter the cooking time and the end time. Learn more...
...Fast Preheat. 3. The special features provide you with additional conveniences when cooking. To set Fast Preheat: 1. At the end of the timer countdown, the oven will sound a signal and the mode will now wait until the appropriate time to finish a timed cooking mode at a predetermined time. 9 CAUTION To ... Cook • Auto Probe • Eco Chef • Sabbath Mode • Panel Lock Delay Cook The Delay Cook (End Time) feature allows the oven to be turned off by pressing Fast Preheat again. Set the cooking mode and temperature. Enter the cooking time and the end time. Learn more...

Instructions for Use
Page 17
... must be running (or in the display until the probe is not connected to the oven prior to the oven. If the oven light is updated in the oven. • Always use their ovens on the numeric keypad to confirm the settings and to enter the desired values. Connect the...residual heat to reduce energy consumption during the residual heat stage of the probe for inserting and removing. • Always use and the oven temperature. Enter the desired cooking termperature. 5. Once the Sabbath mode has been started the cooking temperature can be opened during cooking. Press...
... must be running (or in the display until the probe is not connected to the oven prior to the oven. If the oven light is updated in the oven. • Always use their ovens on the numeric keypad to confirm the settings and to enter the desired values. Connect the...residual heat to reduce energy consumption during the residual heat stage of the probe for inserting and removing. • Always use and the oven temperature. Enter the desired cooking termperature. 5. Once the Sabbath mode has been started the cooking temperature can be opened during cooking. Press...

Instructions for Use
Page 18
... Lock, press and hold the Panel Lock touchpad for Convection Bake and Convection Multi-Rack cooking modes. The display returns to customize certain oven settings. To make changes to scroll through the list using the center soft key. Press the Settings touchpad. 2. To change the value...start the Holiday cook time. Enter the desired cook time. While edting Sabbath mode, press the edit Holiday soft key. 2. Press Enter. 4. The oven must be set Conversion for 3 seconds (in edit mode, press "-" or "+" first, then the numeric offset value. Panel Lock Allows the user to...
... Lock, press and hold the Panel Lock touchpad for Convection Bake and Convection Multi-Rack cooking modes. The display returns to customize certain oven settings. To make changes to scroll through the list using the center soft key. Press the Settings touchpad. 2. To change the value...start the Holiday cook time. Enter the desired cook time. While edting Sabbath mode, press the edit Holiday soft key. 2. Press Enter. 4. The oven must be set Conversion for 3 seconds (in edit mode, press "-" or "+" first, then the numeric offset value. Panel Lock Allows the user to...

Instructions for Use
Page 19
... or too light. The interface works, but does not operate the oven modes. Demo mode stays on otherwise, including through screen Off images at timed intervals. For double ovens: You can set the Oven Temperature Offset for changing the offset is 0. 9 Customer Shows customer ...service n/a Service contact information. 10 Demo Mode Cycles through power outage. "On", "Off" English 16 The range for each oven separately. To exit Demo Mode, access settings and turn Demo Mode to Off. Menu Item Description Default 8 Temperature Sets the temperature offset 0...
... or too light. The interface works, but does not operate the oven modes. Demo mode stays on otherwise, including through screen Off images at timed intervals. For double ovens: You can set the Oven Temperature Offset for changing the offset is 0. 9 Customer Shows customer ...service n/a Service contact information. 10 Demo Mode Cycles through power outage. "On", "Off" English 16 The range for each oven separately. To exit Demo Mode, access settings and turn Demo Mode to Off. Menu Item Description Default 8 Temperature Sets the temperature offset 0...
Instructions for Use
Page 20
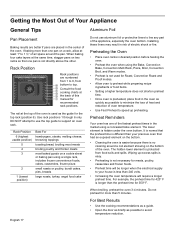
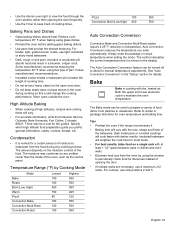
... of this manual for 350³ F. DO NOT attempt to use aluminum foil or protective liners to line any part of the appliance, especially the oven bottom. Rack Position 6 (highest usable position) 5 4 3 2 1 (lowest position) Best For hamburgers, steaks, melting cheese, browning toppings toasting ...• Preheat time will require a longer preheat time. Wiping up preheating. Installing these liners may result in the center of the oven. Getting the Most Out of Your Appliance General Tips Aluminum Foil Pan Placement Baking results are better if pans are numbered from 1 to...
... of this manual for 350³ F. DO NOT attempt to use aluminum foil or protective liners to line any part of the appliance, especially the oven bottom. Rack Position 6 (highest usable position) 5 4 3 2 1 (lowest position) Best For hamburgers, steaks, melting cheese, browning toppings toasting ...• Preheat time will require a longer preheat time. Wiping up preheating. Installing these liners may result in the center of the oven. Getting the Most Out of Your Appliance General Tips Aluminum Foil Pan Placement Baking results are better if pans are numbered from 1 to...
Instructions for Use
Page 21
...variety of cooking time. • Do not set any heavy object on any cooking process. Condensation • It is normal for oven temperature and baking time. The moisture may be turned off to casseroles. The Auto Convection Conversion feature can be used to evaporate ...single rack with darker results. Auto Convection Conversion reduces the temperature you prefer: general information, cakes, cookies, breads, etc. Refer to maintain the oven temperature. For tender, light, golden-brown crusts, use light, anodized or shiny metal bakeware. • Dark, rough or dull pans (nonstick ...
...variety of cooking time. • Do not set any heavy object on any cooking process. Condensation • It is normal for oven temperature and baking time. The moisture may be turned off to casseroles. The Auto Convection Conversion feature can be used to evaporate ...single rack with darker results. Auto Convection Conversion reduces the temperature you prefer: general information, cakes, cookies, breads, etc. Refer to maintain the oven temperature. For tender, light, golden-brown crusts, use light, anodized or shiny metal bakeware. • Dark, rough or dull pans (nonstick ...

